EN
6
Vibration hazards
Exposuretovibrationcancausedisablingdamagetothenervesandbloodsupplyofthehands
andarms.Notallvibrationhazardscanbeeliminatedbytooldesignorconstruction,andsome
residualrisksremain.Checkthevibration-emissionvalue(obtainedusingISO28927-3)shownin
thespecicationtable.Ensuretheriskitrepresentsisassessedandmanaged.Iftheriskcannotbe
managedsothatitfallswithinacceptablelimits,thendonotusethetool.
Takethefollowingstepstoreduceriskofvibration-relatedinjury:
a) Wearwarmclothingwhenworkingincoldconditions.Keephandswarmanddry.
b) Ifnumbness,tingling,painorwhiteningoftheskinofngersorhandsisexperienced,stop
usingthetool,informemployer(whereappropriate)andconsultaqualiedhealthprofessional.
c) Operateandmaintainthetoolasrecommendedintheinstructionstopreventanunnecessary
increaseinvibrationlevels.
d) Whereappropriate,supporttheweightofthetoolinastand,tensionerorbalancer.
e) Theriskfromvibrationisgenerallygreaterwhenthegripforceishigher.Holdthetoolwitha
lightbutsafegrip,takingaccountoftherequiredhandreactionforces.
f) Ensurethetoolandaccessoriesareproperlymountedandingoodrepair:improperlymounted
ordamagedtoolscancauseexcessivevibration.
WARNING:Beawareofpaintnishesortreatmentsthatmayhavebeenappliedtothematerial
thatisbeingworkedon.Manytreatmentscancreatedustthatistoxic,orotherwiseharmful.If
workingonabuildingconstructedpriorto1960,thereisanincreasedchanceofencountering
lead-basedpaints.
WARNING:Thedustproducedwhengrindingobjectspaintedwithlead-basedpaintsis
particularlyhazardoustochildren,pregnantwomen,andpeoplewithhighbloodpressure.Donot
allowthesepeopleneartheworkarea,evenifwearingappropriatepersonalprotectiveequipment.
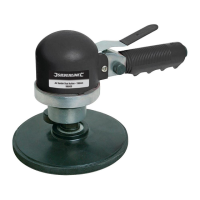
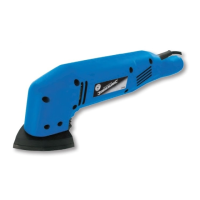
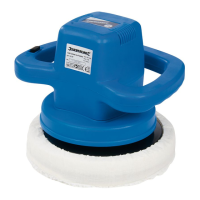
1 Body Cover
2 Power Regulator
3 Speed Control
4 Handle
5 Quick Connector
6 Backing Pad
7 Spindle Lock
8 Drive Spindle
Product Familiarisation
Intended Use
ThisproductisaDualActionAirSanderpoweredbycompressedairfromacompressor,forlight
removalofmaterialssuchaswood,paintandbodyller.
Notintendedforcommercialuse.
ThetoolmustONLYbeusedforitsintendedpurpose.Anyuseotherthanthosementionedinthis
manualwillbeconsideredacaseofmisuse.Theoperator,andnotthemanufacturer,shallbeliable
foranydamageorinjuryresultingfromsuchcasesofmisuse.Themanufacturershallnotbeliable
foranymodicationsmadetothetool,norforanydamageresultingfromsuchmodications.
Unpacking Your Tool
WARNING:Thistoolisnotsuitableforgrindingorcutting.Misuseofthisproductisdangerous
andcouldresultinseriousinjury.
• Carefullyunpackandinspectyourtool.Fullyfamiliariseyourselfwithallitsfeaturesand
functions.
• Ensurethatallpartsofthetoolarepresentandingoodcondition.Ifanypartsaremissingor
damaged,havesuchpartsreplacedbeforeattemptingtousethistool.
Before Use
Fitting the quick connector
ThistoolissuppliedwithtwodifferentmaleairlineQuickConnectors(5)(Fig.I):
• EQ-4–commonlyusedinEurope
• EN-6–mainlyusedintheUK
Pleasechoosetheconnectorthatiscompatiblewiththeairlinesystemyouareusing,andinstallas
outlinedbelow:
1. ApplysomePTFEtape(notincluded)tothescrewthreadsoftheQuickConnector.Thiswillhelpto
maintain an airtight seal
Note: ApplyPTFEtapetightlyandinaclockwisedirection,soitdoesnotcomeoffwhenthethreadis
screwedintothetool.
2. Removetheprotectiveplugfromtheairinlet
3. Usingaspanner(notincluded)screwtheQuickConnectorintotheairinletlocatedatthebaseofthe
Handle(4)
4. Connecttoairline,pressurisecarefullyandcarryoutaleakcheck(e.g.bysprayingsmallamountsof
soapywaterontotheoutsideoftheconnectors)
• AirlinesttedwithmatchingfemaleQuickConnectorswillnowbeapushttothetool
Air supply connection
• Thistoolshouldbeconnectedtoaclean,dryairsupplywithinlineoilerandwaterseparator
• Donotallowsupplypressuretoexceedthemaximumstated(see'Specication')
• Ensurethatwaterisdrainedfromairsystemdaily
• Ensurethatallpartsofthesystem(hoses,couplers,etc.)arecorrectlyratedfortheairpressureto
be used
Attaching the backing pad
1. ScrewtheBackingPad(6)intotheDriveSpindle(8)turningclockwise.Tightenbyhand
2. Useasuitablespanner(notincluded)tostoptheDriveSpindlerotatingifneeded
3. AdoptthisproceduretoremovetheBackingPad,butturnanti-clockwisetounscrew
Attaching the sanding disc
Note: Onlyuseabrasivesandingdiscsof150mmdiameter,withadhesivebacking.
1. RemoveoldsandingsheetsbypeelingthemofftheBackingPad(6)
2. CleananyadhesiveresidueofftheBackingPad
3. Peeloffthebackingpaperfromtheadhesivesideofthenewsandingsheet
4. CentrethenewsandingsheetcorrectlyontheBackingPad
5. PushthesandingsheetontotheBackingPadandcheckitissecurelyattached
Setting tool power
1. Holdtheproductrmly,withouttheBackingPad(6)attached
2. SqueezetheSpeedControl(3)fully
3. WhilstholdingtheSpeedControl,turnthePowerRegulator(2)slowly
Note: Asitturnsyouwillhearthepowerincreaseanddecrease.
4. Setspeedasrequired
5. ReleasetheSpeedControl
Changing orbital mode
WARNING:Disconnecttoolfromairsupplybeforemakinganyadjustments.
Thisproducthastwomodes:
Fixed orbit:
ThesandingpadwillrotateONLYarounditscentralaxis,likeawheel.Itcreatesacircularpatternonthe
sandedmaterial.
1. Inxedorbit,theDriveSpindle(8)andBackingPad(6)donotrotatefreelyaroundtheiraxis
2. Toselectxedorbit,rotatetheSpindleLock(7)sothattheknurledfacelinesupwiththeatonthe
DriveSpindle(Fig.II)
3. CheckthattheDriveSpindle(8)cannotrotatefully,itshouldstopwhenittouchestheSpindleLock
Random orbit:
Thesandingpadorbitsarounditseccentricpath.Itcreatesarandomsandingpatterninalldirectionson
thesandedmaterial.
1. Inrandomorbit,theDriveSpindle(8)andBackingPad(6)canrotatefreelyandfullyaroundtheiraxis
2. Toselectrandomorbit,rotatetheSpindleLock(7)sothatoneatsidefacestheDriveSpindle(Fig.III)
3. ChecktheDriveSpindleisabletorotatefullythrough360°,anddoesnottouchtheSpindleLock
580430_OwnerManual.indd 6580430_OwnerManual.indd 6 12/04/2023 11:0312/04/2023 11:03