NOTE:
For Steps 30 through 33, see Figure 12.
30.
Remove the two-wire test cable from P6 (X) and then replace the receivers cover using four screws (F) (See Fig-
ure 3 if neccesary).
31.
Make sure thatthe receiver’s green LED (U) is still flashing.
32.
Reconnect the two-wire test cable to P6 (X).
33.
Press the setup button (Z).
.
Pressing the setup button starts an automatic setup process that results in a reference voltage for measuring
beam blockages. Additionally, the red and yellow LEDs turn OFF while the green LED turns ON. After some
voltage fluctuations, the meter should settle at 5VDC.
NOTE:
While performing Step 33, be careful not to block the beam or move the units.
.
When the setup period is over, the receiver’s green LED flashes and the voltage drops to between 3.8 and 4.2
VDC. This voltage reading is a reference voltage that later readings can be compared to for determining clean-
ing needs (see MAINTENANCE section).
l
If the voltage is not between 3.8 and 4.2VDC, push the setup button (Z) again.
.-
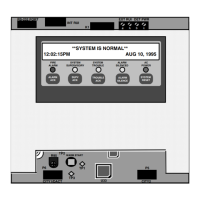
Location of Receiver’s Setup Button
FIGURE 12
34. After setup is complete, remove the test cable from P6 (and reconnect the 2098-9816 Remote Indicator Plate if
used).
35.
Replace the receiver’s access door using one screw (D). See Figure 3 if necessary.
13
Technical Manuals Online! - http://www.tech-man.com