| 7
Hardware installation | NSS evo2 Installation Manual
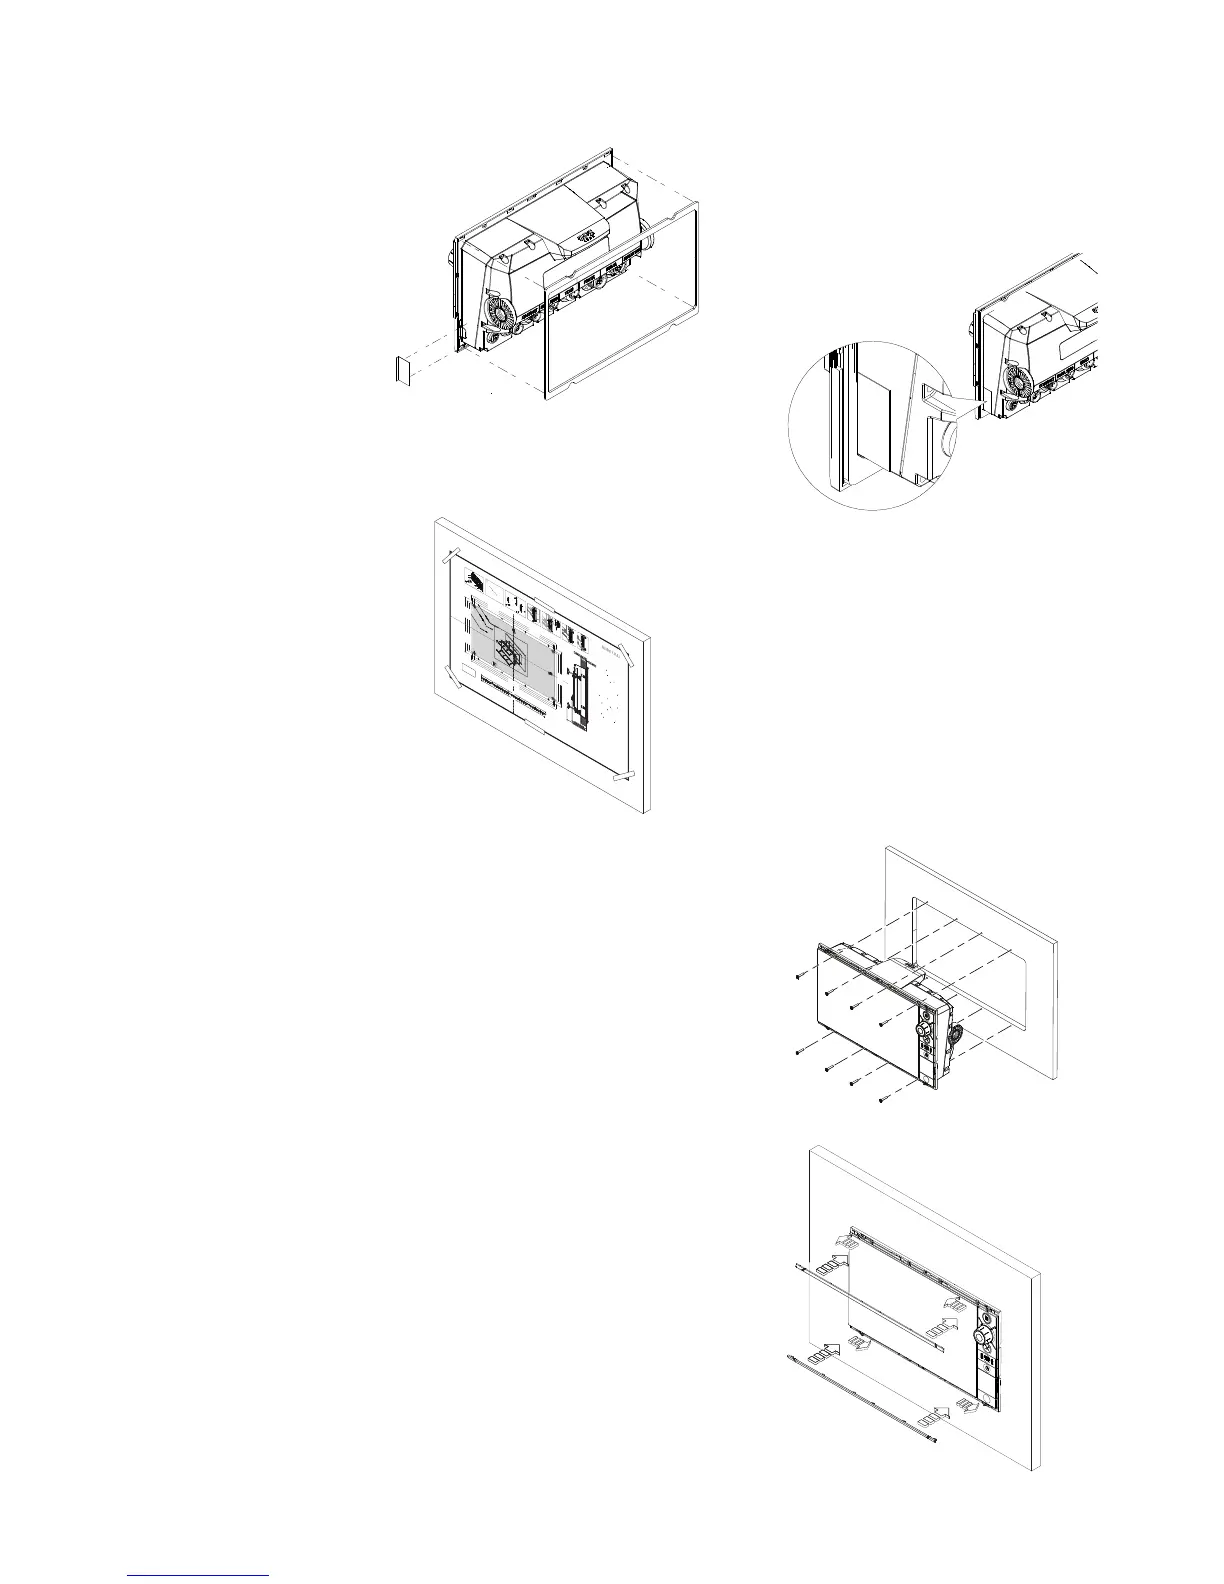
Flush mounting
Fit the small self adhesive decal to right side
of unit, covering rubber tab of SD card reader
gasket. Then attach self adhesive foam gasket to
rear of display.
Check the template for scaling accuracy, using a tape
measure or ruler against the ruler printed on the
template.
Cut away excess paper if required, and tape template
to mounting surface. Check it is correctly aligned to a
vertical or horizontal reference. Do not use a bubble
level as vessel may be listing! Adjust where required.
Drill all marked pilot holes, then using an appropriate
saw, cut through the template and mounting surface,
along the dotted line bordering the shaded area of the
template. Stay within 1mm of the dotted line.
Check the fit of the display, and file away remaining
obstructions. Secure the display with the supplied
screws. Once screws are fully tightened, ensure there
is complete contact with the mounting surface. If
machine screws are required, use only M2.5 (3/32”)
size with a head diameter no greater than 5.6mm
(7/32”).
¼ Note: please ensure mounting surface is completely
flat. Make adjustments to mounting surface if fasten-
ing in place puts product under tension.
Bezel Fitment and Removal
When fitting bezels, ensure hook tabs on
back of each bezel recess in to opposing
slots on screen frame. Once flush with front
surface of screen, slide top bezel to the left,
and bottom bezel to the right to lock in to
place. The bezel trim have been designed
to be very low profile, and therefore fully
conceal the locking tabs that keep them
from being accidentally disengaged from
the mounting flange. To release the locking
tab, it is necessary to gently lever the centre
of the bezel trim away from the mounting
flange. To remove the cover, simultaneously
slide it sideways; to the right for the top
bezel, and to the left for the bottom bezel.
REMOVE SHADED AREA
*988-10455-001*
NO
TE:
DO NO
T SCALE
PRINT 1:1
IMPOR
T
A
NT
. Do not use this t
e
mpla
t
e if it has been r
esc
al
ed
by
c
opy
ing o
r
prin
ng. If this i
s
n
ot the origi
n
al, or is a prin
t
fr
om a
le, plea
s
e chec
k the dimension lines below ar
e t
o
sc
ale be
f
or
e
use.
IMPOR
T
ANT
. Ne pas u
liser
ce
g
ab
ar
it s’il a
ét
é phot
oc
opié ou
imprimé en f
orma
t r
éduit
ou
agr
a
n
di.
S
i
ce
g
abarit n
’
es
t ni un
original ni une v
er
sion imprimée
d
’
un
chier PDF
, v
e
ui
ll
e
z
v
éri
er qu’i
l es
t à l’
échelle
a
v
an
t de l’
u
li
ser
.
IMPOR
T
A
NTE. no usar la plan
ll
a
s
i ha
y pe
ligr
o que la esc
al
a
original e
x
act
a se ha al
t
er
ad
o po
r
c
opias o pr
oc
esos de
impr
e
sión imp
r
eci
so
s. S
i es
t
o
no e
s
e
l origi
nal, o
un PDF
,
v
e
ri
c
ar que las líneas abaj
o es
t
án
a
la es
c
ala an
t
es de usar
.
WICHTI
G.
Diesen
V
or
druck nich
t v
erw
enden, w
enn er dur
c
h
K
o
p
i
e
r
e
n oder Druck
en im Maßs
t
ab v
er
ändert wu
r
de
. S
ollt
e
es
nich
t das Ori
g
in
al
od
er ein
P
DF
-A
usdruck
sein, müssen
un
t
ens
t
ehende Z
eilen v
or erw
endun
g an de
n
rich
g
en
Maß
s
t
ab an
g
ep
a
ss
t w
er
den.
BELANGRIJK.
Ge
bruik
de
z
e mal niet indien de schaal is
v
er
an-
der
d d
oo
r
da
t het i
s
g
ec
opiee
r
d o
f g
e
drukt. Indien d
e
z
e mal
niet het origineel of een pr
i
n
t v
an
P
DF is, c
on
tr
oleer dan of d
e
onder
s
t
aa
n
de
lijnen de jui
s
t
e schaal zijn
v
oo
r
da
t u
z
e
g
ebrui-
kt.
IMPOR
T
ANTE. N
ão u
liz
e e
s
t
e g
abarit
o se a esc
ala do m
esm
o
v
er
sid
o al
t
er
ada por c
ópi
a
ou impr
essão. Se não f
or o
original ou u
m
a
c
ópia impr
e
ssa de um ar
quiv
o PDF
, v
eri
q
ue
as linhas abaix
o
,
p
ar
a acer
t
ar
a esc
ala an
t
e
s da u
liz
aç
ão
.
VIKTIGT
. An
v
än
d in
t
e denna mall om
den
s
k
al
a
ts om
g
enom
utskri
eller k
opiering. Om de
a in
t
e är origi
nal
et eller en
utskri
f
r
ån en PD
F
, k
on
tr
olle
r
a a
linjerna nedan s
t
ämmer
med sk
alan innan d
et an
v
än
ds.
IM
P
OR
T
A
NT
E. N
on u
lizz
ar
e
qu
e
s
t
o modello se è s
t
at
o
rid
i
mensiona
t
o
c
opian
do
lo o
s
t
ampand
olo.
S
e q
ues
t
o non è
l’
originale o la
s
t
amp
a d
i
u
n
le PDF
, v
eri
c
ar
e se le linee che
segu
o
no dev
ono esser
e dim
e
nsion
a
t
e prima
d
i esser
e u
l
izz
a-
t
e
.
T
ÄRK
E
ÄÄ
. Älä k
ä
y
t
ä t
ä
t
ä k
aa
vio
t
a, j
os sen mi
ak
aa
v
a on
muu
unut k
opio-ide
s
s
a t
ai tulos
t
ae
ssa. Jos t
äm
ä ei ole alk
u-
per
äinen t
ai PDF tulos
t
e t
arkis
t
a r
aja
t mi
ak
aa
v
as
t
a all
a
en
nen k
ä
y
öä.
注
意:请尽量不要使用本安装挖孔尺寸
模版图的
复印件。
如果使用复印件,则在使用之前请确认其比例一定要与原
件
大
小必
须一致。
중
요: 복사나 출력으로 크기가 조정 된 경우 이 템플릿을
사용하지 마십시
오
. 원본이 아니거나 인쇄물이면,
사
용하
기
전 아래 치수선의 눈
금을
확인 해
주십
시
오.
注:このテンプレ
ー
トは印刷やコピ
ー
によって縮尺が
変
わっ
てい
る
こ
とが
ありますので使用しない
で下さい
。テ
ンプ
レ
ー
トがオリジナルのものでない場合には、下の寸
法
線を使って縮尺を
確
認してく
だ
さい。
ВНИМАНИЕ: Не используйте эту инструкцию, ес
ли она была изменена в размерах при копирова
н
ии или
р
ас
печатке. Если
вы
используе
те
не ор
игинал, а
расп
ечатк
у из ф
а
йла, убедитесь в соо
тв
етствии размеров лине
йки в
нижн
ей
части
и
нструкции с действительными
раз
мерами.
Check dimensions before cutting
1
2"
300 mm
L
C
L
C
192.5 mm (7.5
8")
186.0 mm (
7
.32
")
1
9
2
.
5 m
m (
7
.
58")
1
86.0 mm (
7
.
3
2
")
200.0 mm (7.8
7")
117.5 mm (4.63")
111.0 mm (4.37")
130.0 mm (5.12")130.0 mm (5.12")
117.5 mm (4.63")
111.0 mm (4.37")
2
0
0
.
0 m
m
(7.
8
7")
385.0 mm (15.16
")
3
72.0 mm (1
4.65")
400.0 mm (15.75")
235.0 mm (9.25")
222.0 mm (8.74")
260.0 mm (10.24")
MO16
Marine Monitor