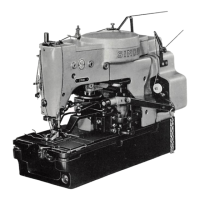
SEWING
HOOK
(continued)
To time the
hook,
loosen the two sprocket
set
screws, shown in Fig. 82, in the
lower
sprocket for the driving shaft belt. Hold hook so
that
its
point will be in dead center of needle
and
turn
arm
shaft until needle eye is 1/16
inch
below
hook
point
(needle bar rising
on
left
hand
throw).
Tighten
sprocket
set screws
lightly.
Tap
hook
shaft lightly to achieve .002 inch to
.003
inch
end
play
and
securelytighten sprocket
set screws. Recheck and, if necessary, re-time.
TENSION RELEASER (TOP OF
ARM)
(ON
ALL
MACHINES,
EXCEPT
271K2)
With
machine
in
"run"
position
and
barring
point
on
barring plate as
shown
in Fig. 84, ad
just
lower collar on tension releaser rod to re
lieve
tension
on
thread
between
discs.
With
machine
in
"stop"
position, adjust
upper collar shown in Fig. 84, on tension re-
leaser
rod to
relieve
tension
on
thread
between
discs.
BARRING
TENSION
PLATE
ACTUATOR
(ON
MACHINE
271K2)
With
machine
in
"stop" position, adjust
upper
collar
oti
actuating
rod,
shown
in
Fig.
85,
to relieve tension between plates.
With
machine
in
"run"
position
and
barring
point
on
barring
plate, adjust
lower
collar on
actuatingrod,
shown
in
Fig.
85,
to
apply
tension
on thread
between
plates.
AUTOMATIC
KNIFE BAR
DISENGAGING
LEVER
Counterbalance
on
automatic
knife bar
dis
engaging lever, should be
set
so that lever
rests
lightly,
on
pin
shown
in
Fig.
86.
To adjust, loosen set screw,
shown
in Fig.
86, and move
counterbalance
forward or back
ward as required. Securely tighten
set
screw.
32
TENSION
RELEASER
ROD
UPPER
V
COLLAR
LOWER
COLLAR
BARRING
POINT
TENSION
DISCS
LOOSEN
SET
SCREWS
TO
MOVE
COLLARS
THEN
TIGHTEN
SECURELY
BARRING
PLATE
Fig. 84. Tension Releaser Adjustment
LOOSEN
SET
SCREWS
.fe
TO
MOVE
COLLARS
THEN
TIGHTEN
^ ^
SECURELVii
ACTUATING
ROD
KNIFE
BAR
DISENGAGING
LEVER^^
Fig.
85.
Actuator
barring
TENSION
PIRATES
"
^UPPER
h-COLLAR
LOWER
COLLAR
AUTOMATIC
KNIFE
DISENGAGING
LEVER
^ I
SCREW
COUNTERBALANCE
Fig.
86.
Disengaging
Lever