27
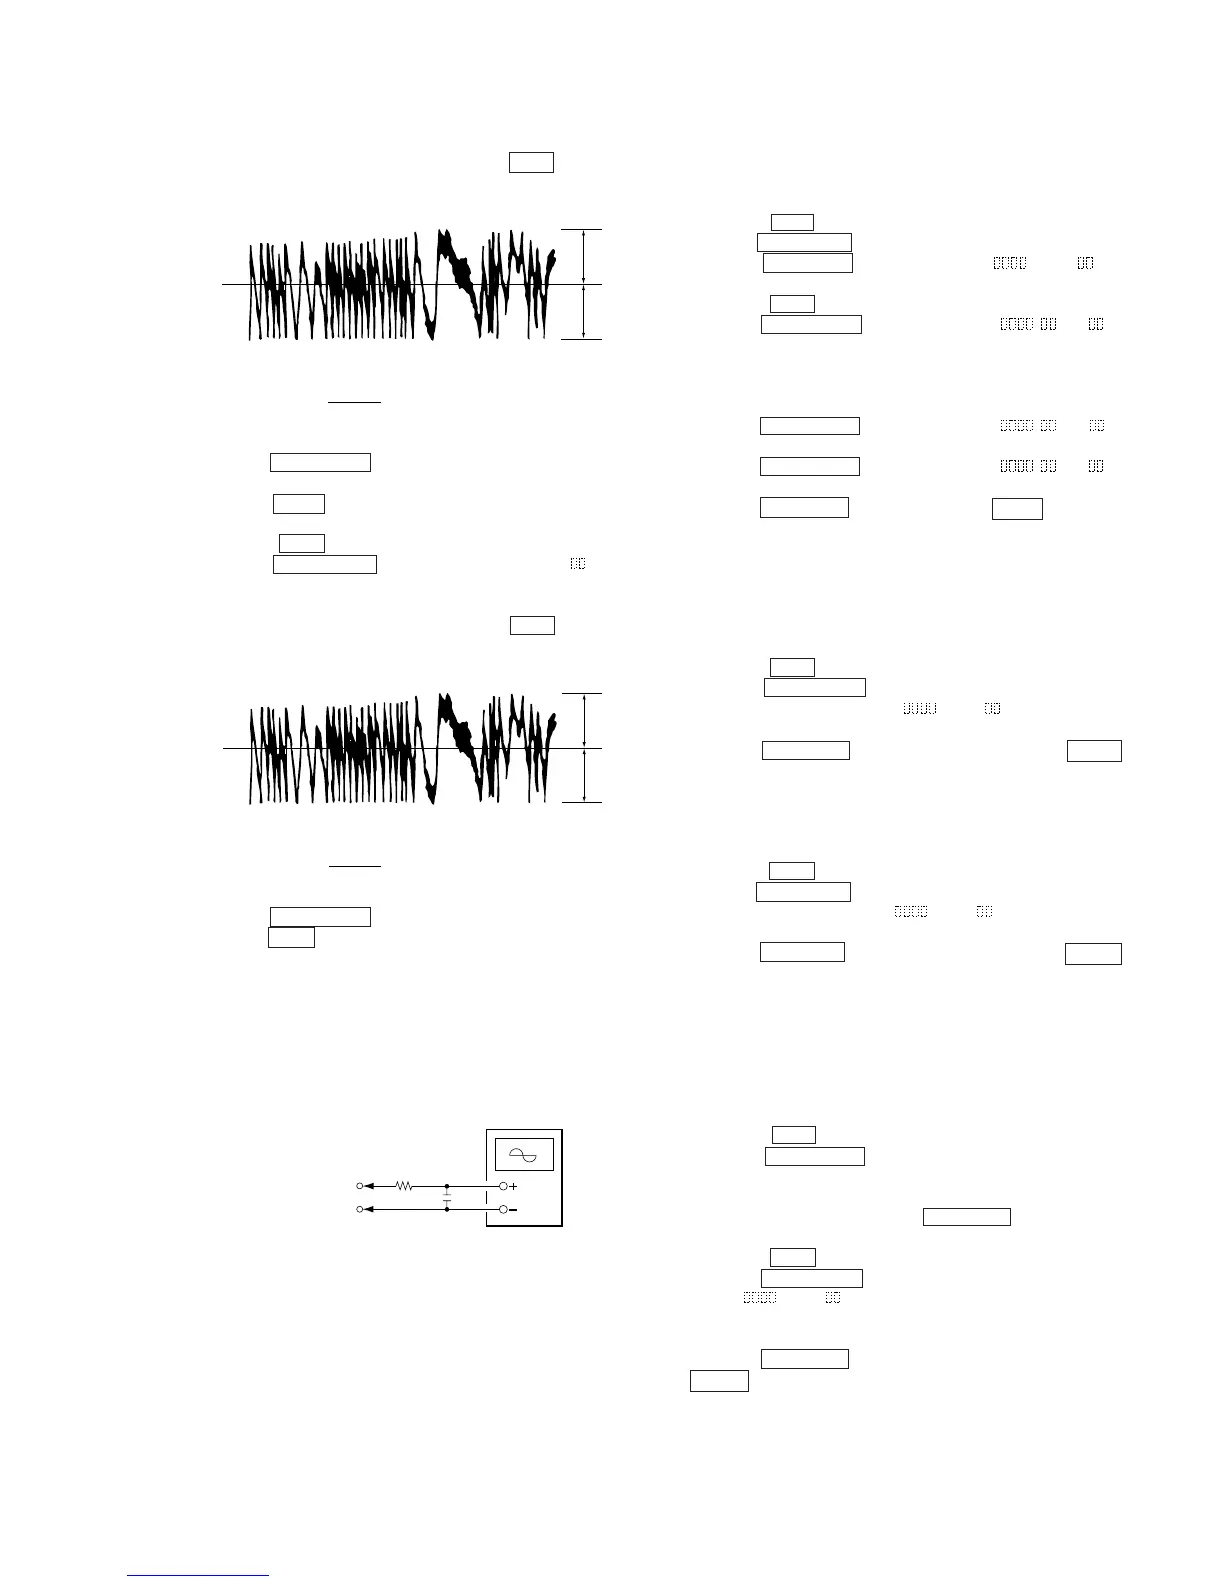
10. Observe the waveform of the oscilloscope, and check that the
specified value is satisfied. Do not rotate the AMS dial.
(Traverse Waveform)
11. Press the ENTER/YES button display “EF MO CHECK”
The disc stops rotating automatically.
12. Press the MD Z button and remove the disc.
13. Load the check disc (MD) TDYS-1.
14. Roteto the AMS dial and display “EF CD CHECK”.
15. Press the ENTER/YES button and display “EFB = CD”.
Servo is imposed automatically.
16. Observe the waveform of the oscilloscope, and check that the
specified value is satisfied. Do not rotate the AMS dial.
(Traverse Waveform)
17. Press the ENTER/YES button and display “EF CD CHECK”.
18. Press the MD Z button and remove the check disc (MD) TDYS-1.
Note 1 : MO reading data will be erased during if a recorded disc is
used in this adjustment.
Note 2 : If the traverse waveform is not clear, connect the
oscilloscope as shown in the following figure so that it can
be seen more clearly.
6-6-4. Focus Bias Check
Change the focus bias and check the focus tolerance amount.
Checking Procedure :
1. Load a test disk (MDW-74/AU-1).
2. Rotate the AMS dial and display “CPLAY MODE”.
3. Press the ENTER/YES button twice and display “CPLAY MID”.
4. Press the MENU/NO button when “C1 = AD = ” is
displayed.
5. Rotate the AMS dial and display “FBIAS CHECK”.
6. Press the ENTER/YES button and display “ / c = ”.
The first four digits indicate the C1 error rate, the two digits
after “/” indicate ADER, and the 2 digits after “c =” indicate the
focus bias value.
Check that the C1 error is below 220 and ADER is below 2.
7. Press the ENTER/YES button and display “ / b = ”.
Check that the C1 error is below 220 and ADER is below 2.
8. Press the ENTER/YES button and display “ / a = ”.
Check that the C1 error is below 220 and ADER is below 2.
9. Press the MENU/NO button, next press the MD Z button, and
remove the test disc.
6-6-5. C PLAY Checking
MO Error Rate Check
Checking Procedure :
1. Load a test disk (MDW-74/AU-1).
2. Rotate the AMS dial and display “CPLAY MODE”.
3. Press the ENTER/YES button and display “CPLAY MID”.
4. The display changes to “C1 =
AD = ”.
5. If the C1 error rate is below 80, check that ADER is below 2.
6. Press the MENU/NO button, stop playback, press the MD Z
button, and test disc.
CD Error Rate Check
Checking Procedure :
1. Load a check disc (MD) TDYS-1.
2. Rotate the AMS dial and display “CPLAY MODE”.
3. Press the ENTER/YES button twice and display “CPLAY MID”.
4. The display changes to “C = AD = ”.
5. Check that the C1 error rate is below 50.
6. Press the MENU/NO button, stop playback, press the MD Z
button, and the test disc.
6-6-6. Self-Recording/playback Check
Prepare a continuous recording disc using the unit to be repaired
and check the error rate.
Checking Procedure :
1. Insert a recordable disc (blank disc) into the unit.
2. Rotate the AMS dial to display “CREC MODE”.
3. Press the ENTER/YES button to display the “CREC MID”.
4. When recording starts, “REC” is displayed, this becomes “CREC
(@@@@)" (@@@@) is the address), and recording starts.
5. About 1 minute later, press the MENU/NO button to stop
continuous recording.
6. Rotate the AMS dial to display “C PLAY MODE”.
7. Press the ENTER/YES button to display “C PLAY MID”.
8. “C1 = AD = ” will be displayed.
9. Check that the C1 error becomes below 80 and the AD error
below 2.
10. Press the MENU/NO button to stop playback, and press the
MD Z button and remove the disc.
VC
A
B
Specified value : Below 10% offset value
Offset value (%) = X 100
IA – BI
2 (A + B)
VC
A
B
Specified value : Below 10% offset value
Offset value (%) = X 100
IA – BI
2 (A + B)
330 kΩ
Oscilloscop
 Loading...