J
John AllenAug 20, 2025
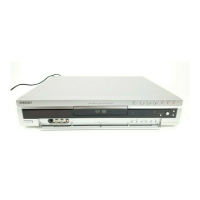
How to fix blurry picture on Sony DVD Recorder?
- MMargaret ParkerAug 20, 2025
If the picture is not clear, the video heads may be dirty. Clean them using a Sony video head cleaning cassette.
How to fix blurry picture on Sony DVD Recorder?
If the picture is not clear, the video heads may be dirty. Clean them using a Sony video head cleaning cassette.
Why does my Sony DVD Recorder tape starts playing as soon as it is inserted?
When the tape starts playing as soon as it is inserted, it is because the safety tab has been removed. To record on this tape, cover the tab hole.
Why does timer not operate on Sony RMT-V501E?
If the timer does not operate, check that the clock is set.
Why does disc not start playing from beginning on Sony RMT-V501E DVD Recorder?
If the disc does not start playing from the beginning, program play, shuffle play, or repeat play, has been selected.
Why is my Sony DVD Recorder remote not working?
If the remote commander isn't working, ensure you're pointing it at the remote sensor on the DVD-VCR. If that doesn't work, replace all the batteries with new ones if they are weak. Also, verify that the TV / DVD·VIDEO switch is set correctly, and select the correct mode (VIDEO or DVD) using the SELECT DVD/ VIDEO button.
Why is there no sound on my Sony DVD Recorder?
If there is no sound, try re-connecting the connecting cord securely. Also, make sure the amplifier (receiver) input is correctly set, and the player isn't in pause mode, Slow-motion Play mode, fast forward, or fast reverse mode. If the audio signal does not come through the DIGITAL AUDIO OUT (COAXIAL) jack, check the audio settings.
What to do if my Sony DVD Recorder disc does not play?
If the disc doesn't play, make sure it's inserted with the playback side facing down on the disc tray and that the TV / DVD·VIDEO switch is set correctly. Note that the player cannot play certain discs.
What to do if nothing happens when press z REC on Sony RMT-V501E DVD Recorder?
If nothing happens when you press z REC, make sure the tape is not at its end.
How to fix poor TV reception on Sony RMT-V501E DVD Recorder?
To improve poor TV reception, adjust the TV antenna.
How to control other TVs with my Sony RMT-V501E DVD Recorder?
If you cannot control other TVs, set your TV’s code number.
Details the technical system specifications of the DVD-VCR.
Lists all input and output connection types and their specifications.
Covers general operational parameters like power requirements and dimensions.
Essential safety guidelines for servicing and operation to prevent hazards.
Procedure to test for AC leakage current from exposed metal parts.
General precautions to follow during the servicing process.
Guidelines for handling electrostatically sensitive devices to prevent damage.
Specific procedures for safely handling the optical pick-up unit.
Explains how to use the manual and its icons.
Details the initial setup process, including unpacking the unit.
Guides users to choose the optimal connection method based on their TV setup.
Instructions for programming the remote to control non-Sony TVs.
Explains how to connect using audio/video jacks for better sound and picture quality.
Guides antenna connection and initial setup for automatic channel tuning.
Details connection for users without a cable box or with few scrambled channels.
How to change the on-screen display language for menus and options.
Instructions for setting the unit's clock, either automatically or manually.
Explains how the DVD-VCR automatically sets the clock via time signals.
Guides on how to automatically or manually preset receivable TV channels.
How to add or remove specific channels from the channel list.
Describes the functionality and purpose of the VCR Plus+ system.
Details the process of coordinating TV channels with program guide channels.
Instructions on how to play various types of discs, including DVD, CD, and VCD.
Covers extra operations related to tape playback, such as search and slow-motion.
Explains the information shown on the display during playback and how to navigate it.
How to lock the disc tray to prevent accidental opening or changes.
Step-by-step guide for inserting and playing VHS tapes.
Instructions for recording TV programs, including timer and direct recording.
Detailed steps for setting up timer recordings for TV programs.
How to use the Dial Timer function for unattended timer recordings.
Instructions for using the VCR Plus+ system with program guide codes.
How to review, modify, or delete programmed timer settings.
Steps to activate the child lock feature to prevent unauthorized operation.
Detailed connection diagrams for A/V receivers with Dolby or DTS decoders.
Instructions for connecting using S-Video or Component Video for enhanced image quality.
Configuring audio output settings for DVDs, CDs, and VCDs.
Adjusting screen parameters like TV type and black level for optimal picture display.
Enabling progressive scan output for compatible TVs to improve picture quality.
How to select languages for DVD menus, audio tracks, and subtitles.
Setting playback restrictions based on age levels for DVD content.
Navigating DVD menus to select titles, audio, subtitles, and other options.
How to zoom in on specific parts of a scene during playback.
Selecting different viewing angles available on multi-angle DVDs.
How to turn subtitles on, off, or change their language during DVD playback.
Steps to create custom playback sequences by arranging tracks.
How to play tracks in a randomized playback order.
Selecting different audio formats and languages for DVD playback.
Enabling virtual surround sound effects without rear speakers.
Guide for playing MP3 audio files from CDs and DVDs.
Information on MP3 file compatibility and recording formats.
Instructions for viewing JPEG image files from CDs and DVDs.
How to rotate JPEG images displayed on the screen.
How to use the PBC function for interactive VCD playback and menus.
Recording TV programs with stereo or bilingual audio tracks.
Techniques for finding specific recordings using index marks and other search features.
Manual adjustment of picture tracking for improved playback quality.
Customizing settings like tape length, auto play, and auto repeat.
Instructions for connecting and recording from another VCR for editing purposes.
Basic setup procedures including setting the RF output channel and TV connection.
How to configure the RF output channel for optimal TV signal reception.
Common issues related to DVD playback and their solutions.
Common problems with VCR playback, recording, and operation with troubleshooting steps.
Definitions of technical terms and features used in the manual.
A guide to locating and identifying various parts and controls of the unit.
Steps for disassembling the outer cabinet and accessing the main circuit boards.
Steps for removing the main chassis assembly from the unit.
Procedure to remove the VCR main printed circuit board.
Diagram showing the placement of major circuit boards within the unit.
Illustration showing the location of VCR deck parts from the top view.
Illustration showing the location of VCR deck parts from the bottom view.
Steps to remove the FL cassette holder assembly.
Procedure to remove the FL arm assembly.
Steps to remove the FL door lever.
Instructions for removing the slider FL drive and gear FL cam.
Procedure to remove the gear worm wheel.
Steps to remove the cable flat connector.
Steps to remove the motor loading assembly.
Instructions for removing bracket gear and gear joints.
Steps to remove gear loading drive, slider cam, and load levers.
Instructions for reassembling gear loading drive, slider cam, and load levers.
Steps to remove pinch and tension drive levers.
Instructions for removing tension assembly and band brake.
Steps to remove brake levers S and T.
Instructions for removing the gear idle assembly.
Steps to remove the disk reels S and T.
Instructions for removing the holder clutch assembly.
Steps to remove lever up/down and gear center assemblies.
Instructions for removing the guide cassette door.
Steps to remove pinch unit, plate joint, and spring drive.
Instructions for removing the lever #9 guide assembly.
Steps to remove the FE head.
Instructions for removing the ACE head assembly.
Steps to remove slider assemblies S and T.
Instructions for removing the plate ground deck and cylinder assembly.
Steps to remove the hook capstan and belt pulley.
Instructions for removing the motor capstan assembly.
Steps to remove the post #8 guide assembly.
Instructions for removing the level head cleaner assembly.
Procedure for ejecting a stuck cassette tape.
Maintenance schedule for cleaning, lubrication, and replacement of key parts.
Steps to remove the holder chuck from the DVD deck.
Instructions for removing the disc tray from the DVD deck.
Steps to remove the pick-up unit deck assembly.
Instructions for removing the housing assembly.
Steps to remove the bracket deck assembly.
Important notes regarding PWB MAIN ASSY replacement and disposal.
Printed circuit board diagrams for the VCR main and function timer sections.
Printed circuit board diagrams for the DVD main section.
Overview of the main functional blocks on the VCR and DVD PCBs.
Detailed schematic for the VCR main circuit board.
Detailed schematic for the DVD main circuit board.
Procedures for adjusting VCR tracking, head switching, and NVRAM settings.
Steps for adjusting the head switching point for optimal VCR performance.
Overview of the tape transport system and necessary adjustments.
Detailed procedures for adjusting the tape transport system after part replacement.
Steps to adjust the ACE head height for proper tape guidance.
How to adjust the ACE head tilt to correct tape curl or wrinkles.
Procedure for adjusting the audio azimuth for maximum audio level.
Steps for adjusting the X-point for optimal tracking center.
Adjusting guide rollers S and T for proper tape linearity and waveform.
Verifying the transition from RPS mode to play mode for correct envelope behavior.
Procedures for checking and adjusting reel torque for proper tape transport.
Troubleshooting steps for the unit not powering on or showing no LED indication.
Diagnosing issues related to key presses or remote control malfunctions.
Visual diagrams showing the breakdown of unit components for repair.
Exploded view of the cabinet assembly and its parts.
Exploded view of VCR mechanical components as seen from the top.
Exploded view of VCR mechanical components as seen from the bottom.
Exploded view of the DVD mechanism and its parts.
A comprehensive list of all electrical components used in the unit.
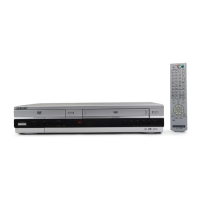
| Type | Remote Control |
|---|---|
| Brand | Sony |
| Model | RMT-V501E |
| Category | DVD Recorder |
| Compatible Devices | Sony DVD Recorders |
| Connectivity | Infrared |
| Battery Type | AA |
| Number of Batteries | 2 |