IM-P337- 6 9 EMM Issue 2
58
8.2.3 How to replace the MVT10 pressure sensor.
1. Ensure that the steam flow through the ILVA is isolated and the line pressure has returned to atmospheric
pressure and the temperature cooled.
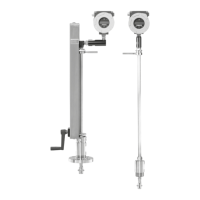
2. Close the isolation valves on the two way manifold and open the bleed valves on the MVT10 to allow
the condensate to drain. (Consider where the condensate is going to drain to. A container placed under
the bleed valves to catch the condensate may be advisable). See Figure 33.
3. Turn off/Disconnect the electric power supply and the communications.
4. Unscrew the rear electronic housing end cap.
5. Disconnect the sensor cable from the terminal block. See Figure 31.
6. Loosen the cable gland on the electronics housing and withdraw cable. See Figure 33.
7. Feed the new sensor cable through the cable gland and reconnect the the cable to the terminal block.
8. Tighten the cable gland and refit the electronic housing end cap.
9. Unscrew the pressure sensor from the MVT10 body and remove old seal.
10. Replace seal and screw in new pressure sensor and tighten to 24 to 26 N m.
11. Reconnect cable to new pressure sensor.
12. Close bleed valves on the MVT10.
13. Recommission (mechanically) as per Section 6.
14. Recommission the new pressure sensor as per Section 7.4.3.
Note: The ZP and EP values are shown on the label fitted to the body of the pressure sensor.
ZP = 0 CAL
EP = 25 CAL
Fig. 33