Do you have a question about the Supermicro C7Z87 and is the answer not in the manual?
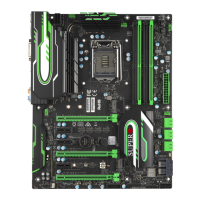
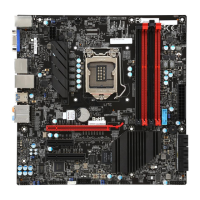
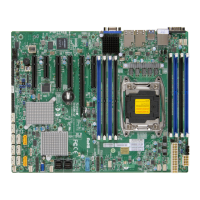
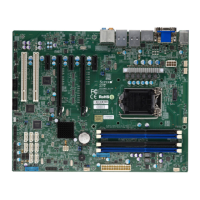
Introduces the C7Z87 motherboard, its purpose, and included items.
Details the key features of the C7Z87 motherboard, including CPU, memory, and expansion.
Visual representation of the motherboard's component connections and data flow.
Procedures and precautions to protect against electrostatic discharge (ESD).
Step-by-step guide for installing the CPU and its heatsink.
Detailed instructions for correctly seating the LGA1150 processor in its socket.
Instructions for mounting a passive CPU heatsink onto the motherboard.
Comprehensive guide for installing DDR3 memory modules.
Step-by-step instructions for inserting DIMM modules into the motherboard slots.
Instructions for physically mounting the motherboard into a computer chassis.
Detailed steps for securing the motherboard within the computer chassis.
Identifies and describes various onboard connectors and I/O ports.
Explains onboard headers and connectors, focusing on power.
Details the 24-pin ATX and 8-pin CPU power connectors.
Explains how to use jumpers to configure motherboard functions.
Details the motherboard's SATA 3.0 connectors and their pin definitions.
General procedures for troubleshooting system problems.
Checks to perform before attempting to power on the system.
Steps to diagnose and resolve issues where the system does not power on.
Troubleshooting steps for systems that power on but display no video output.
Procedures for diagnosing and resolving memory-related errors.
Guidelines on how to contact Supermicro Technical Support for assistance.
Instructions for removing and installing the motherboard battery.
Overview of the AMI BIOS Setup Utility and its navigation.
Description of the primary BIOS setup screen and its displayed information.
Details on configuring advanced system settings in the BIOS.
Settings related to the motherboard's chipset.
Settings for PCI-Express slot configurations and power management.
Displays information about installed memory modules.
Settings for detecting and configuring SATA devices.
Selects the operating mode for installed SATA drives (IDE, AHCI, RAID).
Settings for PCI/PnP configurations.
Allows selection of Intel Extreme Memory Profile (XMP) for performance.
Settings related to CPU performance and power management.
Advanced options for overclocking the CPU.
Options for overclocking the CPU's ring bus.
Settings for SVID and FIVR overclocking.
Options for overclocking the Graphics Transfer (GT) unit.
Settings for overclocking the CPU's uncore components.
Settings for overclocking IOA and IOD voltage.
Monitors hardware status like temperatures, voltages, and fan speeds.
Configures the system's boot order and boot device priorities.
Prioritizes the order of bootable devices for system startup.
Configures system security settings, including passwords.
Options for saving BIOS changes, exiting, or restoring defaults.
Table of beep codes, error messages, and descriptions for POST errors.
Instructions for installing system drivers after OS installation.
Details on configuring SuperDoctor III for system monitoring and management.
Describes the structure of the UEFI BIOS and the main BIOS image.
Steps to recover the BIOS using a USB-attached device.
Overview of the Dual Boot Block feature and its purpose.
Procedure to reboot the system using the JBR1 jumper for BIOS recovery.
| Form Factor | ATX |
|---|---|
| Socket Type | LGA 1150 |
| Chipset | Intel Z87 |
| Memory Slots | 4 |
| Maximum Memory | 32 GB |
| Memory Type | DDR3 |
| PCI Express 2.0 x4 Slots | 1 |
| SATA 6Gb/s Ports | 6 |
| LAN | 1 x Gigabit Ethernet |
| CPU | Intel Core i7/i5/i3/Pentium/Celeron |
| Memory Speed | DDR3 1600/1333/1066 MHz |
| Audio | 7.1 Channel HD Audio |
| RAID Support | RAID 0, 1, 5, 10 |
| USB 3.0 Ports | 6 x USB 3.0 (4 rear, 2 via header) |
| USB 2.0 Ports | 8 x USB 2.0 (4 rear, 4 via headers) |