13 BRICKWALLHD User Manual
6.4.2 Soft Clip Type
The BRICKWALL HD includes newly-rened and developed options for Soft
Clipping.
There are three Types to choose from, and they all represent variations on the
soft clipping theme. Which of them is preferred on the specic content with the
chosen threshold, and possibly in combination with the Limiter, can only judged
by listening in the given situation.
Soft Clip On
Soft
Smooth
Hard
Soft Clip
Type
• • Soft is a 9 dB “knee” soft clipper
• • Smooth is a continuous “knee” from very low levels all the way to the
top. The curve is optimized for least perceptual distortion.
• • Hard is a 2 dB “knee” soft clipper
Note: Use the Soft Clip On/O as a convenient way of A/B’ing the settings.
Note: To avoid nasty surprises, such as an unexpected high amount of clipping in
the last chorus – because it happened to be a little louder – make sure to check
the Soft Clip threshold setting at the loudest passages in your track.
Note: When processing sensitive material, and for live applications, it is
recommended to turn o Soft Clip to avoid bad surprises.
6.5 Operational Hints
Master Limiter: Normal operating procedures involve rst setting the Limiter
Gain in order to reach the desired Output level.
Loudness Limiter: Set the output Loudness Level, activate Set Gain while playing
back your track and let the BRICKWALL HD automatically set the limiter threshold.
Click the Set Gain button again to stop measuring when it has measured long
enough – observe when the measured loudness value below the Set Gain button
has found its level.
Use the Gain Reduction meters, the History readings, the STATS, and your
ears, as guidelines to when it is time to stop adding more Limiter Gain, or if
the Output Loudness level is maybe set too high. For not-previously limited or
-compressed signals, as a rule of thumb, be very careful if exceeding 8 dB of total
gain reduction, if not for artistic reasons. If the signal is already dynamic range
compressed, less drastic limiting treatment should be used.
We recommend ne-tuning the limiter parameters, in combination with
parameters of any dynamic compressor earlier in the processing chain.
Experiment with dierent Limiter Release times, or use the highly intelligent
Adaptive Limiter Proles relative to your music style, and, if needed in order to
relieve the Limiter a bit, add Soft Clip and nd the type and amount that best
compliments the material.
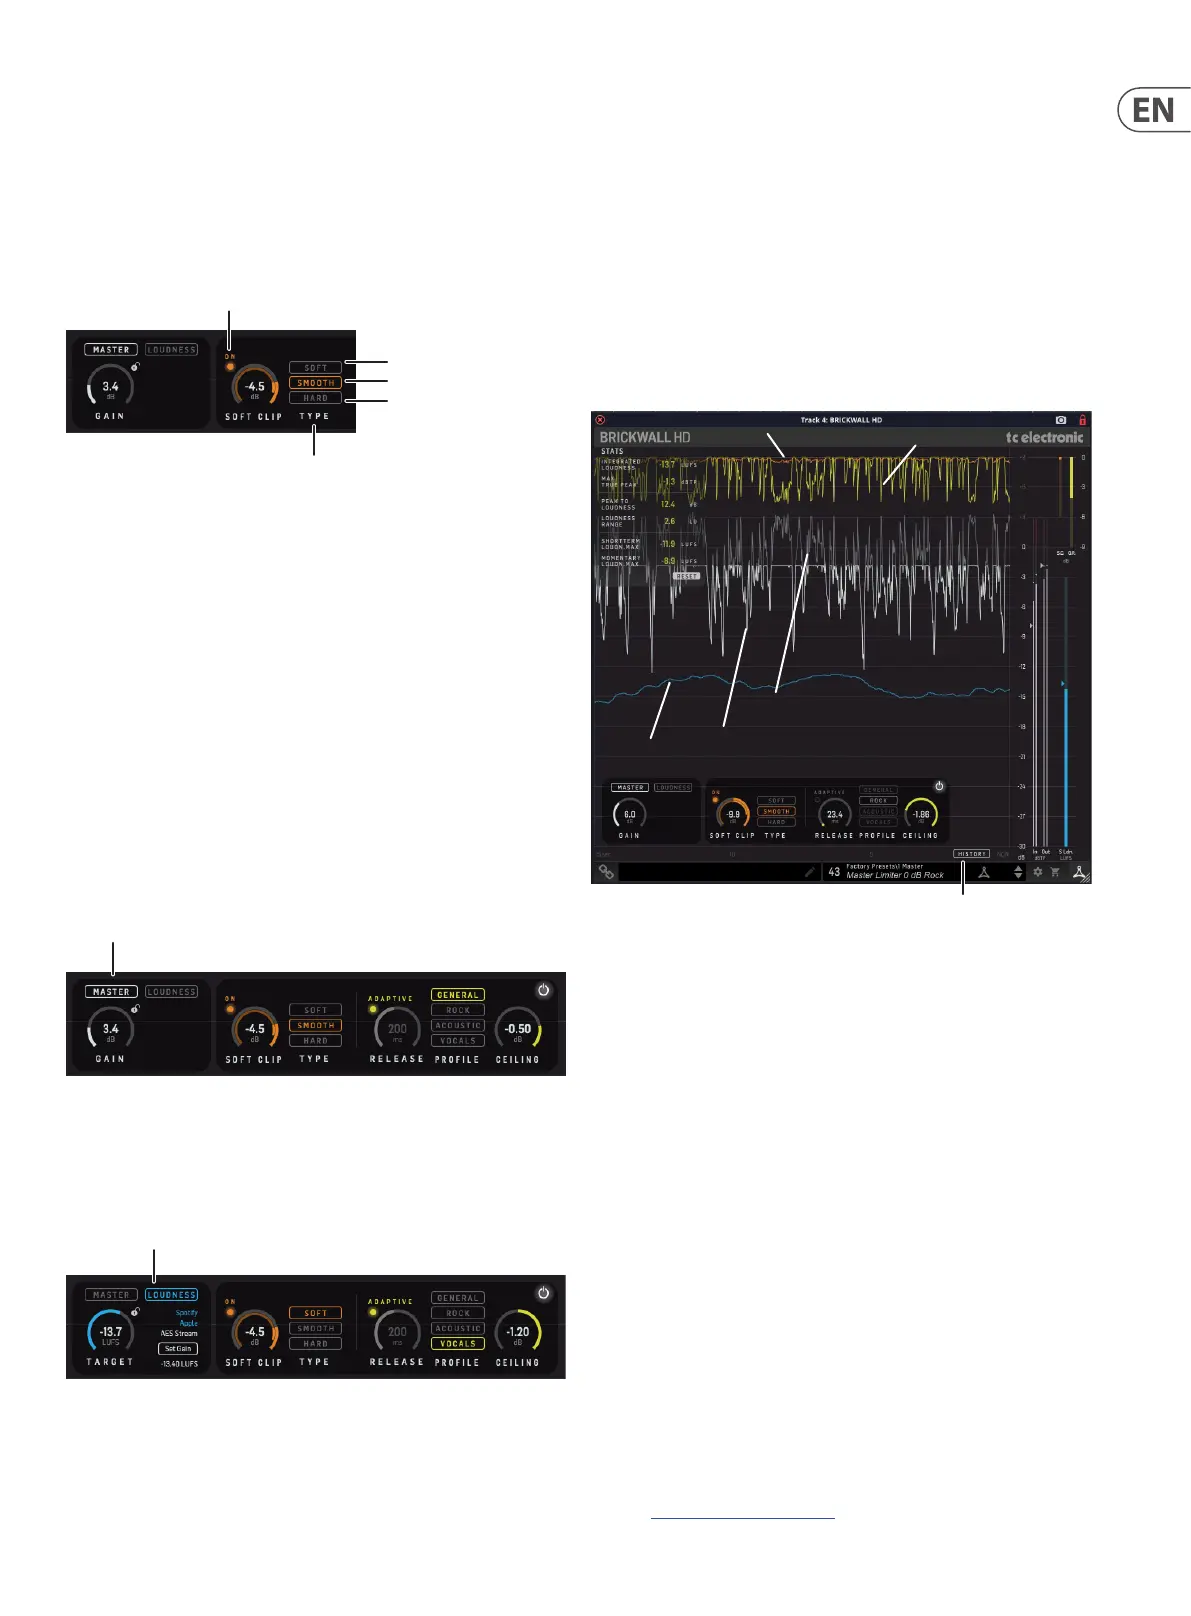
6.5.1 How to read the History
The all-new scrolling History view gives in-depth information and assists you
in making the crucial mix or master track decisions. While we fully support that
your ears is the most important tool, you may nd it useful in the delicate nal
adjustment process to see a scrolling view of the audio transients as well as the
gain reductions for both the Limiter and the Soft Clipper.
Loudness
Output
History
Input
Limiter
Soft Clip
It is possible to see the following:
• • The release time of the limiter, and see how it may end up nearly as a
general level reduction of your mix if the Release Time is too long
• • How the dierent Limiter Proles behave on your mix, especially if you
cycle a small part of your mix while looking carefully at the Limiter Gain
Reduction curve
• • How the Soft Clipper is an instant gain reduction, compared to the
Limiter, which has a dynamic behavior. This can be seen both on the
Gain Reduction curves, as well as on the dierence between the Input
signal (grey curve) and the Output signal (white curve)
• • How the Ceiling parameter sets the margin from 0 dBFS to the max
True-Peaks of your mix
• • The relation between the transients and the short term (3 sec) Loudness
curve. The Loudness curve will display how your mix progresses
loudness-wise, for example from verse to chorus, or from rst to last
chorus. This will help you decide if it has the amount of impact you
are aiming for. In this process, it may also help suggesting changes in
the upstream-process such as the actual mix or potential master bus
compressor settings
• • Note: It may be useful to use reference audio tracks when making
decisions on your mix
• • You may also refer to our free online analyzer for comparing your own
music to well-known, professionally mastered tracks:
https://nalizer.com/analyzer