22
with self-sealing lids are the best
choice. With careful use and han-
dling, Mason jars may be reused
many times, requiring only new lids
each time. When jars and lids are
u
sed properly, jar seals and vacuums
are excellent and jar breakage is rare.
Jar Cleaning
Before every use, wash empty jars in
hot water with detergent and rinse
well by hand, or wash in a dish-
washer. Unrinsed detergents may
cause unnatural flavors and colors.
These washing methods do not
sterilize jars. Scale or hard-water
films on jars are easily removed by
soaking jars several hours in a
solution containing 1 cup of vinegar
(5 percent acidity) per gallon of
water.
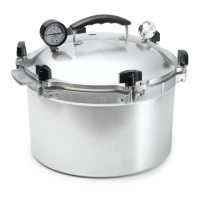
Sterilization of Empty Jars
All jams, jellies, and pickled products
processed less than 10 minutes
should be filled into sterile empty
jars. To sterilize empty jars, put them
right side up on the rack in a boiling-
water canner. Fill the canner and jars
with hot (not boiling) water to 1 inch
above the tops of the jars. Boil 10
minutes at altitudes of less than
1,000 ft. At higher elevations, boil 1
additional minute for each additional
1,000 ft. elevation. Remove and
drain hot sterilized jars one at a time.
Save the hot water for processing
filled jars. Fill jars with food, add lids,
and tighten screw bands.
Empty jars used for vegetables,
meats, and fruits to be processed in a
pressure canner need not be presteril-
ized. It is also unnecessary to
presterilize jars for fruits, tomatoes,
and pickled or fermented foods that
will be processed 10 minutes or
longer in a boiling-water canner.
Lid Selection, Preparation, and
Use
The common self-sealing lid consists
of a flat metal
lid held in
place by a
metal screw
band during
processing. The flat lid is crimped
around its bottom edge to form a
trough, which is filled with a colored
gasket compound. When jars are
processed, the lid gasket softens and
fl
ows slightly to cover the jar-sealing
surface, yet allows air to escape from
the jar. The gasket then forms an
airtight seal as the jar cools. Gaskets
in unused lids work well for at least
5 years from date of manufacture.
The gasket compound in older
unused lids may fail to seal on jars.
Buy only the quantity of lids you
will use in a year. To ensure a good
seal, carefully follow the manufactur-
er's directions in preparing lids for
use. Examine all metal lids carefully.
Do not use old, dented, or deformed
lids, or lids with gaps or other defects
in the sealing gasket.
After filling jars with food, release
air bubbles by inserting a flat plastic
(not metal) spatula between the food
and the jar. Slowly turn the jar and
move the spatula up and down to
allow air bubbles to escape. Adjust
the headspace and then clean the jar
rim (sealing surface) with a damp-
ened paper towel. Place the lid,
gasket down, onto the cleaned jar-
sealing surface. Uncleaned jar-sealing
surfaces may cause seal failures.
Then fit the metal screw band over
the flat lid. Follow the manufacturer's
guidelines enclosed with or on the
box for tightening the jar lids prop-
erly.
Do not retighten lids after
processing jars. As jars cool, the
contents in the jar contract, pulling
the self-sealing lid firmly against the
jar to form a high vacuum.
If rings are too loose, liquid may
escape from jars during processing,
and seals may fail. If rings are too
tight, air cannot vent during
processing, and food will discolor
during storage. Over tightening also
may cause lids to buckle and jars to
break, especially with raw-packed,
pressure-processed food.
C
hecking the Seal
Jars with flat metal lids are sealed if
t
he lid has popped down in the center,
the lid does not move when pressed
down, and tapping the center of the
lid with a spoon gives a clear ringing
sound. A dull sound, however, does
not always indicate a poor seal.
Poor Seals
If a jar or can is not sealed, refrigerate
contents and use or reprocess within
24 hours of the original processing.
Process for the full time recommend-
ed. Quality of the food will not be as
good after reprocessing.
Do not open and refill jars that
have lost liquid during processing.
Loss of liquid does not cause food to
spoil; however opening would
contaminate the sterile contents.
Labeling Cans And Jars
Wipe containers off after they are
cool. In labeling cans, use paste on
selvage ends of the label, keeping it
off of the tin, as this sometimes
causes rust. Label with the date and
contents of the container, particularly
if some batches were packed differ-
ently — without salt, for example. If
you canned more than one lot in one
day, add a lot number.
Storing Cans And Jars
Screw bands are not needed on
stored jars. They can be removed
easily after jars are cooled. When
removed, washed, dried, and stored
in a dry area, screw bands may be
used many times. If left on stored
jars, they become difficult to remove,
often rust, and may not work prop-
erly again. Store cans and jars in a
cool, dry place. Exposure to heat,
freezing temperatures or light
decreases the quality and shelf life of
canned food.
Freezing may damage the seal so
that spoilage begins. In an unheated
storage area, cover jars and cans
with a clean, old blanket, or wrap
them in newspapers.
For best eating quality and nutri-
tive value, use canned goods within
one year.
PACKING CANS OR JARS
 Loading...