batterycompartment.Ifyouinstallthebatteries
improperly,youwillnotdamagethemachine,
butthehandheldremotewillnotoperate.
g341771
g341769
Figure8
1.Positivebatterypolarity
3.Ensurethatthesteelgasketandrubberseal
(Figure7)areseatedinthechannelinthefront
coverhalf.
4.Alignthelanyardringoverthelanyardpin
(Figure7).
5.Assemblethebackcovertotheandfrontcover
with6screws(Figure7).
6.Torquethescrewsto1.5to1.7N⋅m(13to15
in-lb).
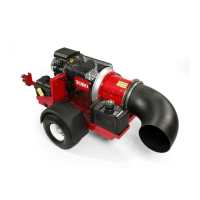
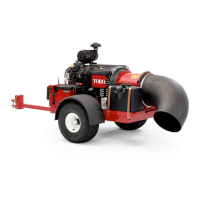
ProductOverview
Controls
HandheldRemote
LEDLight
TheLEDlightindicatescommunicationbetween
thehandheldremotecommunicationandthe
wireless-controlmodule(Figure9).
g029818
Figure9
1.LEDlight5.ROTATENOZZLERIGHT
button
2.ROTATENOZZLELEFT
button
6.INCREASEENGINESPEED
button
3.DECREASEENGINESPEED
button
7.ENGINE-STOPbutton
4.ENGINE-STARTbutton
Engine-StopButton
PresstheENGINE-STOPbuttontoshutofftheengine
(Figure9).
Engine-StartButton
Afterpreparingthemachineforremote-controlstating,
presstheENGINE-STARTbuttontostarttheengine
(Figure9).RefertoRunningtheEngine(page17)
forthestartingsequence.
BlowerNozzle-DirectionButton
PresstheROTATENOZZLELEFTbuttonortheROTATE
NOZZLERIGHTbuttontorotatetheblowernozzletothe
desireddirection(Figure9).
Engine-SpeedButton
•PresstheINCREASEENGINESPEEDbutton(rabbit
icon)toincreasethespeedoftheengine(Figure
9).
11