3
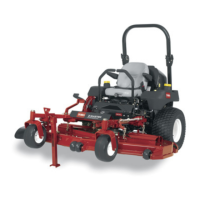
1. Anti-scalp roller
2. Bushing
2
Figure 19
3. Flange Nut
4. Bolt
J
4
G000943
G000944
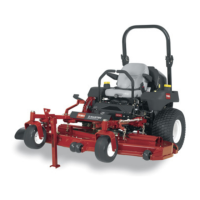
5 3
1. Anti-scalp roller
2. Spacer
3. Bushing
Figure 20
4. Flange Nut
5. Bolt
4
2
1
Adjusting the Flow Baffle
The mower discharge flow can be adjusted for
different types of mowing conditions. Position the
cam locks and baffle to give the best qualiD7 of cut.
1. Disengage the PTO, move the motion control
levers to the neutral locked position and set
the parking brake.
2. Stop the engine, remove the ke), and wait for
all moving parts to stop before leaving the
operating position.
3. To adjust the cam locks, swing the lever up to
loosen the cam lock (Figure 21).
4. Adjust the baffle and cam locks in the slots to
the desired discharge flov<
,
Swing the lever back over to tighten the baffle
and cam locks (Figure 21)•
If the cams do not lock the baffle into place or
it is too fight, loosen the lever and then rotate
the cam lock. Adjust the cam lock until the
desired lock:ing pressure is achieved•
1
2
3
G000945
Figure 21
1. Cam lock 3. Rotate cam to increase or
decrease locking pressure
2. Lever 4. Slot
Positioning the Flow Baffle
The following figures are only recommendations
for use. Adjustments will vary by grass type,
moisture content, and height of grass•
Note: If the engine power draws down and the
mower ground speed is the same, open up the
baffle.
Position A
This is the full rear position• The suggested use
for this position is a follows.
• Use for short, light grass mowing conditions•
• Use in dry conditions•
• For smaller grass clippings.
• Propels grass clippings farther away from the
mower.
24

 Loading...