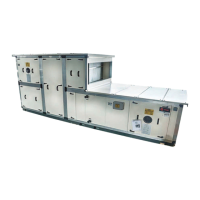
Installation - Mechanical
CLCH-SVX010A-EN 19
Base with Flat Floor
Note: Corner gussets are to ensure unit squareness
during shipping, lifting, and assembly. Please
remove, when unit is set in place.
Note: Failure to completely compress the gasketing may
result in air leakage.
1. Join the two units and secure with factory-provided 5/
8-inch flat washers and 5/8-inch X 2-1/2-inch grade 9
bolts though each of the six holes.
2. Caulk the overlapping flange along the length of each
split to maintain a seal.
Note: Use a polyurethane or equivalent caulk.
3. Before installing the pre-cut 4-inch 18-gauge joining
strips, pre-drill holes in the floor using the 4-inch strip
as a guide with a 7/32-inch drill bit at 12-inch centers.
4. After holes are pre-drilled, apply an ample bead of
caulk to the joint then install 4-inch strip with #14 sheet
metal screws uniformly straddling the split.
5. In cases of tread plate floor, some job specifications
may call for the seam to be welded. In those cases
make sure the sections are pulled together tightly then
weld with appropriate method. The floor construction
in those cases will be such that the heat from welding
will not affect the insulation.
Figure 16. Base assembly with flat floor
#14 SMS screw
Joining strip
3-in. x 1/8-in. gasket
4-in. x 1/4-in. gasket
Joining trim
Top floor
Add caulking before
installing J strip
Trim gasket after
strips are installed
Add caulking after
trimming gasket
 Loading...