Installation - Mechanical
CLCH-SVX010A-EN 25
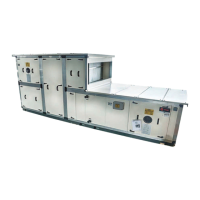
Indoor Roof - Multiple Span
1. Ensure shipping split sections are aligned and pulled
together properly.
2. Apply a bead of caulk to full height of wall joint.
3. Apply 3-inch x 1/8-inch adhesive-backed foam gasket
to inner joining strip.
4. Install inner joining strip using #14 x 1.5-inch gasketed
TEK® screws.
5. Fit the pre-cut hub cap over the joining strip the vertical
height of the wall flush with the roof and secure it to the
wall with #8 sheet metal screws.
6. Fill the top and bottom openings with caulk as a
moisture seal. Screw holes can be pre-drilled with a
#29 bit.
7. Apply a bead of caulk over top corner of cap seam.
8. Using #10 sheet metal screws, attach corner seam trip
cap as shown in Figure 25.
Figure 25. Indoor roof assembly - multiple span
6-inch trim cap
#10 sheet metal screw
Caulk
Cap and gasket
Standing seam
10 ga. galv
#14 sheet metal screw
on 10-inch centers
18 ga. galv
Zip screws
Center roof cap
 Loading...