WSHP-SVX022A-EN
29
8. Verify field installed receptacle box, condensate pipe,
and supply/ return pipe are in the appropriate locations
and does not t require adjustments. Verify water
connection angle prior to brazing of the unit water-in/
out.
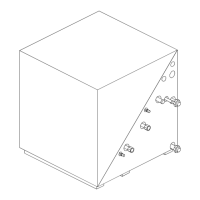
9. Install the field provided water connections to the unit
water-in/out pipe. Trane recommends a ½ in. x ¾ in.
nominal ell to be field brazed to the factory ½ in.
nominal water-in/out lines. Water in/out copper size: 5/8
in. ODS or ½ in. nominal.
1/2" SWAGE x 3/4" FPT
(NOMINAL ELL.)
FIELD PROVIDED
CHASSIS
10. Inspect the system water pipe thoroughly before
connecting the unit to the system. Water-to-refrigerant
heat exchanger fouling, freezing and failure is imminent
if the system pipe contains contaminants. Water to
refrigerant heat exchanger ships with nitrogen holding
charge. Remove rubber plugs from heat exchanger. All
field piping must be cleaned of contaminants.
11. Connect the supply and return line to the unit inlet and
outlet. Flexible hoses reduce vibration from the water
lines to the unit. An isolation valve, p/t plugs and auto-
flow valves are recommended to separate the closed/
open loop from the mechanical device.
12. Because the console configuration is a blow-through
design, no condensate trapping is necessary. However,
it is necessary for the condensate to run in a downward
motion to allow gravity to properly drain the system.
The unit drain connection is 5/8 in. I.D. or 7/8 in. O.D.
for all GEC* 006-018 systems.
13. Power wiring to the equipment should be installed per
national and local electric codes by a professional
electrician. Refer to Step 6, Step 7, and Step 8 for units
that include the factory supplied receptacle box.
For units containing a field provided disconnect, or, are
hard wired to the unit, Trane provides pig tail leads
inside a 2 x 4 handy-box in either the right or left side
end pocket. See unit wiring schematic for details.
For units containing a wall mounted thermostat, a low
voltage (18-pole) terminal strip is provided for field
installation of the thermostat. See Step 18 for unit
mounted controls.
14. The thermostat hook-up to the unit is made at the unit
mounted 24V (18-pole) low voltage terminal strip. This
strip is mounted on the exterior of the control box on the
right side of the unit. For units that contain left hand
piping, a low voltage crossover to the 18-pole terminal
strip may be necessary. For this configuration, run the
low voltage wires behind the chassis to the right side of
the console unit for termination to the terminal strip.
15. Location of the thermostat or zone sensor is an
important element of effective room control. Areas
where the thermostat/zone sensor should not be
mounted include: behind doors or corners; near hot or
cold air ducts; near radiant heat (heat emitted from
appliances or sun); near concealed pipes or chimneys;
on outside walls or other non conditioned surfaces; in
air-flows from adjacent zones or other units.
16. For units with unit mounted controls (option), all low
voltage connections are factory made. The fan will run
continuous with unit mounted controls.
17. For units with the factory provided receptacle box
options, the receptacle plug may now be connected to
the electrical outlet.
Installation