RT-SVX34R-EN
89
WWAARRNNIINNGG
LLiivvee EElleeccttrriiccaall CCoommppoonneennttss!!
FFaaiilluurree ttoo ffoollllooww aallll eelleeccttrriiccaall ssaaffeettyy pprreeccaauuttiioonnss
wwhheenn eexxppoosseedd ttoo lliivvee eelleeccttrriiccaall ccoommppoonneennttss ccoouulldd
rreessuulltt iinn ddeeaatthh oorr sseerriioouuss iinnjjuurryy..
WWhheenn iitt iiss nneecceessssaarryy ttoo wwoorrkk wwiitthh lliivvee eelleeccttrriiccaall
ccoommppoonneennttss,, hhaavvee aa qquuaalliiffiieedd lliicceennsseedd eelleeccttrriicciiaann
oorr ootthheerr iinnddiivviidduuaall wwhhoo hhaass bbeeeenn pprrooppeerrllyy ttrraaiinneedd
iinn hhaannddlliinngg lliivvee eelleeccttrriiccaall ccoommppoonneennttss ppeerrffoorrmm
tthheessee ttaasskkss..
HHIIGGHH VVOOLLTTAAGGEE IISS PPRREESSEENNTT AATT TTEERRMMIINNAALL
BBLLOOCCKK HHTTBB11 OORR UUNNIITT DDIISSCCOONNNNEECCTT SSWWIITTCCHH..
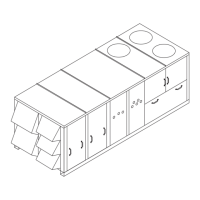
3. Remove the mist eliminator retainer bracket and the
mist eliminators from the fresh air hood.
4. Remove the five (5) screws in the top and bottom of
each fresh air damper located inside the hood area.
5. Using the Service Test guide in , p. 68 — Table 46,
p. 74, momentarily jump across the test terminals
one time for constant volume applications, or three
consecutive times for a variable air volume
application, to start the Minimum Ventilation Test.
6. With the supply fan “On” and rotating in the proper
direction, measure the return duct static pressure.
7. Using Table 65, p. 89, enter the desired amount of
fresh air and the return air static pressure reading to
obtain the proper damper opening dimension.
8. Loosen the adjustment screws on each side of the
damper and slide it downward to the required
opening.
9. Tighten the adjustment screws and re-install the
mist eliminators and the mist eliminator retainer
bracket.
10. Open the main power disconnect or the unit
mounted disconnect switch to shut the unit off and
to reset the RTRM.
11. Before closing the disconnect switch, ensure that
the compressor discharge service valve(s) and
suction service valve(s) are backseated.
Table 65. Damper adjustment
Damper Opening (in.)
Return Air Static Pressure - Inches w.c.
Damper #1 Damper #2
-0.20 -0.40 -0.60 -0.80 -1.00 -1.20 -1.40 -1.60
2 0 430 590 725 840 950 1040 1120 740
4 0 780 1080 1330 1545 1730 1890 2035 2170
6 0 1185 1620 1990 2300 2575 2815 3030 3240
8 0 1530 2110 2600 3025 3390 3705 3985 4240
10 0 1930 2655 3270 3800 4250 4650 5005 5345
10 2 2295 3165 3910 4545 5095 5575 6010 6415
10 4 2660 3650 4510 5255 5905 6480 6995 7470
10 6 3010 4150 5130 5965 6690 7330 7900 8440
10 8 3345 4600 5680 6610 7410 8120 8765 9365
10 10 3690 5125 6350 7395 8295 9075 9775 10420
Starting the Compressor
Optional service valves must be fully opened before
startup (suction and discharge line).
NNoottee:: Suction and discharge service valves are
standard on high efficiency units and 40-50T
standard efficiency constant volume units.
NNOOTTIICCEE
CCoommpprreessssoorr FFaaiilluurree!!
FFaaiilluurree ttoo ffoollllooww iinnssttrruuccttiioonn bbeellooww ccoouulldd rreessuulltt iinn
ccoommpprreessssoorr ffaaiilluurree..
UUnniitt mmuusstt bbee ppoowweerreedd aanndd ccrraannkkccaassee hheeaatteerrss
eenneerrggiizzeedd aatt lleeaasstt 88 hhoouurrss BBEEFFOORREE ccoommpprreessssoorrss
aarree ssttaarrtteedd..
Starting 27.5 to 35 Ton Standard
Efficiency Units
Install a set of service gauges onto the suction and
discharge service ports. To start the compressor test,
close the main power disconnect switch or the unit
mounted disconnect switch.
Jump across the “Test terminals” on LTB1 or toggle
the test switch three consecutive times if it is a constant
volume application, or five times if it is a variable air
volume application for two to three seconds per jump.
Refer to , p. 68 - Table 46, p. 74 for the Cooling Test
sequence.
SSttaarrttuupp
 Loading...