Do you have a question about the Tripp Lite NetDirector B030-DP08-17D and is the answer not in the manual?
Details optional accessories available for purchase to enhance KVM functionality.
Details the resolution and refresh rate for the integrated LCD monitor.
Lists requirements for connecting an external console (monitor, keyboard, mouse).
Outlines the necessary equipment for each computer connected to the KVM.
Lists compatible operating systems for connected computers.
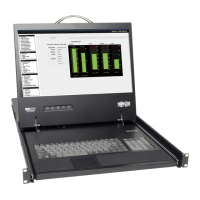
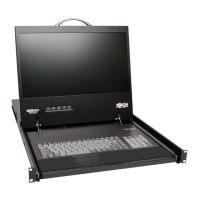
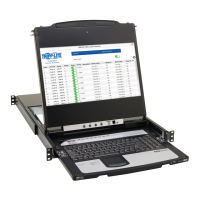
Visually identifies the main components of the KVM console.
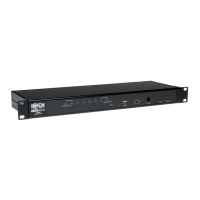
Illustrates and describes the rear panel components and ports of the KVM switch.
Outlines specific safety precautions for installing the KVM switch in a rack.
Explains the procedure for mounting the KVM switch in a standard 1U rack.
Describes mounting in a 2-post rack using an optional kit.
Provides instructions for properly grounding the KVM switch.
Outlines the process for connecting computers and power to the KVM switch.
Explains how to open and close the KVM console's modules.
Details steps 1 and 2 for opening the LCD module independently.
Describes the procedure for opening both LCD and keyboard modules simultaneously.
Warns about the load capacity of the keyboard module and proper handling.
Details the steps for closing the keyboard module into the console.
Explains how to configure the LCD On-Screen Display (OSD) using the control buttons.
Describes the function of each button used for OSD configuration.
Details the various settings available for adjusting the LCD display quality.
Explains the support for connecting and disconnecting components without shutting down the KVM.
Notes the need to reconfigure OSD for port changes with hot-plugging.
Provides instructions for powering down and restarting the KVM switch.
Describes how to connect and access USB peripherals via the KVM's front panel port.
Lists the three methods for switching between connected computers.
Covers operations performed using the KVM's built-in console.
Explains the process for logging into the KVM's local console.
Describes the hotkey sequence to access the On-Screen Display (OSD).
Explains the structure and navigation of the On-Screen Display (OSD) main menu.
Describes the columns and their meaning in the OSD main menu.
Details how to navigate through the OSD menus and options.
Explains how to access and use the various OSD functions for configuration.
Explains the GOTO function for directly switching to a port by name or ID.
Describes how to filter the displayed list of ports in the OSD.
Details the settings for customizing the user environment and port displays.
Administrator-only function to configure overall OSD operation and user settings.
Function to set usernames and passwords for administrator and users.
Defines user access rights (full, view, or none) for each port.
Sets the inactivity period before automatic user logout.
Allows creating, modifying, or deleting names for KVM ports.
Resets settings to factory defaults, excluding port names and user accounts.
Clears all previously assigned port names.
Toggles the audible beeper on or off for port changes and invalid entries.
Selects ports to be included in quick-view lists and auto-scanning.
Assigns the operating system type (WIN, MAC, SUN) for each connected computer.
Enables firmware upgrade mode for updating the KVM switch's software.
Sets the language for the computer keyboard attached to the KVM port.
Configures whether user login is required to access the KVM console.
Invokes Skip mode for manually switching between accessible computer ports.
Invokes Broadcast mode to send commands to all connected computers simultaneously.
Invokes Auto Scan mode for automatically monitoring computer activity at intervals.
Logs out of OSD control, blanking the console screen and requiring re-login.
Explains how to use hotkeys for KVM focus control and settings.
Describes the keystroke sequences to enter Hotkey mode.
Details how to switch KVM focus to a specific port using its ID via hotkeys.
Explains how Auto Scan mode automatically switches between accessible ports.
Details how to manually switch between accessible ports using arrow keys.
Describes how to reset the keyboard/mouse connection to a computer.
Toggles the beeper on or off using a hotkey combination.
Toggles between available Hotkey Settings Mode invocation keys.
Changes the port's operating system setting to match the connected computer.
Sets the USB speed (low/full) for selected KVM ports.
Restores hotkey settings to their default values.
Provides a quick reference table for all KVM hotkey commands.
Lists emulation mappings for PC keyboard to Mac keyboard functions.
Lists emulation mappings for PC keyboard to Sun keyboard functions.
Explains the purpose of the Windows-based firmware upgrade utility.
Outlines the steps required to prepare for a firmware upgrade.
Guides the user through initiating the firmware upgrade process.
Informs the user when the firmware upgrade process has been completed successfully.
Provides steps for recovering the firmware if an upgrade fails.
Details the hardware specifications for the 8-port and 16-port KVM switches.
Lists the default settings for the KVM's On-Screen Display (OSD).
Details the warranty coverage period and conditions for the KVM switch.
Provides instructions for registering the product online for warranty and promotions.
Information regarding Waste Electrical and Electronic Equipment compliance for European Union customers.
| Device Type | KVM Switch |
|---|---|
| Number of Ports | 8 |
| Video Resolution | 1920 x 1200 |
| USB Ports | Yes |
| Audio Support | Yes |
| Rack Mountable | Yes |
| Form Factor | 1U Rackmount |
| KVM Technology | Digital |
| Number of Users Supported | 1 |
| Power over Ethernet (PoE) | No |
| Operating Temperature | 32°F to 104°F (0°C to 40°C) |
| Humidity | 0-80% RH, Non-condensing |