CONNECTIONS CONTINUED...
1. Power Connection:
Connect the plug-in power supply to the power (DC) connector on
the far left.
2. Control Boards (24V or 110V) Connection
Connect the 24V Control Board to the Aqua-X with a RJ12 cable
going from the 24V CONTROL socket to the first 24V Control Board
to be connected. Plug the 24V Control Board to the wall outlet for
power supply. Press "Addressing" button, the Aqua-X Controller will
assign an address to the connected Control Board in sequence. Use
another RJ12 cable to connect to the second 24V Control Board. Repeat
this process until all 24V Control Boards (up to 5pcs for exclusive use)
have been connected to the Aqua-X Controller.
The connection of 110V Control Boards is similar to above processes
but through the 110V CONTROL port.
3. Program Device Station Connection:
The connection of Program Device Station is similar to the 110V
Control Board. The 110V Control Board and Program Device Station
can be chained together with T-Splitter through the 110V CONTROL
socket.
4. Water Detectors Connection:
Connect the Water Detector to the Aqua-X with a RJ12 cable going
from the Water Detector socket to the first Water Detector to be
connected. Use the
T-Splitter and a short RJ cable so that the first
cable can continue on to be
connected to the next T-Splitter (Water
Detector) to be connected. Press the “Addressing” button, the controller
will automatically assign an address to the Water Detector in sequence.
Repeat this process until all Water Detectors (up to 30pcs
per set) are
connected to the main controller.
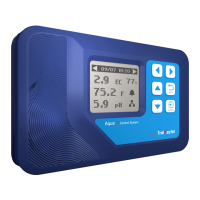
5. Sensors Connection:
Connect the Sensor Board to the Aqua-X with a round-headed cable
(male-to-male). Connect the pH Sensor and EC/Temp Sensor to the
corresponding connector on the Sensor Board.
6.Internet Connection
This unit has the feature of connecting the network for remote control.
User can use a standard network cable for connection through the
INTERNET socket.
08 09
 Loading...