EasyManua.ls Logo

Tru-Test XR5000 - User Manual

Tru-Test XR5000
38 pages
Print Icon
To Next Page IconTo Next Page
Loading...
Issue 4, 8/2017 1
S
E
R
V
I
CE MAN
U
AL -
Le
v
el 1

Questions and Answers

  • K
    Katie PaulAug 5, 2025
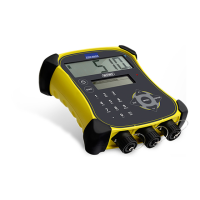
    What to do if the Tru-Test XR5000 Accessories indicator does not switch on?
    • C
      Cindy GarciaAug 5, 2025
      If the red stable LED illuminates when you plug in the power adapter, let it charge for 30 minutes to see if the battery recovers and allows the indicator to turn on. If the red stable LED doesn't light up when the power adapter is plugged in, or if the battery doesn't recover after 30 minutes, check the battery voltage. If it's less than 2.5 V, replace the battery.
  • P
    Peter WhiteheadAug 10, 2025
    What to do if the Tru-Test Accessories save files to USB flash drive is not working?
    • A
      aperryAug 10, 2025
      First, try the USB flash drive on a PC to ensure it's functioning correctly. If the USB flash drive is faulty, replace it. Also, if the USB flash drive has the wrong file system, replace it with a known good USB flash drive.
  • J
    johnsonjamesAug 13, 2025
    What to do if Tru-Test XR5000 Accessories shows a bad cell code?
    • N
      newtonkevinAug 14, 2025
      The issue is likely due to a non Tru-Test load cell. It probably needs span calibration. See the technical bulletin Span Calibration Guide.
  • P
    Paula HansonAug 18, 2025
    How to troubleshoot a Bluetooth wireless connection that's not working on Tru-Test XR5000 Accessories?
    • K
      Kristin HarveyAug 18, 2025
      The issue may be with the master device. Here's what to check: 1. Make sure the indicator is on. 2. Ensure the Wi-Fi Data Link screen is not active (press 'Finish' if it is). 3. Refer to the master device's documentation to ensure Bluetooth is enabled and connected to the indicator, not another device. 4. The Bluetooth functionality on the master device may be faulty.
  • M
    Michelle FoxAug 22, 2025
    What to do if the Stable LED is not working on Tru-Test XR5000 Accessories?
    • S
      sandra04Aug 22, 2025
      Check the indicator settings for Damp System and Resolution. Damp System should be set to Superdamp III (Cattle) or Superdamp III (Sheep). The Resolution may be set too small, so set it to a coarser resolution. See the technical bulletin Span Calibration Guide.
  • J
    Joel LinAug 27, 2025
    What causes a loss of user data on Tru-Test Accessories?
    • D
      Diana GarrisonAug 27, 2025
      Replace the PCA.
  • C
    Courtney WrightAug 31, 2025
    What to do if there is a bad indicator internal FPC connection in Tru-Test XR5000 Accessories?
    • J
      Joann LongAug 31, 2025
      Check that both load bar FPCs are correctly inserted into the PCA. Plug a good load bar FPC into the PCA and check if the weights are stable.

Summary

Product Changes and Differences

Servicing Procedures

Servicing Indicators <510,000

Guides replacement procedures for older models, noting LCD exceptions.

Servicing Indicators >510,000

Guides replacement procedures for newer models, emphasizing like-for-like parts.

Parts List

LCD

Lists LCD part numbers based on serial number, with availability notes.

Battery

Lists battery part numbers for models <510,000 and >510,000.

PCA (Printed Circuit Assembly)

Lists PCA part numbers for XR5000 and ID5000 models.

Troubleshooting

Indicator Power and Charging Issues

Addresses issues with power-on, boot process, and battery charging.

Short Battery Run Time

Diagnoses and suggests actions for short battery life.

LCD Display Faults

Troubleshooting steps for LCD display issues like incomplete or blank screens.

Incorrect Weight Display

Solutions for unstable weights, zeroing issues, and incorrect weight display.

Keypad Unresponsiveness

Diagnoses and resolves issues with unresponsive keypad buttons.

RS232 Communication Errors

Steps to troubleshoot and resolve RS232 communication issues.

Bluetooth Connectivity Problems

Diagnoses and resolves problems with Bluetooth connectivity.

USB Interface Issues

Troubleshooting steps for the USB interface not functioning.

Indicator Testing Procedures

Checking for Stable Weights

Procedure to test for stable weight readings, including disabling auto zero track.

Testing Stable Weights

Step-by-step guide to perform stable weight tests using calibration plugs.

Checking Calibration

Procedure to check indicator calibration using calibration plugs.

Checking Load Cell Codes

How to check and verify load cell codes for accurate weighing.

Checking Bluetooth Connection

Steps to establish and verify a Bluetooth connection with an EID reader.

LCD Checks

Testing LCD Operation and Backlight

General advice for checking LCD segment integrity and operation.

Keypad Testing

Testing Keypad Functionality

Procedure to test each key on the keypad for proper response.

Battery Checks and Care

Battery Problem Diagnosis

Steps to test battery capacity and identify potential issues.

Checking Battery Voltage

Procedure to check battery voltage and determine replacement needs.

Advanced Battery Testing

Steps for removing and testing the battery with a load.

Repair Procedures Overview

Before Beginning Repairs

Pre-repair steps, including data cloning and indicator shutdown.

Indicator Shutdown Methods

Two methods for safely powering off the indicator before repair.

Flexible Printed Circuit (FPC) Connector Handling

Guidelines for safely disconnecting and connecting FPC connectors.

Disconnecting;Reconnecting LCD FPC

Detailed steps for disconnecting and reconnecting the LCD FPC.

Case Back Removal and Refitting

Removing the Case Back

Procedure for unscrewing and lifting off the indicator's case back.

Refitting the Case Back

Steps for correctly refitting the case back, emphasizing seal integrity.

Case O-ring Replacement

Battery Replacement

Battery Removal

Steps to remove the battery, including preliminary disassembly and disconnection.

Battery Fitting

Steps to install and connect the new battery, and final refitting.

Load Bar and Power;Comms Connector Replacement

USB Connector Replacement

PCA Removal and Refitting

Cradle Replacement

LCD Replacement (>510,000 Serial)

Removing the LCD - Separating from Case

Using tools to separate the LCD from the case front and gasket.

LCD Refitting

Insert LCD into Case Front

Placing the LCD into the case front, ensuring correct orientation.

Case Front Assembly Replacement

Refit LCD and Assemblies into New Case

Refitting the LCD and other assemblies into the new case front.

Tru-Test XR5000 Specifications

General IconGeneral
Water ResistanceIP67
Internal MemoryYes
Environmental ProtectionIP67
ConnectivityWiFi, Bluetooth
Power Supply12V DC
CommunicationBluetooth, USB
CategoryLivestock Weigh Scale Indicator

Related product manuals