Do you have a question about the Vaillant auroFLOW plus VPM 15 D and is the answer not in the manual?
Classification of action-related warnings by danger severity and signal words.
Defines the product's intended use and what constitutes improper use.
Covers qualifications, safety devices, electric shock, over-voltage, burns, error functions, and material damage risks.
Specifies minimum cross-sections and maximum lengths for various cable types.
Advises observance of national regulations, standards, guidelines, and laws.
Emphasizes observing all included operating and installation instructions.
Instructs to pass instructions and documents to the system operator.
Specifies the product types and article numbers to which these instructions apply.
States that the solar system is described in the operating instructions.
Details compatibility with auroMATIC VRS 620/3 and geoTHERM heat pumps.
Lists compatible cylinders (alISTOR, auroSTOR) and diverter valve configurations.
Lists conditions for correct solar system operation, e.g., installation height, pipe gradients.
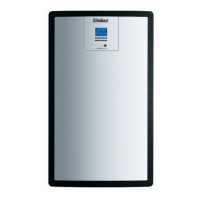
Details the components of the basic module with a diagram.
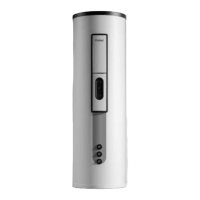
Shows the design of basic and expansion modules with key components.
Explains information found on the product's identification plate.
Provides abbreviations and explanations for product identification.
Explains how to find and interpret the product's serial number.
Explains the meaning of the CE label and declaration of conformity.
Specifies storing the product in a dry and dust-free room.
Provides step-by-step instructions for unpacking the product.
Lists the items included in the delivery for the basic module.
Lists the items included in the delivery for the expansion module.
Advises not to lift the product by its front casing.
Shows diagrams with dimensions for the product and its connections.
Specifies required clearances around the product for installation.
States clearance requirements from combustible materials.
Details the mains connection cable length and routing.
Discusses operational noise and recommendations for installation location.
Provides rules for pipeline installation, heat insulation, and placement relative to collectors.
Details installing the basic module, including removing the front casing and wall-mounting.
Includes connecting cylinder circuit, discharge line, and solar circuit; emphasizes caution.
Details electrical installation, including connecting shift-load valve and mains connection.
Includes checking electrical installation and fitting the front casing.
Details installing the expansion module, including pipe connections and tank removal.
Details installing the second solar pump and connecting its hydraulic lines.
Instructions for wall-mounting the expansion module.
Explains the DIA system, operating concepts, and accessing the installer level.
Covers opening isolators, filling/purging cylinder circuit, and filling the storage tank.
Guides through setting language, type of use, system size, purging, date, time, and contact data.
Details the process of pressure compensation to prevent damage and injury.
Provides access to statistics, check programs, and sensor/actuator tests.
Allows changing settings like language, date, time, and operating mode.
Explains how to access and query the product's fault memory.
Provides a table of fault codes, their texts, and explanations.
Refers to the appendix for an overview of faults, causes, and remedies.
Lists inspection and maintenance tasks and their intervals for solar circuit and collectors.
Emphasizes regular inspection and maintenance by a competent person.
Recommends using original spare parts for maintenance and repair.
Details safety precautions before starting inspection and maintenance.
Covers checking fluid properties, draining, adding fluid, and pressure compensation.
Steps to complete after maintenance, including checks and test runs.
Steps for temporarily switching off and draining the system.
Steps for permanently switching off and draining the system.
Advises against household waste disposal and proper disposal of product/accessories.
Instructions for environmentally friendly disposal of solar fluid.
Guidance on proper disposal of wear parts.
Guidance on proper disposal of defective components.
Provides a diagram illustrating the installer level menu structure.
Shows a schematic diagram of the system connections.
Lists faults, possible causes, and remedies in a table.
Provides technical specifications for VPM 15 D and VPM 30 D models.
| Brand | Vaillant |
|---|---|
| Model | auroFLOW plus VPM 15 D |
| Category | Water System |
| Language | English |