Do you have a question about the Varian archon and is the answer not in the manual?
Detailed description of the Archon Purge and Trap AutoSampler and its automated sample handling capabilities.
Highlights key features of the Archon AutoSampler, including its robotic arm, sample tray, and programmable options.
Provides detailed specifications for the Archon AutoSampler, including capacity, dimensions, and environmental requirements.
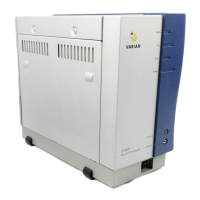
Describes the main components of the Archon, breaking them down by location like the front panel.
Details the components of the front panel, including the keypad and LCD screen for operation and programming.
Describes the components and connections found on the rear panel of the Archon, including power, gas, and I/O ports.
Explains the internal components of the Archon, such as the robotic arm, probes, and syringe assembly.
Differentiates between the two types of sample vials (Patented SoilVial and Standard 40 mL VOC vial) used by the Archon.
Lists the necessary materials and tools required for the proper installation and setup of the Archon AutoSampler.
Provides instructions on how to safely unpack the Archon AutoSampler and its components from the shipping cartons.
Details the specific parts and materials included in the Archon Accessory Kit for installation and operation.
Specifies the required bench space, clearance, and placement considerations for installing the Archon AutoSampler in a laboratory environment.
Explains the correct procedure for connecting the required high-purity helium gas supply to the Archon AutoSampler.
Details the proper electrical connections for the Archon AutoSampler, including power requirements and grounding.
Guides the user on connecting electronic I/O signals for communication between the Archon and other instruments like purge and trap systems.
Explains the connection of the sync cable for communication between the Archon and purge/trap concentrators and GCs.
Describes how to connect the Archon to external computing devices via the RS-232 port for software control.
Provides instructions for setting up the water and waste lines required for the Archon's operation, including blank/wash bottles.
Details the setup procedure for the blank/wash water reservoir bottle and its associated lines.
Explains how to route and connect the waste lines from the Archon to appropriate waste receptacles for proper drainage.
Guides the user on removing, inserting, and properly positioning the sample tray within the Archon AutoSampler.
Provides instructions for setting up the optional refrigerated chiller bath for cooling the sample tray.
Details the installation of the Archon sample transfer lines and purge gas cut-off solenoid valve lines to purge and trap instruments.
Provides step-by-step instructions for installing the Archon to the Tekmar 3000 purge and trap instrument.
Specifies the necessary configuration settings for the Tekmar 3000 to ensure proper communication with the Archon.
Provides instructions for interfacing the Archon with the Tekmar 2000 purge and trap instrument, including fitting installation.
Guides the user through the installation of the Archon heated soil transfer line and purge gas lines to the OI 4560.
Specifies parameter settings for the OI 4560 to ensure proper handshaking and communication with the Archon.
Explains how to adjust the helium purge gas flow rate for soil samples using the front panel controls.
Details the procedure for calibrating the internal standard valve loop volume for accurate sample data analysis.
Provides a comprehensive checklist to verify all installation steps and connections are correct before operating the Archon.
Provides a general overview of the Archon's keypad layout and LCD screen, detailing operational and setup keys.
Explains how to use the AUTO key to start the Archon's autosampling sequence, including method selection and delayed start.
Describes how to use the MANUAL key for single sample runs or priority samples, including during an AutoRun.
Details how to interrupt an AutoRun to process a Priority Sample using the Manual key.
Explains how to use the FLUSH key to decontaminate sample pathways and offers four options for flushing.
Details the procedure for draining the sparge tube as part of the system flush sequence.
Describes how to flush the 26 mL syringe assembly as part of the system flush sequence.
Explains how to rinse the sparge tube and syringe simultaneously as part of the manual flush mode.
Details how to backflush the water probe with hot blank water and helium.
Explains the multifunctionality of the Pause/Stop key for pausing or aborting operations during an AutoRun.
Describes how to place the Archon in a 'HOLD' state, pausing its current sequence without affecting motors.
Guides the user on how to edit and save up to 30 methods for various sample analysis configurations.
Details various parameters for setting up sample methods, including sample type, vial numbers, volumes, and standards.
Explains how to program method blanks after specific sample vials to ensure system cleaning and contamination checks.
Provides example programming guidelines for water and soil sample methods to aid in creating custom methods.
Offers an example setup for programming a typical Water sample method, including key parameters.
Provides an example setup for programming a typical Soil sample method, including key parameters.
Explains how to program a Blank method, detailing parameter entries for blank runs.
Describes how Equilibrium Count and Time parameters are used to equilibrate samples to desired temperatures before analysis.
Details the operational sequence steps performed by the Archon during a typical sample run.
Outlines the step-by-step process the Archon follows when running a Water sample.
Details the sequence of operations performed by the Archon when processing a Soil sample.
Describes the sequence of steps the Archon follows when performing a Blank sample run.
Explains the procedure to move the Robotic Arm to the front for easier access to the rear of the Archon for service.
Allows the user to view the remaining time for the Cycle Timer and the status of heated zones.
Covers procedures for maintaining the Archon, including filling reservoirs, priming lines, and resetting counters.
Details the process for filling internal standard reservoirs and priming the associated lines.
Explains how to view and adjust movement counts for critical components to schedule routine maintenance.
Describes how to move the Archon's mechanisms to a secure position for shipping and installation of shipping hardware.
Details the procedure for moving the XYZ mechanism to allow access for cleaning the syringe assembly.
Explains how to exercise the sample elevator up and down for testing or maintenance.
Provides access to routines for calibrating target positions for the Robotic Arm and Gripper.
Details how to run the Calibration Test to verify and ensure proper alignment of the unit.
Guides the user through the Auto Calibrate program to automatically set coordinate positions for vial handling.
Details the protocol to recalibrate the critical Vial 22 position, which is foundational for other tray locations.
Explains the procedure to recalibrate the water probe vial position for proper probe penetration.
Details how to recalibrate the Equilibrium Block position for accurate vial placement in the temperature equilibration zone.
Explains how to recalibrate the Knockoff Clearance to allow the gripper to pass under the Knockoff plate.
Details how to recalibrate the Standard Clearance for proper gripper passage under standard vials.
Describes manual calibration routines for fine-tuning robotic arm and gripper positions for specific instrument operations.
Allows testing of motors and remote I/O functions to verify proper operation and circuitry of the Archon.
Enables adjustment of overall system parameters, including temperature settings, motor speeds, and time specifications.
Allows enabling optional features of the Archon, such as Barcode Scanner, Needle Sparge, and Vial Checks.
Provides instructions for the removal and replacement of the needle sparge or SoilVial probes on the Archon.
Details the procedure for removing and replacing the water probe assembly on the Archon.
Explains how to clean the soil transfer line frit, a critical component for sample transfer.
Provides instructions for replacing the water line screen, a small but important component.
Details the process for removing and replacing the soil transfer line assembly.
Guides the user through replacing the soil purge gas needle.
Explains the monthly procedure for cleaning the vial gripper arms to ensure proper vial handling.
Describes how to perform a leak check on the helium purge gas flow system to identify and resolve leaks.
Provides instructions for replacing the heated upper soil valve assembly on the Archon.
Details how to adjust the speed of the sample stir motor using the access hole on the rear panel.
Explains the importance and procedure for cleaning the drip pan to prevent algae buildup.
Details the monthly procedure for cleaning or replacing the syringe plunger O-ring.
Guides the user on cleaning the internal standard valve and lines if standard recovery is low or erratic.
Explains how to properly fill and install the 5 ml standard vials before starting a sample run.
Provides instructions on how to prepare the Archon for shipping by accessing the 'Shipping Positions' menu.
Lists the pin assignments and wire colors for the Archon's REMOTE I/O connector for cable hookup.
Provides detailed pin-out diagrams and configuration steps for connecting the Archon to Tekmar LSC-2000/3000.
Details the hookup and configuration for interfacing the Archon with a Tekmar 3000 and HP 5890 GC.
Provides pin-out diagrams and connection instructions for the Archon to Tekmar LSC 2000/3000 with Varian 3400/3600.
Explains the connection of Archon and Workstation cables to the Varian GC motherboard using splitters.
Describes the J-16 Splitter, an accessory used for Varian GC motherboard connections.
Describes the J-23 Splitter, an accessory used for Varian GC motherboard connections.
Provides hookup and configuration for Archon to Tekmar 3000 with HP 5890 GC/MS systems.
Details the cable hookup and configuration for connecting the Archon to Tekmar LSC 2000/3000 and HP 6890 GC.
Provides connection and configuration details for the Archon to OI 4460/4560 with HP 5890.
Details the hookup and configuration for the Archon to OI 4460/4560 with Varian 3400/3600.
Provides instructions for connecting the Archon to OI 4460/4560 and HP 5890 GC/MS systems.
Details the cable hookup and configuration for the Archon to Tekmar 2000/3000 with Varian 3800.
Lists the main categories of Archon parts available, such as interface cables, probes, and solenoids.
Illustrates and lists the components found on the front panel of the Archon, including gauges and controllers.
Shows the syringe plate assembly, detailing its main components like the internal standard valve and probes.
Details the components of the internal standard valve assembly, including the motor, valve, and reservoir vials.
Illustrates the mixing solenoids and the 26 mL syringe assembly, listing their associated parts.
Details the different probe assemblies, including water, soil, and needle sparge probes, and their part numbers.
Shows the vial sample stations, listing components like the stir motor assembly and vial cups.
Details the interface, transfer line, and purge gas solenoid components of the Archon system.
Provides a detailed diagram of the rear panel components, including valves, motors, and belts.
Illustrates the robotic arm assembly, listing its motors, pulleys, and sensor boards.
Presents a diagram showing the interconnections between various components of the Archon system.
| Brand | Varian |
|---|---|
| Model | archon |
| Category | Laboratory Equipment |
| Language | English |