35
36
◆In case closing the power switch, no-load voltage may be exported.Do not touch
the output electrode with any part of your body.
◆Before operation,no concerned people should be left,Do not watch the arc in
unprotected eyes.
◆Ensure good ventilation of the machine to improve duty ratio.
◆Turn off the engine when the operation finished to economize energy source.
◆When power switch shuts off protectively because of failure.Don’t restart it until
until problem is resolved.
Otherwise,the range of problem will be extended.
4.1 MMA basic welding technique
Arc Welding Practice
The techniques used for arc welding are almost identical regardless of what types of
metals are being joined. Naturally enough, different types of electrodes would be used
for different metals as described in the preceding section.
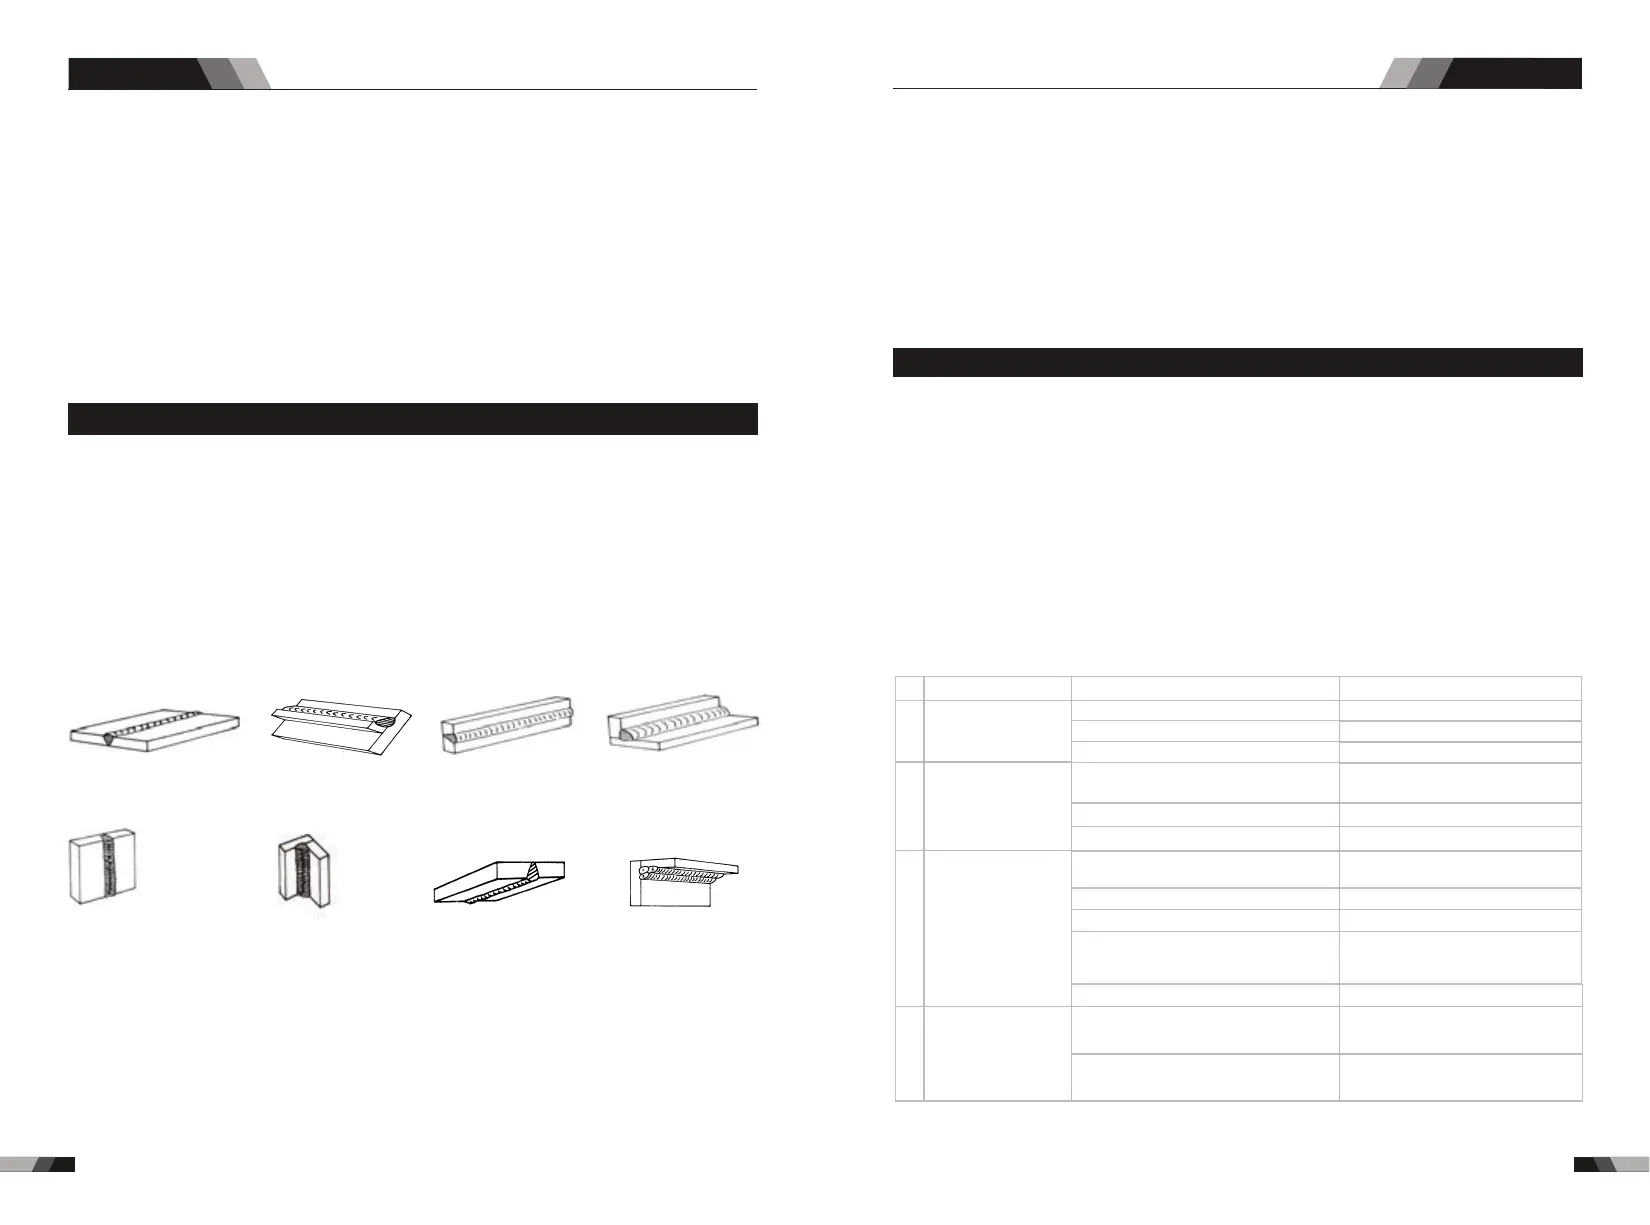
Welding Position
The electrodes dealt with in this publication can be used in most positions, i.e. they
are suitable for welding in flat, horizontal, vertical and overhead positions. Numerous
applications call for welds to be made in positions intermediate between these. Some
of the common types of welds are shown
Flat Position,
Down Hand Butt Weld
Flat Position,
Gravity Fillet Weld
Horizontal Position,
Butt Weld
Horizontal-Vertical
(HV) Position
Vertical Position,
Butt Weld
Vertical Position,
Fillet Weld
Vertical Position,
Fillet Weld
Overhead Position,
Fillet Weld
Joint Preparations
In many cases, it will be possible to weld steel sections without any special preparation.
For heavier sections and for repair work on castings, etc., it will be necessary to cut or grind
an angle between the pieces being joined to ensure proper penetration of the weld metal
and to produce sound joints.
In general, surfaces being welded should be clean and free of rust, scale, dirt, grease, etc.
Slag should be removed from oxy-cut surfaces.
5.1 Troubleshooting
Arc welding technique - A word to beginners
For those who have not yet done any welding, the simplest way to commence is to run beads
on a piece of scrap plate. Use mild steel plate about 6.4mm (1/4") thick and a 3.2mm (1/8")
electrode. Clean any paint, loose scale or grease off the plate and set it firmly on the work
bench so that welding can be carried out in the downhand position. Make sure that the work
clamp is making good electrical contact with the work, either directly or through the work
table. For light gauge material, always clamp the work lead directly to the job, otherwise
a poor circuit will probably result.
Welding technique
Troubleshooting
◆Before arc welding machines are dispatched from the factory, they have already been
debugged accurately. So forbid anyone who is not authorized by us to do any change to
the equipment!
◆Maintenance course must be operated carefully. If any wire becomes flexible or is
misplaced, it maybe potential danger to user!
◆Only professional maintenance personal who is authorized by us could overhaul the
machine!
◆Guarantee to shut off the arc welding machine’s power before turn on the outline of
the equipment!
◆If there is any problem and has no the authorized professional maintenance personal,
please contact local agent or the branch company!
If there are some simple troubles of welding machine, you can consult the following
overhauling chart:
Nr.
1
2
3
4
Troubles
Solution
Fan is broken
The power board is broken
The power cable is broken
There is something in the fan
The start capacitor of fan damaged
Turn on the power
source, power
indicator is lit, fan
is not working.
Turn on the
power source,
fan is working,
power indicator
is not lit
Turn on the power
source, fan is not
working ,power
indicator is not lit
Turn on the power
source, power
indicator is lit, fan
is working, there
is no welding
output.
Reasons
Change fan
Clean it
Change capacitor
The power light damaged or
connection is not good
The power cable connected not
good
Display panel is broken
The light of the power indicator is
broken and the problems
mentioned in Nr. 2
Change the light of the power
indicator or refer to the solution
in Nr. 2
Change it
Change it
Change it
Change it
Replace it
Change it
Repair or change it
Change the power light
Connect correctly
Power on switch is damaged
The power board is broken
Control board is broken
st
1 inverter circuit damaged
ARC SERIES EQUIPMENTARC SERIES EQUIPMENT