4)
Push the nozzle seal (g. 19, 6) over the needle (7); the groove (slot) should point
towards you.
5)
Place the nozzle (g. 19, 5) on to the gun body with the recess facing downwards.
Attention: Position of needle must be congruent with the nozzle aperture. (Fig.20)
6) Put the air screen (g. 21, 4) in the air cap (3). Put both on the nozzle (5) and secure
with the union nut (2).
7) Adjust the setting ring (g. 22, 1) so that the two "horns" grip the air cap and the red
adjustment lever rests on the pin.
8) Place the container seal from below on the suction tube and slide it over the collar,
while turning the container seal slightly.
9) Insert the suction tube with container seal in the gun body.
20. Maintenance
Replace the air lters depending on soiling. Unplug the power plug. Open the cover of
the air lter compartment (Fig. 23, A). Replace both air lters (Fig. 23, B). Close the cover
of the air lter compartment.
WARNING! Never operate the machine without the air lter; dirt could be sucked in
and interfere with the function of the machine.
In order to mount the gun more easily apply lubricating grease (enclosed) liberally
to the O-ring at the spray attachment (Fig. 16, A).
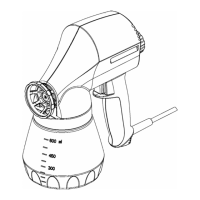
21. Spare Parts
Spare Parts List Standard spray attachment (Fig. 24)
Pos. Designation Order No.
Standard spray attachment complete with 800 ml container 2361 730
1 Union nut 2362 873
2 Air cap 2362 877
3 Nozzle 2362 878
4 Nozzle seal 0417 706
5 O-ring of spray attachment 2362 875
6 Ventilating hose, valve cover, diaphragm 2304 027
7 Suction tube 2362 876
8 Container seal 2323 039
9 Container with cover 800 ml 0413 909
 Loading...