r
/=,EET Quick Start Guide
7.2 Compass Calibration
L
,
Attention:
(1)
When come to a new flying ground or change the flying ground far away from
original place, please calibrate compass first.(the motor must be locked and
right red LED go out )
(2)
When binding, please choose the open field that is away from the strong
electromagnetic.
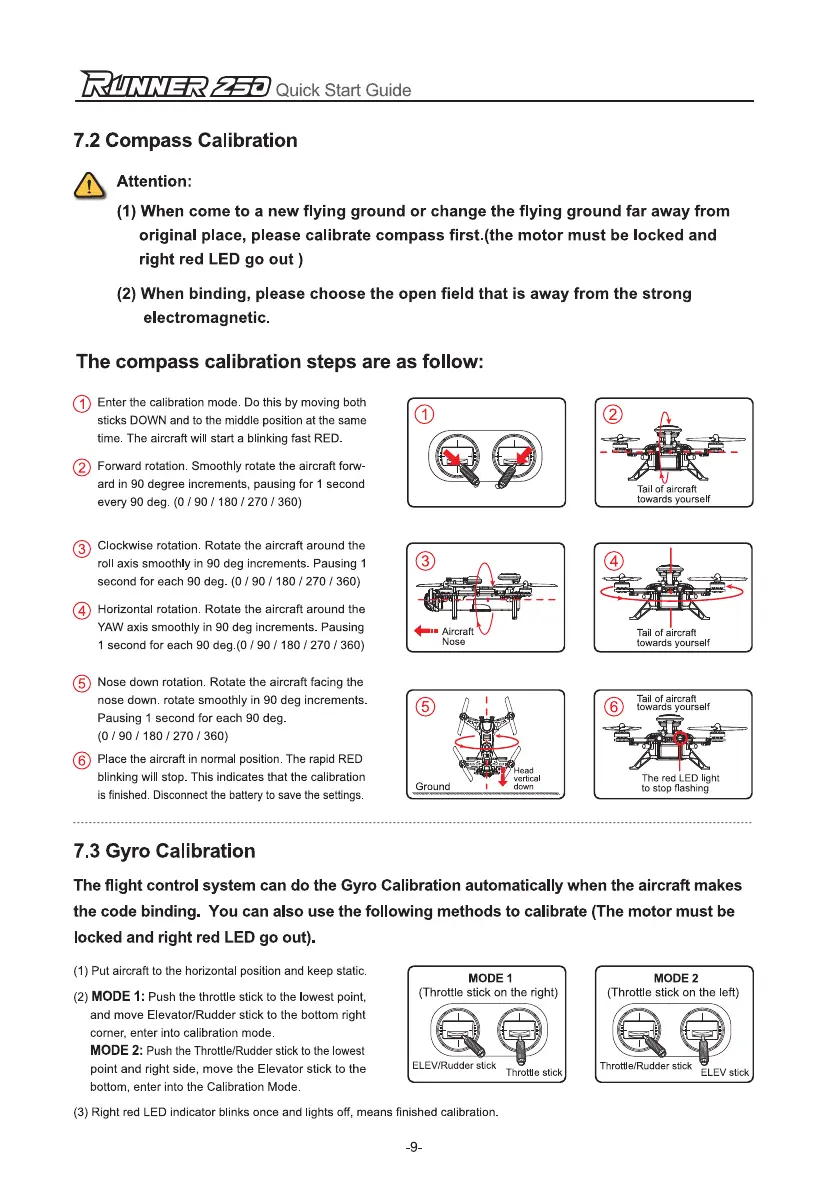
The compass calibration steps are as follow:
Enter the calibration mode. Do this by moving both
sticks DOWN and to the middle position at the same
time. The aircraft will start a blinking fast RED.
0
Forward rotation. Smoothly rotate the aircraft forw-
ard in 90 degree increments, pausing for 1 second
every 90 deg. (0 / 90 / 180 / 270 / 360)
0
Clockwise rotation. Rotate the aircraft around the
roll axis smoothly in 90 deg increments. Pausing 1
second for each 90 deg. (0 / 90 / 180 / 270 / 360)
0
Horizontal rotation. Rotate the aircraft around the
YAW axis smoothly in 90 deg increments. Pausing
1 second for each 90 deg.(0 / 90 / 180 / 270 / 360)
Nose down rotation. Rotate the aircraft facing the
nose down. rotate smoothly in 90 deg increments.
Pausing 1 second for each 90 deg.
(0/ 90/180 /270 /360)
Place the aircraft in normal position. The rapid RED
blinking will stop. This indicates that the calibration
is finished. Disconnect the battery to save the settings.
7.3 Gyro Calibration
The flight control system can do the Gyro Calibration automatically when the aircraft makes
the code binding. You can also use the following methods to calibrate (The motor must be
locked and right red LED go out).
(1)
Put aircraft to the horizontal position and keep static.
(2)
MODE 1:
Push the throttle stick to the lowest point,
and move Elevator/Rudder stick to the bottom right
corner, enter into calibration mode.
MODE 2:
Push the Throttle/Rudder stick to the lowest
point and right side, move the Elevator stick to the
bottom, enter into the Calibration Mode.
(3)
Right red LED indicator blinks once and lights off, means finished calibration.
-9-