Do you have a question about the Workzone GT-UDM-02 and is the answer not in the manual?
Follow basic safety measures for battery-operated devices to prevent fire and damage.
Keep work area orderly to prevent accidents and risks.
Use the device in a well-lit area and avoid damp or wet environments, fire or explosion risks.
Device is not for persons with impaired capabilities; children must be supervised and packaging kept away.
Ensure secure footing for balance in every working position for safe operation.
Concentrate on work, proceed sensibly, do not use if tired, avoid looking into laser beam.
Never look directly into the laser beam or shine it into others' eyes.
Avoid positioning device at eye level or near reflective surfaces to prevent laser projection into eyes.
Do not remove labels from the device as they contain important safety information.
Use the device only as described in these operating instructions for safety.
Using unauthorized accessories can lead to accidents; use only recommended items.
Inspect the device for damage before use; do not use if defective.
Store unused devices and batteries in a dry, child-inaccessible place.
Repairs must be performed by authorized specialists using original parts.
Not using the device according to instructions may void the warranty.
Laser beams are hazardous; avoid direct exposure and do not look into the beam.
Never use optical instruments like binoculars to view the laser beam.
Laser complies with Class 2 safety standards as per EN 60825-1:2007.
Do not replace the laser diode yourself; have repairs done by authorized workshops.
The laser function is intended solely for aiming purposes.
Position the device to prevent the laser beam from crossing people at head level.
Keep children away from the laser beam and the device during operation.
Batteries must be disposed of properly at designated collection sites, not in household waste.
Never attempt to recharge batteries due to explosion risk.
Keep batteries from children, fire, short circuits, and dismantling to prevent hazards.
Seek immediate medical attention if a battery is swallowed.
Ensure correct polarity when inserting batteries to prevent damage.
Clean battery and device contacts before insertion for optimal performance.
Remove depleted batteries promptly to prevent leakage and damage.
Avoid exposing batteries to extreme conditions like heat to prevent leakage.
Component responsible for emitting and receiving ultrasound signals.
Laser beam emitter used for aiming during measurements.
Display screen showing measurement results and memory data.
Sets the distance measurement reference point (baseline).
Switches between metric and imperial units, and displays temperature.
Changes measurement mode, saves measurements, or clears data.
Adds measured values or enters addition/memory mode.
Initiates measurement and displays dynamic values during process.
Built-in level to ensure accurate 90° alignment with the surface.
Distance calculation reference can be set to device base or top.
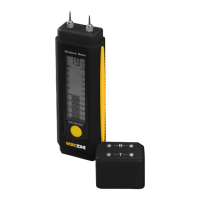
Guide to opening the compartment and connecting the 9V battery.
Explanation of symbols and data shown on the LCD display.
Tips to prevent inaccuracies and ensure reliable measurement results.
The device cannot take measurements through glass surfaces.
Sound-absorbent materials like curtains cannot be measured accurately.
Surface quality of the target object can affect measurement accuracy.
Align the device at a 90° angle to the target surface using the spirit level.
Strong wind conditions can negatively impact measurement precision.
Obstacles between the device and the object can reduce measurement accuracy.
An 'Err' message indicates the measured result is outside the device's capabilities.
The '+' symbol is ignored when adding different parameter types.
Switch off nearby ultrasound or high-frequency devices to avoid interference.
Temperature and humidity affect precision; ensure device temperature matches environment.
Measurement errors may occur when taking readings in corridors or hallways.
The laser pointer activates only when the READ button is pressed during measurement.
Align the device vertically and ensure the spirit level is centered for accurate readings.
Press the BASE button to prepare the device for operation.
Press READ to measure distance; hold and move device for dynamic values.
Use FT/M to switch between metric and imperial units.
Press and hold a button for three seconds to manually switch off the device.
Measure objects with hard, unobstructed surfaces for best results.
Choose large, smooth, and hard surfaces for optimal measurement precision.
Use chipboard on small or irregular surfaces for more reliable measurements.
The device is unable to perform measurements through glass.
Maintain a distance of over 60 cm from the object for accurate measurements.
Ensure device temperature matches ambient temperature for precise results.
Press READ to display the first measurement value.
Press +/- to enter addition mode; '+' symbol appears, result in bottom section.
Measure, then hold MODE for 2 sec. to save; 'M+' appears on display.
Press READ to start a new measurement for addition.
Press +/- to enter addition mode; '+' symbol will appear.
Add memory content to last measurement by holding +/- for 2 sec.; 'M' disappears.
Press MODE to enter area mode; symbol appears for area calculation.
Press READ to measure length; 'L' flashes, result shown in upper display.
Press READ to measure width; 'W' flashes, result shown in upper display.
The calculated area is automatically shown in the lower section of the display.
Pressing READ cycles through length and width display in the upper section.
Press MODE to delete current display data for a new area calculation.
Single press of MODE cycles through length, area, volume; it clears data without changing mode.
Hold MODE to save the first calculated area; 'M+' appears with a beep.
Press MODE to clear data for the second measurement and calculation.
Press +/- after second calculation to enter addition mode; '+' appears.
Press +/- to display the sum of both areas in the bottom section.
Repeat steps to add more measured areas to the total.
Press MODE to enter volume mode for space volume calculation.
Press READ to measure length; 'L' flashes, result in upper display.
Press READ to measure width; 'W' flashes, result in upper display.
Press READ to measure height; 'H' flashes, result in upper display.
Repeated READ presses cycle between length, width, and height display.
Press MODE to delete data for a new volume calculation.
Single press of MODE cycles through length, area, volume; it clears data without changing mode.
Press MODE to store the first calculated volume; 'M+' appears.
Press MODE to clear data for the second measurement and calculation.
Press +/- after second volume calculation; '+' appears with a beep.
Press +/- to display the sum of both volumes in the lower section.
Repeat steps to continue adding measured volumes.
Hold FT/M for 2 sec. to show temperature in °F (Anglo-Saxon) or °C (metric).
Press READ again to switch back to the measurement mode.
Clean the device with a dry or slightly damp cloth; it is maintenance-free.
Keep the device in a dry and frost-free location, out of reach for children.
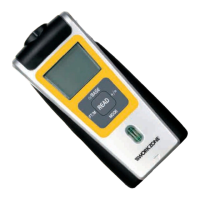
This document describes the WORKZONE Ultrasonic Distance Measurer, model GT-UDM-02, a multi-measurement device designed for various applications, particularly in the construction and furnishing industries. It utilizes ultrasonic technology to determine distances and offers several advanced features for efficient and precise measurements.
The primary function of the device is to measure distances electronically using high-speed ultrasonic signals. The measurement results are displayed on a double-row LCD screen, with the top row showing the current measurement and the bottom row indicating memory or calculation results. Beyond simple distance measurement, the device is equipped with a computer chip and memory function that enable automatic area and volume calculations, making it a versatile tool for professionals like property brokers, furniture designers, and craftsmen.
A key feature is its laser orientation function, which emits a red laser beam to assist users in accurately aiming at the target object during measurements. This ensures that the device is correctly aligned, which is crucial for obtaining precise results. The device also incorporates an automatic temperature comparison function. This not only contributes to more precise measurement results by compensating for temperature variations but also displays the exact environmental temperature, adding another layer of utility.
The device offers flexible measurement reference points. Users can choose to calculate the distance from either the baseline or the top of the device by pressing the /BASE key, allowing for adaptability based on the measurement scenario.
For continuous or complex measurements, the device supports addition functions. Users can add measured lengths, areas, or volumes by pressing the +/- button. This feature is available both without and with memory storage. When using memory storage, the final result can be saved by holding the MODE button for approximately 2 seconds, indicated by a double beeping tone and an "M+" symbol on the display. This allows for the accumulation of multiple measurements.
The READ button serves multiple purposes. A light press initiates a measurement, displaying the value in the upper section of the screen. Keeping the READ button pressed down allows for dynamic values to be read as the device is moved during the measurement process. In area and volume modes, the READ button is used to obtain sequential measurements (e.g., length, width, height) required for calculations.
The MODE button is central to navigating the device's functions. A brief press allows users to delete the current measurement, return to the menu, or switch between length, area, and volume modes. Holding the MODE button down for approximately 2 seconds saves the current length, area, or volume measurement to memory. This button also facilitates switching between different measurement modes (length, area, volume) and clearing current data if already present on the display, while keeping the mode unchanged.
The FT/M button allows users to switch between metric (meters) and imperial (feet) units for distance measurements with a light press. Holding this button down for approximately 2 seconds displays the environmental temperature, which can be shown in either Celsius or Fahrenheit, depending on the selected metric system.
An automatic switch-off feature conserves battery life, as the device will turn itself off after 60 seconds of non-use. This is a practical design choice for a portable measurement tool.
To ensure accurate measurements, several operational guidelines are provided. The device should be aligned at a 90-degree angle to the target surface, and a spirit level is integrated to aid in this alignment. Measurements through glass or sound-absorbent materials like curtains are not possible, and surface quality of the object can affect precision. Strong winds can also introduce errors. Objects between the device and the target can interfere with measurement accuracy. For optimal results, the device should be at least 60 cm away from the measured object, and the measured object should have a hard, smooth, and large surface. If the surface is too small, irregular, or soft, using chipboard on the surface can improve accuracy. The device's temperature should correspond to the environmental temperature for more precise results.
The device's laser is a Class II laser, and users are advised not to stare into the beam or use optical instruments to view it. The laser should only be used for aiming, and care should be taken not to shine it directly into anyone's eyes or set up the device at eye level or near reflective surfaces where the beam could be reflected into eyes. Children should be kept away from the laser.
The ultrasonic distance measurement device is designed to be maintenance-free. Cleaning the device is straightforward, requiring only a dry or slightly damp cloth. No specific cleaning agents or complex procedures are necessary.
For storage, the device should be kept in a dry and frost-free location, out of reach of children. This helps protect the internal components and ensures the device remains in good working condition over time.
Battery instructions emphasize responsible handling and disposal. Batteries are not to be disposed of with household waste but at designated collection sites. Recharging non-rechargeable batteries is strictly prohibited due to the risk of explosion. Batteries should be kept away from children, fire, and should not be short-circuited or dismantled. If a battery is swallowed, immediate medical attention is required. Correct polarity must be observed when inserting batteries, and battery and device contacts should be cleaned if necessary. Depleted batteries must be removed promptly to prevent leakage and potential damage to the device. Batteries should not be exposed to extreme conditions, such as radiators, as this increases the risk of leakage. Non-compliance with these instructions can lead to battery discharge beyond its end voltage and leakage, causing damage. In case of battery acid contact with skin, eyes, or mucous membranes, rinse the affected areas with plenty of clear water and seek immediate medical attention. Dead batteries should be removed and disposed of responsibly, and replaced with a suitable new 9V battery.
Repairs should only be carried out by authorized specialists using original replacement parts, as the device complies with specific safety guidelines. Not using the device according to the operating instructions could void the warranty. The labels on the device, including safety warnings, should not be removed.
| Type | Laser Distance Meter |
|---|---|
| Laser Class | Class 2 |
| Laser Wavelength | 635 nm |
| Auto Power Off | Yes |
| Waterproof | No |
| Operating Temperature | 0°C - 40°C |
| Accuracy | ± 2.0 mm |
| Units | m, in, ft |
| Battery Type | 2 x AAA |
| Storage Temperature | -10°C - 60°C |