ZERO ZONE, INC. • 800-247-4496 • ZERO-ZONE.COM
© 2018 Zero Zone, Inc. All Rights Reserved. • AUG 2018
66-0052-B
Standard Shroud Assembly for Crystal Merchandiser
®
or Reveal Merchandiser
®
For proper shroud installation on Crystal Merchandiser
®
or Reveal Merchandiser
®
, start with the side shrouds. This will help
determine the correct position of the front shroud.
SIDE SHROUD ASSEMBLY
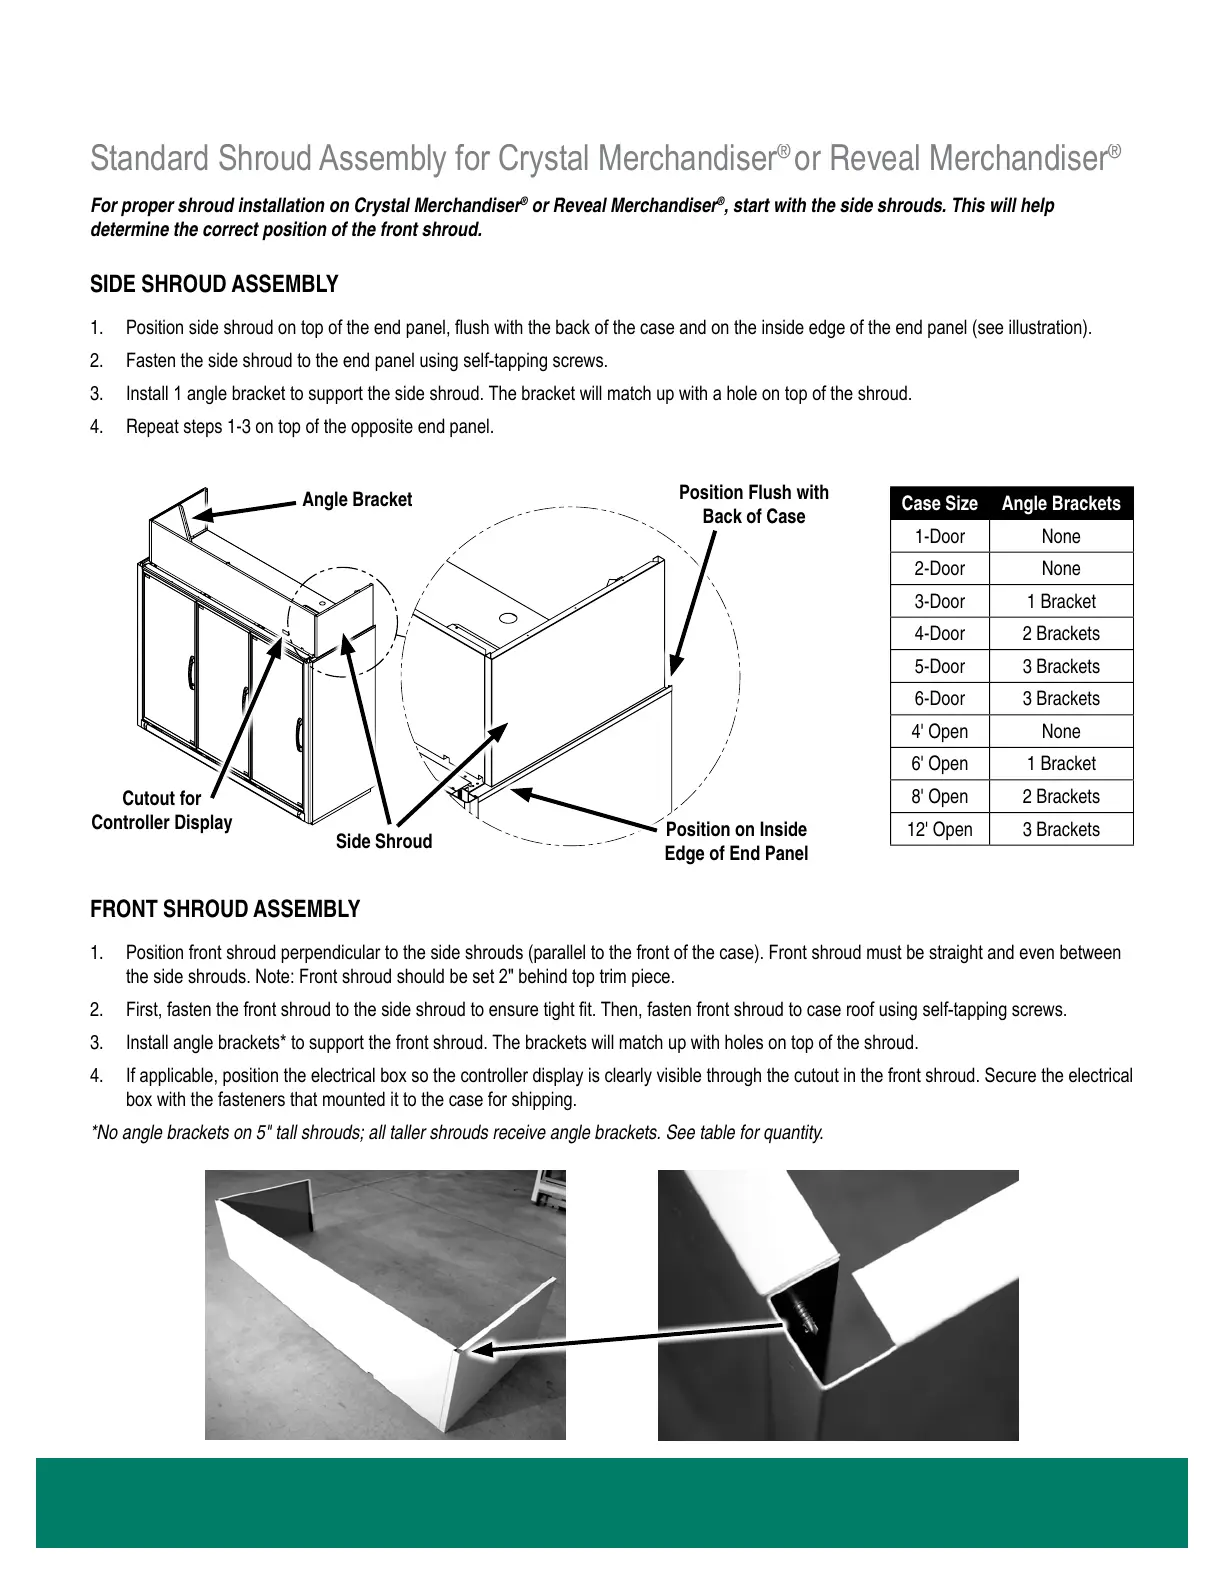
1. Position side shroud on top of the end panel, ush with the back of the case and on the inside edge of the end panel (see illustration).
2. Fasten the side shroud to the end panel using self-tapping screws.
3. Install 1 angle bracket to support the side shroud. The bracket will match up with a hole on top of the shroud.
4. Repeat steps 1-3 on top of the opposite end panel.
SHROUD INSTALLATION INSTRUCTIONS
FRONT SHROUD ASSEMBLY
1. Position front shroud perpendicular to the side shrouds (parallel to the front of the case). Front shroud must be straight and even between
the side shrouds. Note: Front shroud should be set 2" behind top trim piece.
2. First, fasten the front shroud to the side shroud to ensure tight t. Then, fasten front shroud to case roof using self-tapping screws.
3. Install angle brackets* to support the front shroud. The brackets will match up with holes on top of the shroud.
4. If applicable, position the electrical box so the controller display is clearly visible through the cutout in the front shroud. Secure the electrical
box with the fasteners that mounted it to the case for shipping.
* No angle brackets on 5" tall shrouds; all taller shrouds receive angle brackets. See table for quantity.
INSTRUCTIONS
RELEASED
CAD DRAWING
NO MANUAL REVISIONS
NOT TO SCALE
Curtis Johnson
SCALE:
MODELED BY:
DRAWN BY:
2/14/2018
B
3 OF 3
66-0052
SHROUD INSTALLATION
SHEET:
DATE:
REVISION
ZERO ZONE, INC.
110 NORTH OAKRIDGE DRIVE
NORTH PRAIRIE, WISCONSIN
USA 53153
DRAWING No:
DESCRIPTION:
BY
DATE
ECN No.
REVISION DESCRIPTION
No.
CJ
8/1/2018
13052
ADDED SHEET 3 FOR CRYSTAL.
B
REVISION INFORMATION
ADDED SIDE SHROUDS TO ALL VIEWS.
B
REV.
66-0052
Curtis Johnson
MATERIAL:
(PER SP-0404)
FINISH:
(PER SP-0154)
NONE
NONE
SIGNIFICANT DIMENSIONS DENOTED BY
X.XX
OR
X.XXX
AND MUST MEET Cpk ≥ 1.33.
CRITICAL DIMENSIONS DENOTED BY
X.XX
OR
X.XXX
AND MUST MEET Cpk ≥ 1.66.
SHEET SIZE
A
TOLERANCES SHALL APPLY
UNLESS OTHERWISE SPECIFIED
.X = ± .1 .XX = ± .02
.XXX = ± .005 ANGLES, ± 1º
ZERO ZONE WORKMANSHIP STANDARDS SHALL APPLY PER
ES-08-1007
ASME Y14.41-2012 & ASME Y14.5-2009 SHALL APPLY AS REQUIRED
ALL DIMENSIONS IN INCH UNLESS OTHERWISE SPECIFIED
COPYRIGHT INFORMATION
THIS DRAWING AND THE INFORMATION CONTAINED WITHIN,
IS THE SOLE PROPERTY OF ZERO ZONE, INC. ANY USE OF
THIS DOCUMENT OR DISCLOSURE OF ITS CONTENTS; BY
REPRODUCTION OR OTHER MEANS, WITHOUT THE WRITTEN
CONSENT OF ZERO ZONE, INC. IS STRICTLY PROHIBITED.
 Loading...