TB82PH ATEX Product Instruction Manual ABB
8 TB82PH-ATEX-EN-A
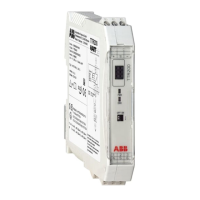
ELECTRICAL CONNECTIONS - Power Wiring
The TB82PH Transmitter is powered by DC voltage. See
the appropriate power requirements in the Specification
Section for the particular type of TB82 Transmitter in use
(Analog, HART, PROFIBUS or Foundation Fieldbus (FF)).
Power is connected to the POWER/OUTPUT area on
TB1, terminals 1 and 2 (see Figure 7).
The terminal blocks located in the rear of the transmitter
accept wire sizes from 12 to 24 AWG. Pin-style
terminations should be used for all connections. The
terminal block label identifies all electrical connections and
should be followed when wiring the transmitter.
Normal grounding practice is to terminate all grounds at
the control room side, in which case the field side of the
screen should be adequately protected to avoid contact
with metallic objects. The transmitter case should be
grounded. Ground connections are provided internally (in
the terminal compartment) and externally.
For IS systems the grounding should be at the safety
barrier earth connection. For bus-powered systems the
grounding of the screen should be close to the power
supply unit. The specific noise immunity and emitted
interference are only guaranteed when bus screening is
fully effective (e.g., ensuring that screening is maintained
through any existing junction boxes.) Appropriate equi-
potential bonding must be provided to avoid differences in
potential among the individual plant components.
To ensure fault-free communication on fieldbus (FF or PA)
installations, the bus must be properly terminated at both
ends. Only approved bus terminators must be used for
intrinsically safe circuits.
REAR COVER
REMOVED
EXTERNAL
GROUND SCREW
T01088E
PANEL GASKET
PA NE L
9.5
0.38
MAXIMUM PANEL
THICKN
ESS
EPTHNEL D
PA NE L
CUTOUT
MINIMUM PA = 144.8 MM (5.70 IN.)
11.9
0.4
7
135.4
+1.3
–
0.8
5.33
+0.05
–
0.03
135.4
+1.3
–
0.8
5.33
+0.05
–0.03
11.9
0.47
LOCK A
SHER (4)
REAR VIE
W
PANEL MOUNTING
BRACKET (4)
3/8-IN.
W
3/8-16 x 1/2-IN.
HEX SCREW (4)
PANEL MOUNTING
SCREWS (4
)
Figure 6 – Panel Mounting Detail
Warning.
Use this equipment only in those classes of
hazardous locations listed on the nameplate.
Uses in other hazardous locations can lead to
unsafe conditions that can injure personnel and
dama
e e
ui
ment.
Figure 7 - Power Connections
SENSOR CONNECTIONS
TB2
POWER/OUTPUT
CONNECTIONS
POWER
TEST
BLUE
YELLOW
BLACK
GREEN
RED
WHITE
HVY GRN
SENSE
GUARD
REF
SOL GND
RTD
RTD
SHIELD
1
2
3
4
5
6
7
8
+1
- 2
+3
- 4
SIGNAL
METER
TERMINALS