Do you have a question about the Agilent Technologies U1604B and is the answer not in the manual?
Identifies the manual's part number.
Specifies the manual's edition and publication date.
Details warranty terms and disclaimers for manual content.
Information regarding hardware and software licensing terms.
U.S. Government rights legend for software and technical data.
Explains the meaning of CAUTION and WARNING notices used.
Guidelines for returning the instrument for warranty service or repair.
Outlines the buyer's sole and exclusive remedies for product issues.
Definitions and explanations of WARNING and CAUTION notices.
Essential safety precautions for instrument operation, service, and repair.
Steps to verify all items are present in the shipping container.
Instructions for fully charging the instrument's internal battery before first use.
Procedure for turning the instrument on and off using the power switch.
Method to restore the instrument to its original factory configuration settings.
Steps to perform self-calibration for optimal instrument performance.
Instructions for setting the instrument's internal date and time display.
Procedure to configure the auto power off function to conserve battery life.
How to change the language for the instrument's built-in help system.
Steps to adjust the LCD display contrast for improved readability.
Guide on how to compensate oscilloscope probes for accurate measurements.
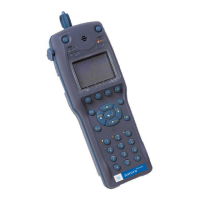
Description of the instrument's front panel keys and controls.
Explanation of the various elements displayed on the oscilloscope screen.
Explanation of the elements displayed on the multimeter screen.
Adjusting vertical settings for waveform display and analysis.
How to enable or disable specific channels for waveform display.
Procedures for configuring the vertical system settings.
Adjusting the vertical position of the waveform relative to the ground reference.
Resetting the waveform's vertical position to the center of the screen.
Adjusting the vertical scale factor (Volts/division) for waveform display.
Selecting input coupling modes (AC, DC, GND) for signal processing.
Using AC coupling to block DC offset and view AC components of a signal.
Using DC coupling to view both AC and DC components of a signal.
Using GND coupling to set the input to ground reference.
Setting the probe attenuation factor (1X, 10X, 100X) for correct voltage readings.
Inverting the displayed waveform vertically with respect to the ground level.
Adjusting horizontal scale, position, and trigger point of waveforms.
Adjusting the time base (time/division) for waveform viewing.
Setting the trigger point's position relative to the time reference.
Adjusting the position of the trigger point indicator on the display.
Explains different horizontal display modes for waveform analysis.
Describes YT (volts vs. time) and XY (volts vs. volts) display formats.
Using Main mode and Zoom function for detailed waveform analysis.
Setting trigger conditions to obtain stable and consistent waveform displays.
Selecting between Auto, Normal, and Single trigger modes for signal acquisition.
Overview of available trigger types: Edge, Pulse, Pattern, and Video.
Triggering based on edge slope and voltage level of a signal.
Triggering on pulses with specific width, polarity, and conditions.
Triggering based on logical gate combinations of channel states (High/Low).
Triggering on standard video signal fields or lines (NTSC, PAL, SECAM).
Settings related to waveform acquisition modes and display.
Standard mode for displaying most waveforms without averaging.
Reduces random noise by averaging multiple acquisitions for improved resolution.
Captures maximum/minimum values to detect aliasing and glitches.
Options for customizing the display appearance and behavior.
Switching between Dots and Vectors display types for waveform visualization.
Adjusting the LCD contrast for optimal visibility.
Selecting grid display shapes (lines, crosshairs) for the waveform area.
Setting infinite persistence to observe slow waveform changes or infrequent events.
Overview of the instrument's automatic measurement capabilities.
Steps to activate and select automatic measurements for display.
Using cursors for precise voltage and time measurements on waveforms.
Measuring time differences and delta values using vertical cursors.
Measuring voltage differences and delta values using horizontal cursors.
Performing mathematical operations (Add, Subtract, FFT) on waveforms.
Adding and subtracting waveforms from different channels.
Analyzing waveforms in the frequency domain using FFT.
Saving and recalling instrument setups and waveforms.
Saving and recalling data from the instrument's internal memory.
Saving and recalling data using an external USB flash drive.
Controls for automatic display scaling and managing signal acquisition.
Automatically configures display settings for optimal signal viewing.
Starting and stopping signal acquisition.
Instrument configuration and settings menu.
Setting the auto power off timer to conserve battery.
Changing the language for the instrument's Quick Help feature.
Enabling or disabling USB flash memory connectivity.
Setting the instrument's internal date and time.
Performing internal self-calibration for optimal performance.
Calibrating the oscilloscope probe for accurate measurements.
Information regarding low battery warnings and automatic shutdown.
Enabling or disabling key sounds and low battery alerts.
Instructions for performing AC, DC, and AC+DC voltage measurements.
Performing resistance, continuity, diode, and capacitance measurements.
Steps to measure resistance values accurately.
Performing continuity checks with audible feedback.
Testing diode forward and reverse bias characteristics.
Measuring capacitance values of components.
Utilizing auxiliary meter functions with external adapters.
Measuring temperature in Celsius or Fahrenheit.
Measuring AC and DC current using a current adapter.
Measuring relative humidity using a humidity adapter.
Measuring pressure in psi or kPa using a pressure adapter.
Using the relative (Null) measurement function for differential readings.
Using Min/Max/Average measurement features in multimeter mode.
Clearing captured readings and retesting multimeter measurements.
Enabling or disabling manual range selection for multimeter measurements.
How to use the data logger to record and plot measurements over time.
Using Min/Max/Average measurements within the data logger function.
Saving logged data to USB in CSV format with configurable logging intervals.
Clearing previous readings and resetting the data logger.
Information on worldwide warranty coverage and how to contact service centers.
Procedures for cleaning the external surfaces of the instrument.
Guidance for diagnosing and resolving common instrument problems.
Recommended test equipment for verifying instrument performance.
Procedures for verifying oscilloscope measurement accuracy and functionality.
Verifying voltage measurement accuracy using cursors and a calibrator.
Testing the instrument's bandwidth response at specified frequencies.
Verifying the accuracy of horizontal time measurements (Δt).
Testing the instrument's ability to trigger reliably under varying signal conditions.
Procedures for verifying multimeter measurement accuracy.
Verifying DC voltage measurement accuracy against specified limits.
Verifying AC voltage measurement accuracy against specified limits.
Verifying resistance measurement accuracy against specified limits.
Verifying capacitance measurement accuracy against specified limits.
Verifying the accuracy of the diode test function.
Verifying the accuracy of the continuity test function.
Performing self-calibration for optimal instrument performance.
Explains error codes that may occur during the self-calibration process.
General instructions and safety precautions for dismantling the instrument.
Step-by-step procedure for removing the instrument's stand.
Instructions for removing the battery pack from the instrument.
Steps for safely replacing the battery pack with a new one.
Procedure for removing the instrument's handler assembly.
Steps for removing the instrument's front and rear casings.
Procedure for removing the instrument's keypad.
Steps for separating the instrument's internal system boards.
Procedure for removing the LCD display unit from the instrument.
Information on ordering replacement parts using part numbers.
Warranted performance specifications for the instrument's functions.
Detailed specifications for oscilloscope functions.
Detailed specifications for multimeter functions.
Detailed specifications for auxiliary meter functions.
Typical performance characteristics of the instrument's features.
Typical characteristics for oscilloscope functions.
Characteristics of the vertical system and scope channels.
Characteristics of the horizontal system.
Characteristics of the trigger system.
Characteristics of the measurement system.
General physical and operational characteristics of the instrument.
Operating and non-operating environmental requirements.
Rating of the instrument's tolerance to environmental pollution.
Defines measurement categories for electrical safety compliance.
| Bandwidth | 200 MHz |
|---|---|
| Sample Rate | 2 GSa/s |
| Channels | 2 |
| Memory Depth | 2 Mpts |
| Display Type | Color LCD |
| Weight | 1.5 kg |
| Vertical Resolution | 8 bits |
| Vertical Sensitivity | 2 mV/div to 100 V/div |
| Timebase Range | 5 ns/div to 50 s/div |
| Trigger Modes | Edge, Pulse Width, TV, Pattern |
| Connectivity | USB |
| Battery Life | Up to 4 hours |
| Dimensions | 256 mm x 169 mm x 64 mm |
| Display | 5.7 in TFT LCD |
| Type | Handheld |
| Category | Oscilloscope |
| Display Size | 5.7 in |
| Input Voltage Range | 300 Vrms |
| Input Impedance | 1 MΩ ±2% |
| Voltage Range | 300 Vrms |
| Power Supply | 100 to 240 VAC |