38
PVR and Time Shift Option
USB Device Setup
Before use the recording and time shift function, you
should insert a USB device and format it in the USB
host port at the connection panel of the TV.
Press / buttons to select Format.
IMPORTANT: The setup will format the USB device,
therefore all the data stored in the device will be lost.
We strongly recommend you back up your USB device
before you format your USB device.
Check PVR File System
Press / buttons to select Check PVR File System, then press OK button to start checking.
Once checking is completed, it should appear SUCCESS.
Free Record Limit Time
Press / buttons to select Free Record Limit. Press OK to enter submenu. Press /
buttons to select desired recording time limit.
Your TV features a Personal Video Recording function which lets you:
• Instantly record a digital TV programme (via the one-touch recording button on the
remote control).
• Time shift playback when watching digital TV programme.
• Set a timer to record future digital TV programmes (via the Time Recorder in SETUP
menu).
IMPORTANT
Before recording (including time shift recording), you must insert a FAT32 formatted
USB storage device into the USB port.
Instant one-touch recording and playback is only available in DTV mode.
Setup PVR Recording
When watching a digital programme. Press the REC button on the remote control to start
recording directly.
Press / buttons to select desired option in the tool bar and press OK button to conrm
selection. If below tool bar has disappeared, press button to display it again.
Press button on the remote control to call out a dialogue box. Select “YES” to save recorded
programme and stop recording.
32
PVR and Time Shift Operation
USB Device Setup
Before use the Recording and Time shift functions, you
should insert a USB device and format it in the USB Host
port at the connection panel of the TV set.
Press / navigation button to select Format.
IMPORTANT: The setup will format the USB device,
therefore all the data stored in the device will be lost. We
strongly recommend to save the content of your USB
device to your PC before starting configuration.
PVR File System
Highlight this item and press OK button to enter it.
Press / navigation button to select desired option, and press / button to adjust it.
Free Record Limit Time
Press / navigation button to select Free Record Limit. Press OK button to enter it. Press
/ button to adjust recording time limit.
Aspect Ratio
Press / navigation button to select Aspect Radio. Press Ok button to enter it. Press /
button to select available options: Auto, 4:3, 16:9, Zoom1, Zoom2. Press Ok button to conrm
selection.
Blue Screen
Press / navigation button to select Blue Screen, press / button to select ON or OFF.
The screen background will turn blue at very weak or no signal condition, if BLUE SCREEN is
ON.
First Time Installation
Press / button to select First Time Setup, then press Ok button to enter. This item is used
to select desired OSD language, country and do auto tuning when rst time installing.
Reset
Press / button to select Reset. Press OK button to enter it. Press / button to restore
factory default settings.
Software Update (USB)
Use / the button to select Software Update, then press OK button to update software
using USB.
NOTE: To avoid any malfunctions, we strongly recommend a professional or technician to
update the software.
Menu Operations in DTV Mode (Cont.)
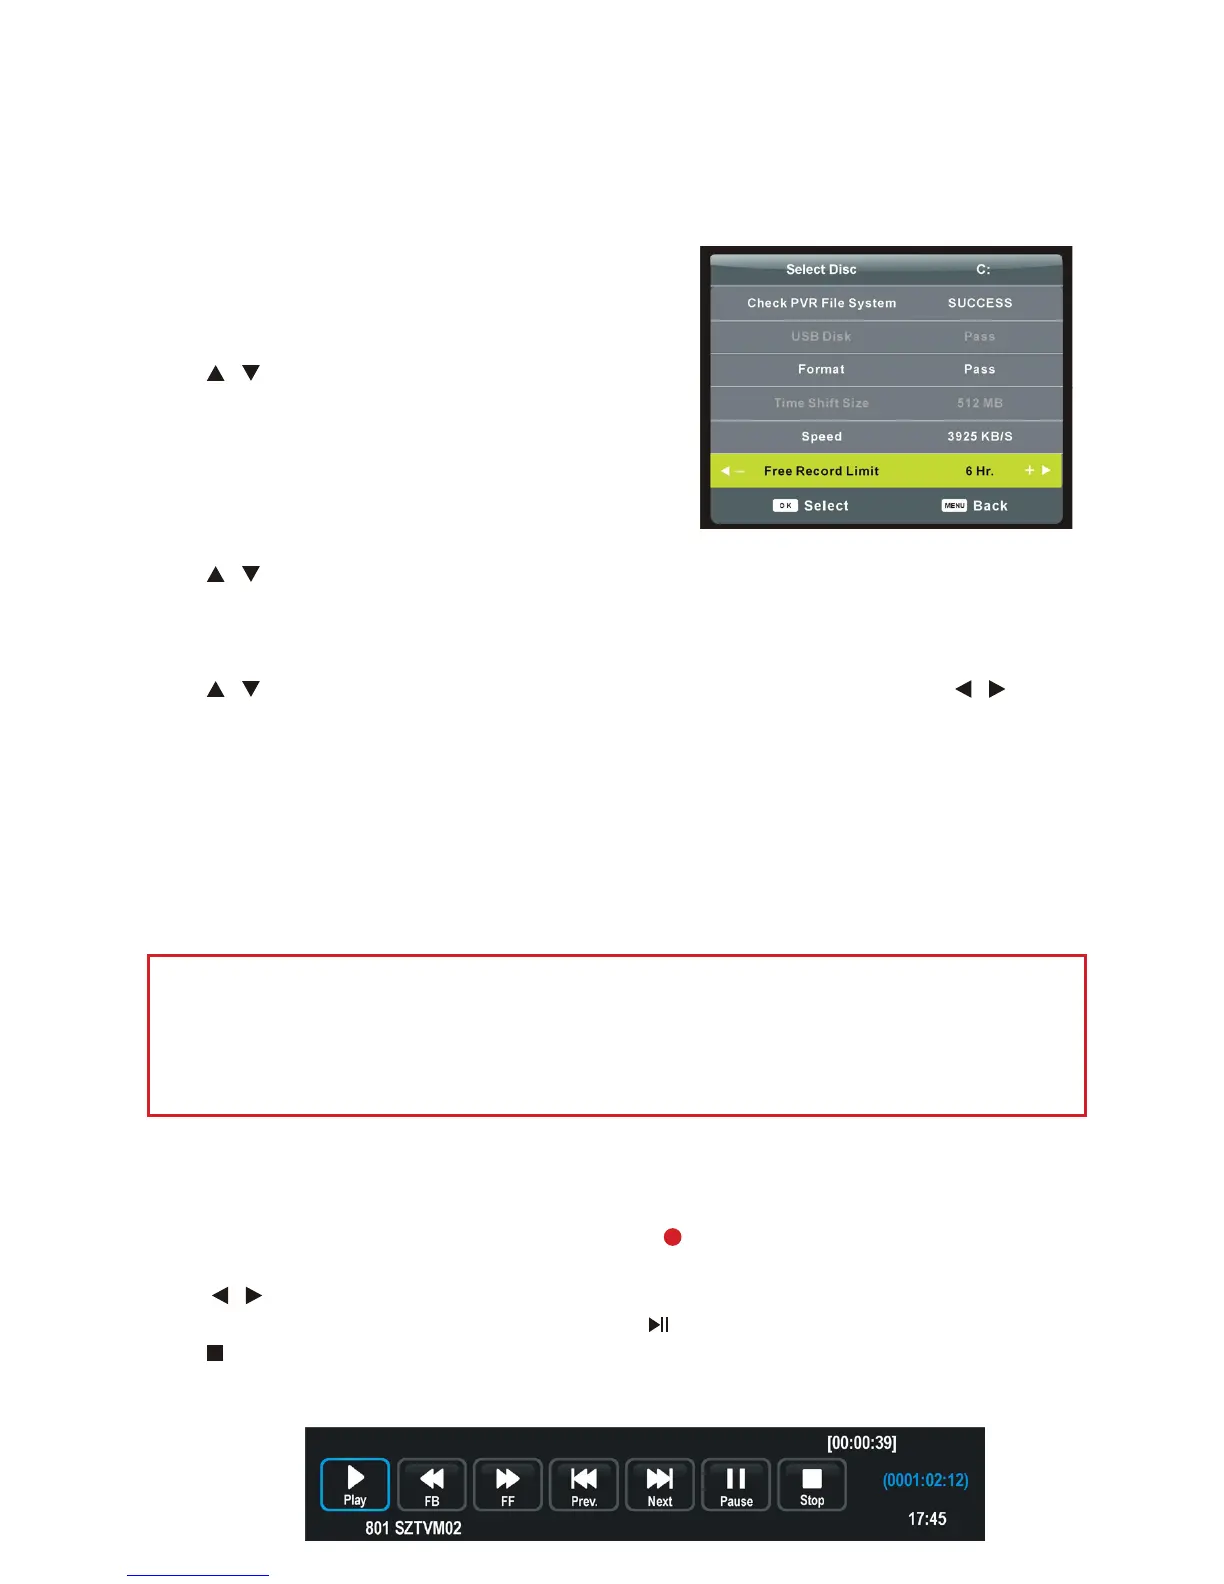
PVR File System
●
Insert your USB memory device into USB port before entering PVR file system.
●
Press ▲/▼ button to select this item and press OK button to enter it.
●
Press ▲/▼ button to select desired option and press ◄/► button to adjust it.
●
Press OK button to enter submenu or confirm setting.
●
In this part, you can select desired disk, check PVR File System, format your USB memory device
and set desired Free Record Limit time.
Aspect Ratio
Press ▲/▼ button to select this item and press OK button to enter it. Then use ▲/▼ button to
select desired option: Auto, 4:3, 16:9, ZOOM1, ZOOM2. Press OK button to confirm it.
Blue Screen
Press ▲/▼ button to select this item and press◄/► button to turn on/off it.
First Time Installation
Press ▲/▼ button to select this item and press OK button to call out First Time Installation menu.
Reset
Press ▲/▼ button to select this item and press OK button to enter it. Then use ◄ or ► button to
restore factory default settings or not.
Software Update (USB)
Press ▲/▼ button to select this item and press OK button to detect new software from your USB
device.
NOTE: To avoid any malfunctions, we strongly recommend a professional or technician to update
the software.
33
PVR and Time Shift Operation (Cont.)
Your TV features a Personal Video Recording function which lets you:
• Instantly record a digital TV program (via the one-touch recording button on
the remote control).
• Time shift playback of a digital TV program.
• Set a timer to record future digital TV programs (via the Timer Record in SETUP
menu).
IMPORTANT!
Before recording (including time shift recording), you must insert a FAT32
formatted USB storage device into the USB port.
Instant one-ouch recording and playback (DTV mode only).
Setup PVR Recording
When watching a digital program. Press
button on the remote control to start
recording directly.
Press
/ button to select desired option in the tool bar and press OK button to
conrm it. If below tool bar has disappeared, press
button to display it again.
Press
button on the remote control to call out a dialogue box. Select “Yes” to save
recorded program and stop recording.
Recording Program List
Press INDEX button on the remote control to call out the Recorded Program List.
Press
/ button to select a recorded le and press Ok button to start playback.
Recording (PVR Function)
Your television features a PVR recording function which lets you:
●
Instantly record a digital TV program (via the one-touch recording button on the remote
control).
●
Time-shift playback of a digital television program.
●
Set a timer to record future digital TV programs (via the “Add” function in Schedule List of
Channel menu, see Page 23 for details).
Instant one-touch recording and playback (DTV mode only)
When watching a digital program:
1. Press ● button on remote control to start recording directly.
2.
Press ◄/► button to select desired option in the tool bar and press OK button to confirm it. If
above tool bar has disappeared, press button to display it again.
3.
Press button on remote control to call out a dialogue box. Select “Yes” to save recorded
program and stop recording.
To watch recorded programs:
1. Press INDEX button on remote control to call out the Recorded List
2. Press ▲/▼ button to select a recorded file and press OK button to start playback.
Before recording (including time-shift recording), you must have
inserted a FAT32 formatted USB storage device into the USB port!
38
PVR and Time Shift Option
USB Device Setup
Before use the recording and time shift function, you
should insert a USB device and format it in the USB
host port at the connection panel of the TV.
Press / buttons to select Format.
IMPORTANT: The setup will format the USB device,
therefore all the data stored in the device will be lost.
We strongly recommend you back up your USB device
before you format your USB device.
Check PVR File System
Press / buttons to select Check PVR File System, then press OK button to start checking.
Once checking is completed, it should appear SUCCESS.
Free Record Limit Time
Press / buttons to select Free Record Limit. Press OK to enter submenu. Press /
buttons to select desired recording time limit.
Your TV features a Personal Video Recording function which lets you:
• Instantly record a digital TV programme (via the one-touch recording button on the
remote control).
• Time shift playback when watching digital TV programme.
• Set a timer to record future digital TV programmes (via the Time Recorder in SETUP
menu).
IMPORTANT
Before recording (including time shift recording), you must insert a FAT32 formatted
USB storage device into the USB port.
Instant one-touch recording and playback is only available in DTV mode.
Setup PVR Recording
When watching a digital programme. Press the REC button on the remote control to start
recording directly.
Press / buttons to select desired option in the tool bar and press OK button to conrm
selection. If below tool bar has disappeared, press button to display it again.
Press button on the remote control to call out a dialogue box. Select “YES” to save recorded
programme and stop recording.
32
PVR and Time Shift Operation
USB Device Setup
Before use the Recording and Time shift functions, you
should insert a USB device and format it in the USB Host
port at the connection panel of the TV set.
Press / navigation button to select Format.
IMPORTANT: The setup will format the USB device,
therefore all the data stored in the device will be lost. We
strongly recommend to save the content of your USB
device to your PC before starting configuration.
PVR File System
Highlight this item and press OK button to enter it.
Press / navigation button to select desired option, and press / button to adjust it.
Free Record Limit Time
Press / navigation button to select Free Record Limit. Press OK button to enter it. Press
/ button to adjust recording time limit.
Aspect Ratio
Press / navigation button to select Aspect Radio. Press Ok button to enter it. Press /
button to select available options: Auto, 4:3, 16:9, Zoom1, Zoom2. Press Ok button to conrm
selection.
Blue Screen
Press / navigation button to select Blue Screen, press / button to select ON or OFF.
The screen background will turn blue at very weak or no signal condition, if BLUE SCREEN is
ON.
First Time Installation
Press / button to select First Time Setup, then press Ok button to enter. This item is used
to select desired OSD language, country and do auto tuning when rst time installing.
Reset
Press / button to select Reset. Press OK button to enter it. Press / button to restore
factory default settings.
Software Update (USB)
Use / the button to select Software Update, then press OK button to update software
using USB.
NOTE: To avoid any malfunctions, we strongly recommend a professional or technician to
update the software.
Menu Operations in DTV Mode (Cont.)
PVR File System
●
Insert your USB memory device into USB port before entering PVR file system.
●
Press ▲/▼ button to select this item and press OK button to enter it.
●
Press ▲/▼ button to select desired option and press ◄/► button to adjust it.
●
Press OK button to enter submenu or confirm setting.
●
In this part, you can select desired disk, check PVR File System, format your USB memory device
and set desired Free Record Limit time.
Aspect Ratio
Press ▲/▼ button to select this item and press OK button to enter it. Then use ▲/▼ button to
select desired option: Auto, 4:3, 16:9, ZOOM1, ZOOM2. Press OK button to confirm it.
Blue Screen
Press ▲/▼ button to select this item and press◄/► button to turn on/off it.
First Time Installation
Press ▲/▼ button to select this item and press OK button to call out First Time Installation menu.
Reset
Press ▲/▼ button to select this item and press OK button to enter it. Then use ◄ or ► button to
restore factory default settings or not.
Software Update (USB)
Press ▲/▼ button to select this item and press OK button to detect new software from your USB
device.
NOTE: To avoid any malfunctions, we strongly recommend a professional or technician to update
the software.
33
PVR and Time Shift Operation (Cont.)
Your TV features a Personal Video Recording function which lets you:
• Instantly record a digital TV program (via the one-touch recording button on
the remote control).
• Time shift playback of a digital TV program.
• Set a timer to record future digital TV programs (via the Timer Record in SETUP
menu).
IMPORTANT!
Before recording (including time shift recording), you must insert a FAT32
formatted USB storage device into the USB port.
Instant one-ouch recording and playback (DTV mode only).
Setup PVR Recording
When watching a digital program. Press
button on the remote control to start
recording directly.
Press
/ button to select desired option in the tool bar and press OK button to
conrm it. If below tool bar has disappeared, press
button to display it again.
Press
button on the remote control to call out a dialogue box. Select “Yes” to save
recorded program and stop recording.
Recording Program List
Press INDEX button on the remote control to call out the Recorded Program List.
Press
/ button to select a recorded le and press Ok button to start playback.
Recording (PVR Function)
Your television features a PVR recording function which lets you:
●
Instantly record a digital TV program (via the one-touch recording button on the remote
control).
●
Time-shift playback of a digital television program.
●
Set a timer to record future digital TV programs (via the “Add” function in Schedule List of
Channel menu, see Page 23 for details).
Instant one-touch recording and playback (DTV mode only)
When watching a digital program:
1. Press ● button on remote control to start recording directly.
2.
Press ◄/► button to select desired option in the tool bar and press OK button to confirm it. If
above tool bar has disappeared, press button to display it again.
3.
Press button on remote control to call out a dialogue box. Select “Yes” to save recorded
program and stop recording.
To watch recorded programs:
1. Press INDEX button on remote control to call out the Recorded List
2. Press ▲/▼ button to select a recorded file and press OK button to start playback.
Before recording (including time-shift recording), you must have
inserted a FAT32 formatted USB storage device into the USB port!
Recording (PVR Function)
Your television features a PVR recording function which lets you:
●
Instantly record a digital TV program (via the one-touch recording button on the remote
control).
●
Time-shift playback of a digital television program.
●
Set a timer to record future digital TV programs (via the “Add” function in Schedule List of
Channel menu, see Page 23 for details).
Instant one-touch recording and playback (DTV mode only)
When watching a digital program:
1. Press ● button on remote control to start recording directly.
2.
Press ◄/► button to select desired option in the tool bar and press OK button to confirm it. If
above tool bar has disappeared, press button to display it again.
3.
Press button on remote control to call out a dialogue box. Select “Yes” to save recorded
program and stop recording.
To watch recorded programs:
1. Press INDEX button on remote control to call out the Recorded List
2. Press ▲/▼ button to select a recorded file and press OK button to start playback.
Before recording (including time-shift recording), you must have
inserted a FAT32 formatted USB storage device into the USB port!
 Loading...