14 Amico Mobility Solutions Corporation
3. Make sure the trolley is inserted correctly in the GoLift.
The trolley is equipped with sensors that will only allow the
GoLift to operate when the trolley is secured inside the lift.
4. Slide the GoLift motor into the PLP track from the other side.
Make sure the GoLift Motor is constantly in contact
with the charging strip.
5. Fasten the end stops back on to the PLP track. Ensure there is enough clearance room to place the end cap on the
PLP arm and place the end cap back on the arm.
6. Fasten all end stops tightly using an adjustable wrench.
NOTE: If you are installing the Amico GoLift in an existing track system you must ensure that the max load of
the track system is equal or higher than the max load of the Amico GoLift.
7. Two locking screws must be inserted into the lift for additional security against tampering. A trolley cannot be
detached or attached when the screws are in place. Simply remove them to free the lift from the trolley.
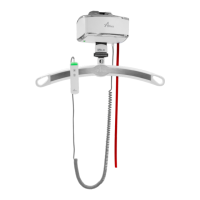
LIFT ATTACHMENT/DETACHMENT
To detach the lift from the trolley, first support the weight of the lift before squeezing the two buttons located on the
top, then release the lift from the trolley latches (only applies to quick release models).
Installing the GoLift in the Amico PLP Track
Charging Strip