Rev. A2, 07/16 PG7
21
Automation Products Group, Inc.
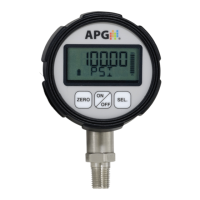
Analog Low (AL CAL) & Analog High (AH CAL) Calibration:
Allows the user to calibrate or “trim” the endpoints of the analog signal
output (i.e. 4mA & 20mA or 0V & 2V/5V)
Calibrating the Analog Signal End-Points:
Step 1: Use a calibrated meter to monitor the analog output signal.
Step 2: Force a low analog output signal (i.e. 4mA or 0V) either by adjusting
the applied pressure or by adjusting the Analog Setpoints (see “Analog
Low & Analog High Setpoints” on page 20 for details).
Step 3: Press the On/O button once to enter the main setup menu.
Step 4: Press (Z) to cycle through the options until Output is displayed.
Step 5: Press (S) to access the Output Settings menu.
Step 6: Press (Z) to cycle through the setup options until AL CAL is
displayed.
Step 7: Press (S) to access the Analog Low Calibration value. A 5-digit
number will appear with the rst digit ashing.
Step 8: Press (Z) to change the value of the ashing digit.
NOTE: Increasing this 5-digit number will increase the output signal.
Changing the digit farthest to the left will produce the coarsest adjustment,
while each successive digit moving to the right will cause subsequently ner
adjustments to the output signal.
Step 9: Press (S) to accept the value of the ashing digit and advance to the
next digit. Repeat steps 6 and 7 until the desired Analog Output signal
is displayed on the meter. After the last digit is accepted by pressing
(S), the display will return to the output menu.
Step 10: Press (S) to reenter the Output Settings menu.
Step 11: Press (Z) to cycle through the options until AH CAL is displayed.
Step 12: Repeat Steps 5-7 to adjust the Analog High Calibration value.
Step 13: To exit the output menu, press (Z) until EXIT is displayed and press
(S) to exit to the main setup menu.
www. .com
information@itm.com1.800.561.8187