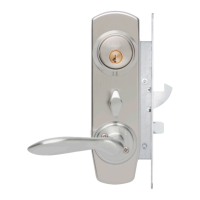
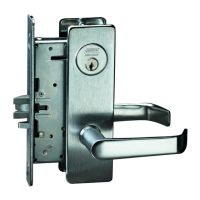
The ML2000 Series Mortise Lock is a robust access solution designed for use with VN Escutcheon Trim and V Series Indicators, manufactured by Corbin Russwin, an ASSA ABLOY Group company. This manual provides comprehensive instructions for its installation and rehanding, ensuring proper functionality and secure operation.
Function Description:
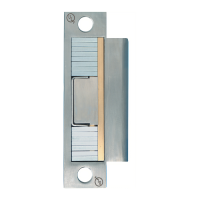
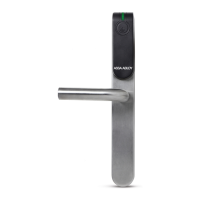
The ML2000 Series Mortise Lock is a mechanical locking device that integrates with various escutcheon trims and indicators to provide secure access control for doors. Its primary function is to secure a door by engaging a latch and, in some configurations, a deadbolt, into a strike plate. The lock's operation can be controlled by a key, a thumbturn, a coin turn, or a lever, depending on the specific indicator and trim variations chosen. The V Series Indicators provide visual feedback on the lock's status (e.g., "Unlocked," "Locked," "Vacant," "Occupied"), enhancing user awareness and safety. The lock is designed for durability and reliable performance in various commercial and institutional settings.
Important Technical Specifications:
- Tools Required for Installation:
- Phillips screwdriver (#1, #2, and #3 sizes)
- Flat-blade screwdriver
- 1/8" Allen wrench (for standard trim)
- 3/32" Allen wrench (for Muséo® trim)
- 7/64" Allen wrench (for ML20900/ML20600 - NAC)
- 3/8" dia. drill bit
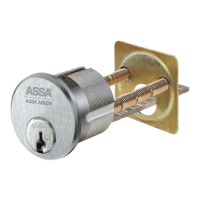
- Cylinder Compatibility: Designed for 1-1/8" cylinders. For longer cylinders, consultation with the factory is recommended.
- Door Preparation: Requires door preparation according to the FM500 door marker template for function holes, size, and location.
- Handing: The lock body and indicator components are handable, meaning they can be configured for Left Hand (LH), Left Hand Reverse Bevel (LHRB), Right Hand (RH), or Right Hand Reverse Bevel (RHRB) doors. Correct handing is critical for proper lock function.
- Indicator Variants:
- Thumbturn: For installation on the inside of the door.
- Cylinder: For installation on the inside or outside of the door, allowing key operation.
- Coin Turn: For installation on the outside of the door, typically used for privacy functions.
- No input/blank: For installation on the inside of the door, indicating no user input mechanism.
- Indicator Display Assembly Part Numbers:
- Green 'Unlocked' / Red 'Locked': 858F241
- Green ‘Vacant' / Red 'Occupied': 858F251
- Green Unlocked Icon / Red Locked Icon: 858F261
- White 'Unlocked' / Red 'Locked': 858F271
- White ‘Vacant' | Red 'Occupied': 858F281
- White Unlocked Icon / Red Locked Icon: 858F291
- Indicator Spindle Cam Part Numbers:
- Thumb Turn: 855F619
- Cylinder / No Input/Blank: 855F707
- Coin Turn: 855F747
- Other Indicator Parts:
- VN Indicator Escutcheon: Consult Factory
- Indicator Window: 856F049
- Indicator Escutcheon Back Plate: 855F638
- VN Escutcheon Screw Pack: 858F517 x finish
- Door Marker Template: FM500
- Screws: #8-32 x 2-1/4" screws for inside escutcheon assembly and #8-32 x 1/4" flat head screws for outside front attachment.
Usage Features:
- Visual Status Indication: The V Series Indicators provide clear visual cues regarding the lock's status (e.g., locked/unlocked, vacant/occupied), which is particularly useful in privacy or security applications.
- Versatile Trim Options: Compatible with VN Escutcheon Trim and various lever styles, including Muséo® levers and standard levers, allowing for aesthetic and functional customization.
- Handing Flexibility: The lock and indicator components can be rehanded in the field to match the specific door configuration (LH, LHRB, RH, RHRB), providing adaptability during installation.
- Cylinder Operation: Supports cylinder input for key access, enabling controlled entry and exit. The Corbin Russwin logo on the cylinder must be horizontal and on the top portion for correct installation.
- Thumbturn/Coin Turn Operation: Offers options for privacy or basic access control without a key, depending on the indicator type.
- Muséo® Levers: Feature a specific attachment method where the lever threads onto an adapter, and the spindle is inserted and tightened, with a slight loosening to allow spindle engagement. Correct spindle orientation is crucial for these levers.
- Standard Levers: Involve installing an adjustment bolt on the opposite side of the door and a dowel screw on the inside lever/knob. Proper alignment of the adjustment bolt hole with the lever hole is essential.
Maintenance Features:
- Functional Check: After installation, a series of functional checks are recommended to ensure proper operation:
- Insert key into the cylinder and rotate, checking for smooth operation without friction and that the key retracts the latch.
- Throw the deadbolt (if present) and verify that the key retracts both the deadbolt and latch.
- Test the inside lever to ensure it retracts the latch and deadbolt (if installed).
- Verify that the indicator displays the correct status when the lock is locked and unlocked.
- Latch Mechanism: The manual details how to rehand the latch by depressing the catch plate and turning the latch over, ensuring it is pushed in until the catch plate is no longer depressed. This process is critical for the lock's proper function.
- Indicator Rehanding: Instructions are provided for rehanding the indicator by removing the back plate, positioning the spindle cam correctly for the door hand, and sliding the spindle cam post into the display slide slot. This allows for field adjustment if the indicator's default handing does not match the door.
- Cylinder Adjustment: The cylinder installation process includes steps to check and adjust the cylinder operation if necessary, ensuring smooth key rotation and engagement.
- Lever Adjustment: For standard levers, the adjustment bolt's alignment with the lever hole is crucial and can be adjusted by threading the bolt in or out. This ensures the lever is securely attached and operates correctly.
- Troubleshooting: The manual highlights warnings such as "LOCK HANDING IS CRITICAL TO ENSURE LOCK FUNCTIONS PROPERLY" and "WARNING: LOCK-IN CAN OCCUR IF LATCH IS NOT PROPERLY INSTALLED," emphasizing key areas where attention to detail during installation can prevent future issues. The note to "Keep door open while installing lock" and "Make sure lock is unlocked" also serves as a preventative measure.
The ML2000 Series Mortise Lock is designed for ease of installation and maintenance, with clear instructions and visual aids to guide installers through the process. Its modular design, with various indicator and trim options, allows for customization to meet diverse security and aesthetic requirements.