Do you have a question about the Assa Abloy PDU8500 Series and is the answer not in the manual?
Outlines the first step of placing the door flat on saw horses for the panic device installation, ensuring proper orientation.
Details the installation of the actuator post assembly onto the door, ensuring the push rod is correctly seated and secured.
Step-by-step guide for installing the vertical door mount, covering alignment, threadlocker application, and securing components.
Instructions for installing the horizontal door mount, including alignment, threadlocker application, and securing the stud and conehead union.
Specific steps for installing the horizontal door mount when a deco end cap is used, covering stud, cap, washer, and union placement.
Details the final steps for attaching the panic device assembly to the door, securing it with set screws and threadlocker.
Explains how to adjust the latch height for optimal engagement with the strike using a flat head screw and specific rotation directions.
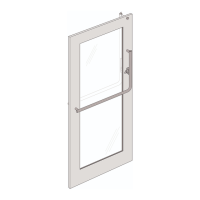
The PDU8500 Series Panic Device is a robust and versatile solution designed to meet both egress and security needs for various door types, including storefront, wood, and metal doors. This device is engineered for superior functionality, ensuring reliable operation and enhanced safety in commercial and institutional settings.
The core function of the PDU8500 Series Panic Device is to provide a quick and easy means of egress during emergencies while maintaining security against unauthorized entry. It achieves this through a horizontal crash bar mechanism that, when pushed, retracts the latch, allowing the door to open. The device is designed for intuitive operation, making it accessible even in high-stress situations.
The installation process involves several key assemblies: the Panic Device Assembly, Vertical Door Mount Assembly, Actuator Post-Cylinder Housing Assembly, and Horizontal Door Mount Assembly. These components work in concert to secure the door and facilitate its release. The panic device is mounted on the door, with various parts installed to ensure proper alignment and engagement with the door frame.
A critical element of the PDU8500 is its latch mechanism, which engages with a strike plate on the door frame. This latch is retractable, automatically moving upward to engage the strike when the door closes. The system includes an actuator post assembly that transmits the force from the crash bar to the latch, ensuring smooth and consistent operation. The device can be configured with different cylinder types, allowing for integration with various keying systems for external access control.
The PDU8500 Series Panic Device incorporates several features to enhance its usability and adaptability:
Dogging Feature: This feature allows the panic device to be held in an unlatched (dogged) position, enabling free passage through the door without needing to operate the crash bar. The dogging mechanism is located on the bottom of the Panic Device Assembly's vertical tube, directly under the Actuator Post Assembly. To engage, the horizontal crash bar is pushed, and the dog button is slid to the up position. When the dog button is in the up position, the device is dogged. To un-dog the device, the button is moved to the down position. This is particularly useful in high-traffic areas where temporary free access is desired, such as during business hours or for deliveries.
Adjustable Latch: The latch mechanism is adjustable, allowing for fine-tuning of its engagement with the strike plate. This adjustment is crucial for ensuring proper door closure and preventing rattling. The latch can be moved up or down by rotating it after removing a flat head screw. A full 360-degree turn of the latch provides a specific amount of height adjustment, allowing installers to achieve optimal alignment. This flexibility accommodates minor variations in door and frame dimensions, ensuring a secure and quiet closure.
Door Stop-Strike Adjustment: The door stop and strike plate are also adjustable to ensure proper alignment and engagement with the retractable latch. When the door is closed, there should be a small amount of play (approximately 1/16") between the latch face and the strike face. If the latch does not engage, the door stops can be moved inward. If the door rattles, indicating a loose fit, the door stops can be moved outward. This adjustability ensures a snug fit and proper latching, contributing to both security and noise reduction.
Compatibility with Various Door Types: The PDU8500 is designed for installation on storefront, wood, and metal doors. While the installation process is largely similar across these types, specific framing conditions, particularly for hollow metal frames, are taken into account. For hollow metal frames, specific requirements for stop height, stop width, and reinforcement are outlined to ensure proper installation and performance.
Cylinder Recommendations: The device is compatible with a range of cylinders from various manufacturers, including Yale, Sargent, Corbin Russwin, Schlage, ASSA, and Stanley/Best. This broad compatibility allows users to select cylinders that match their existing keying systems or security preferences, offering flexibility in access control. Different cylinder lengths (e.g., 1 1/8", 1 1/4", 1 3/8", 1 1/2") are supported, each corresponding to specific cylinder rings and compatible cams.
To ensure the longevity and optimal performance of the PDU8500 Series Panic Device, regular maintenance is recommended, focusing on fasteners, cleaning, and lubrication:
General Maintenance Instructions: Periodically, all fasteners on the panic device should be checked for tightness. Loose fasteners can compromise the device's security and functionality. If any fasteners are found to be loose, threadlocker should be reapplied, and they should be tightened to the specified torque values. This proactive approach prevents wear and tear and maintains the structural integrity of the device.
Finish Cleaning Instructions: The panic device is available in various finishes, each requiring specific cleaning methods to preserve its appearance and durability. Before cleaning the entire device, it is recommended to test a small, inconspicuous area to ensure satisfaction with the results. Frequent cleaning is encouraged to extend the life of all finishes.
Mechanical Maintenance (Threadlocker and Lubrication): Specific components of the panic device require threadlocker and lubrication to ensure smooth operation and prevent loosening over time.
Torque Values: The manual provides specific torque values for different thread types (6-32, 8-32, 12-24, 1/4-20, 5/16-18). Adhering to these torque requirements during installation and maintenance is essential for ensuring the secure fastening of components and preventing damage from overtightening or undertightening.
By following these detailed maintenance guidelines, users can ensure the PDU8500 Series Panic Device remains a reliable, secure, and smoothly operating egress solution for many years.
| Category | Safety Equipment |
|---|---|
| Type | Power Distribution Unit |
| Model | PDU8500 Series |
| Input Voltage | 100-240 VAC |
| Frequency | 50/60 Hz |
| Number of Outlets | 8 |
| Operating Humidity | 0 to 95% RH, non-condensing |
| Safety Standards | UL |