TCI Library www.telephonecollectors.info
AT&T Private Pay Phone Plus
February, 1988
SECTION V MAINTENANCE
A Troubleshooting
If an AT&T Private Pay Phone does not operate properly, try the following troubleshooting
procedures before seeking repair assistance.
• NO DIAL TONE
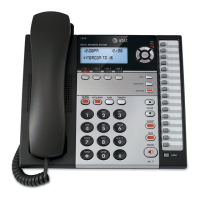
• Make sure power is supplied to the phone, and all connections are correct .
• Inspect the power wire connections on the power supply board and transformer.
• Make sure the front housing is plugged into its socket underneath the programming
keypad. Refer to Figure
1 .
• Make sure the phone is not in the mode to access on-site features .
• Make sure the phone is not currently on line to the remote programming source .
• Check with your telephone company to make sure your local service has not been
temporarily changed to low-voltage equipment.
• NO RESPONSE TO DIAL BUTTONS
• Make sure the front housing is plugged into its socket underneath the programming
keypad. Refer to Figure
1 .
• Make sure the phone is not currently on line to the remote programming source .
• NO SPEECH PROMPT FOR DEPOSIT
• Make sure the number dialed is not programmed as a free number.
• PRIVATE PAY PHONE DOES NOT DIAL OUT
• Make sure the line to which the Private Pay Phone is connected is working properly.
• Make sure the 2-conductor telephone line cord is plugged in at both ends. (If a 2670
jack is being used, the telephone line cord coming from the Private Pay Phone must
be 4-conductor line cord. This line cord must be connected to the socket labeled
"PHONE" on the 2670 jack.)
• Make sure the phone is not being excluded by another telephone on the line (See
Appendix A).
• Make sure enough money has been deposited for the call being made.
• Check the number dialed to make sure it has not been programmed as restricted .
• COINS NOT RECOGNIZED
• Make sure the coin chute plug is plugged into its socket that is located below the
programming keypad. Refer to Figure
1.
• Make sure the coin chute is not jammed. (If it is, see page 64.)
• Make sure the phone is not in the mode to access on-site features.
• Make sure the phone is vertical within the specifications outlined in the installation
procedures (See page 22).
Owner Manual
Page 58