Chapter 4: Making Studio Connections 13
Connecting a Microphone to
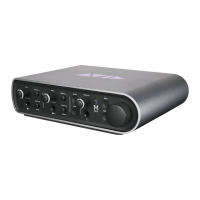
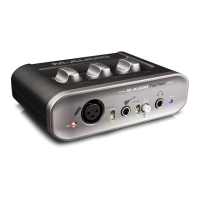
Mbox Mini
Mic Cables and Connectors
Use a microphone with an XLR connector to
connect the microphone to the Mbox Mini.
The Mbox Mini can only supply power through
a microphone cable with an XLR connector. If
you are not sure about the phantom power re-
quirements for your microphone, refer to your
microphone’s documentation or contact the
manufacturer.
Phantom Power
Some microphones require power to operate.
This power, called phantom power, is supplied ei-
ther by a battery in the microphone, or through
an audio interface (such as Mbox Mini) that can
supply power through the microphone cable.
Most condenser microphones (such as an
M-Audio Solaris) require phantom power to op-
erate. Dynamic microphones (such as a Shure
SM57 or M-Audio Aries) do not require phan-
tom power to operate, but are not harmed by it.
Using a Mic that Has an XLR
Connector
To use a microphone that has an XLR connector:
1 Plug your microphone cable into the Mic/Line
input on the back of Mbox Mini.
2 Set the Combo/DI switch on the back to
Combo (or “microphone”) position. The button
should be out, not pressed in.
3 If your microphone requires phantom power,
make sure the microphone is connected, then
press the Phantom Power switch (labeled 48V)
on the back of the Mbox Mini. 48V phantom
power is enabled when the switch is pressed in.
4 On the front of the Mbox Mini, turn the Mix
control fully left to Input.
5 On the front of the Mbox Mini, carefully turn
the Input 1 Gain control to the right to increase
the input level of your microphone signal.
6 If the incoming signal is too loud, pull the
Gain knob out to engage the –20 dB pad.
XLR connector
Although phantom power can be used
safely with most microphones, it is possible
to damage some ribbon microphones with
it. Always turn off phantom power and wait
at least ten seconds before connecting a rib-
bon microphone.