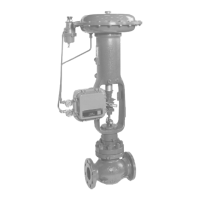
VDC, VAC, VST, VAA - Diaphragm Control Valve 4-1
Chapter 4 : Control Valve Adjustment
Generally the diaphragm control valve does not require adjustment. However, when
it is disassembled and reassembled for overhaul or parts replacement, adjustment
should be made as described below:
4-1 : Lift Adjustment
For direct acting actuators:
Connect the air tubing to the diaphragm chamber while the stem connector is
disengaged to supply compressed air to the chamber.
Push down the valve stem and make the valve plug touch on the valve seat.
Next, apply air pressure up to 5~10% (min. 1%) of the rated lift (check name plate for
lift rate) from the reference position of no air in the chamber then x the pressure at
this position. The index on the scale should be set at SHUT at this point.
Connect the actuator stem to the valve stem with the stem connector.
Increase air pressure to the diaphragm chamber and verify the valve lift is more than
the rated lift range and the valve seat and plug touch each other. Make sure that this
contact takes place while in the SHUT position.
For reverse acting actuators
Connect the air tubing to the diaphragm chamber while the stem connector is
disengaged to supply compressed air to the chamber.
Push down the valve stem and make the valve plug touch on the valve seat.
Apply air pressure to the diaphragm chamber until the actuator stem stops.
Next, reduce the pressure in the diaphragm chamber until the lift is 5~10% above the
rated lift range (min. 1 mm) then x the pressure at this position. The index on the
scale should be set at SHUT at this point.
Connect the actuator stem to the valve stem with stem connector at this position.
Reduce the air pressure to the diaphragm chamber and verify if the valve lift is more
than the rated lift range (min. 1 mm) and the valve seat and plug touch each other.
Make sure that this contact takes place while in the SHUT position.