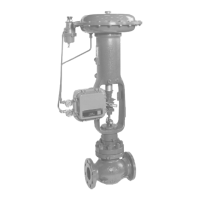
VDC, VAC, VST, VAA - Diaphragm Control Valve 2-1
Chapter 2 : Installation of a Control Valve
When installing a control valve, please observe the following:
• Before installation, ensure that scales, welding chips or any other foreign
materials have been cleaned out of the process pipe to which the control valve is
to be connected.
• While installing the control valve ensure the process uid ow direction matches
with the ow direction indicated on the connecting anges of the valve body.
• Install the control valve, in a position such a position that its actuator is positioned
vertically.
• Exercise caution so that no edges of the gaskets connecting the pipe extrude
into the process pipe. Make sure the selected gasket material is suitable for the
process uid.
• Take adequate measures to avoid applying large force to the control valve by the
process piping. Take care when tightening ange bolts to avoid biased tightening
which may cause undesirable mechanical stress.
• After installing the control valve and before connecting the air pipe to the
actuator, below the air tube with clean compressed air to remove dust and other
foreign material from inside the air pipe.
• Sucient space shall be provided above the actuator for its removal.
• Install the control valve in a place where the ambient temperature does not
exceed the specied temperature limit of the actuator.
• Check that the actuator pointer, positioner and manual handwheel (if provided)
are installed in the correct direction.
To change the mounting direction of the actuator, proceed as follows: Apply a
pneumatic pressure of approximately 60 kPa (0.6 kgf / cm
2
) to the diaphragm
so that the valve lift is set at a mid-position of its range. Loosen the yoke clamp
nut with a wrench Swivel the overall actuator to the correct position, and then
securely tighten the yoke clamp nut with a wrench. Release the pneumatic
pressure applied to the diaphragm. In case of a control valve that has a bellows
seal, however, disconnect the actuator stem from the valve stem and then loosen
the yoke clamp nut and swivel the actuator section. For details, see Chapter 5.
“Disassembly and Reassembly of a Control Valve.”