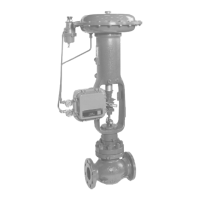
VDC, VAC, VST, VAA - Diaphragm Control Valve 7-1
Chapter 7 : Manual Handwheel
(Side Handwheel of Actuator)
7-1 : Operation Method
(a) Manual Operation
Undo the handwheel lock (the fork -shaped lock for VA1 to VA3 or the chain lock
for VA4 and VA5). Turn the handwheel in the direction indicated the arrow. As you
turn the handwheel clockwise, the valve moves in the closing direction regardless of
whether it is a direct - acting or reverse - acting type. The arrows on the handwheel
indicates the direction for valve SHUT and OPEN function.
(b) Automatic Operation
For the automatic operation, turn the handwheel such that the pointer of the
operation bolt indicates the AUTO position. Then, lock the handwheel.
7-2 : Installation
(1) A side mounted handwheel can be installed even when the valve is set for
automatic operation. To install the handwheel, proceed as follows:
(2) Turn the handwheel of the manual operation assembly so that the pointer of the
operation bolt indicates the AUTO position.
(3) Remove the bolt (s) (one bolt in case of VA1 to VA3; three bolts in case of VA4
or VA5) which clamp the two levers. Widen the gap between the two levers.
(4) Install the manual drive assembly on the mounting pad at the back of the Air-O-
Motor, with the mounting bolts.
(5) Hang the smaller holes at the end of the levers on to the pointer base and the
other larger holes at the other end on to the base of the operation nut. Secure the
lever clamp bolt.
(6) When in automatic operation, set the pointer of the operation nut to the AUTO
position and lock the handwheel.
7-3 : Disassembly and Reassembly
Before disassembling the manual drive assembly, ensure that the handwheel is set
at the AUTO position.
(1) Undo the bolt (s) (one bolt in case of VA1 to VA3; three bolts in case of VA4 or
VA5) which clamp the two levers. Remove the levers from the pointer base.
(2) Remove the mounting bolts of the manual drive assembly and detach it from the
Air-O-Motor.
(3) Remove the handle lock nut and then remove the handwheel.