Disassembly and Reassembly Azbil Corporation
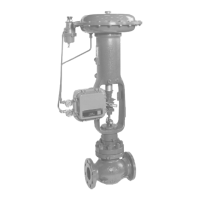
5-2 VDC, VAC, VST, VAA - Diaphragm Control Valve
Split -type cage valve employs no spiral gasket. Mount cage (lower) directly onto
the valve body using the cage clamping/removing tool.
(3) Mount bonnet. When securing nuts, turn all bolts by hand as far as possible and
then uniformly tighten them with a wrench, avoiding biased tightening which will
cause mechanical stress.
(4) Insert gland packing into gland section. For assembly procedure, see Chapter 5
“Parts Replacement”, subsection 5-1 “Replacement of Gland Packing”.
(5) Mount actuator on to the valve body. Securely tighten yoke clamp nut with a
wrench.
(6) Connect actuator stem and valve stem with stem connector. For this assembly
procedure, see Chapter 6 “Control Valve Adjustment“, Item (a) “Lift Adjustment”.
(7) Secure air connection to the actuator.
5-3 : Disassembly and Reassembly of Bellows-sealed Valve
(1) Follow the disassembly procedure in Item (a), steps (1) through (5) for a regular
valves.
(2) Remove the bellows ange gasket (upper)
(3) Remove the hex nut of the bellows ange. When doing this, securely hold bellows
seat with wrench so that no unreasonably large force is applied to bellows.
(4) Remove bellows ange and gasket (lower), by evenly striking the bellows seat
from above.
(5) Loosen the extension bonnet nuts and remove extension bonnet.
(6) Pull out the valve plug upwards. the valve plug and stem are integrated with the
bellows, bellows seal, and pin.
(7) For further disassembly, follow the same procedure as that of Item (a), steps (6)
and (7) for a regular valve.
(8) To assemble the control valve, follow the reverse order of the above disassembly
procedure in reverse order. Make sure to hold the bellows seat with a wrench
when tightening the hex nut of the bellows ange, lest unreasonably large force
should not be applied to the bellows.