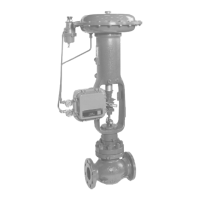
VDC, VAC, VST, VAA - Diaphragm Control Valve 5-1
Chapter 5 : Disassembly and Reassembly
Before disassembling the control valve, ensure to shut o the ow from the process
pipe to release pressure from inside the control valve, and wait until it cools o.
5-1 : Disassembly
(1) If control valve is of a reverse- acting type, apply pneumatic pressure to the
diaphragm that will place the pointer at a position slightly above the SHUT point
on scale. This indicates that valve plug is not seated on the seat ring.
(2) Loosen the stem connector and disconnect the actuator stem from the valve
stem.
(3) Release the air from the diaphragm and disconnect the air connection.
(4) Remove the yoke clamp nut with a wrench. Remove the actuator from the valve
body.
(5) Remove the bonnet clamp nuts, loosen the gland packing ange nut, and then
remove bonnet from the valve body.
(6) For model VDC or VAC Valve, remove valve plug from valve body. Next, remove
gasket (upper) and pull out the cage by hand or use a cage removing tool*. Next,
remove gasket (lower) and spiral gasket.
Of split-type cage valves, the cage (lower) is coupled to the valve body by means
of screw thread. Remove it by unscrewing it using a split type cage clamping/
removing tool*. The split - type cage valve has no spiral gasket.
(7) For Model VST or VAA valve, remove gasket (upper) and remove valve plug.
In this case, for Model VST or VAA valve, remove the guide ring also. Then
remove the gasket (lower). To remove the seat ring, use a seat ring clamping/
removing tool *.
*: Available as option tool.
5-2 : Reassembly
To reassemble the control valve, follow the procedure in reverse order of the
assembly procedure of (a).
When assembling, thinly apply a sealing agent to the seat ring, sealing the surface
outside of the cage, and gasket.
However, do not apply any sealing agent to oil-inhibited valves.
(1) To mount the seat ring of Model VST, VAA or VAV valve, use a seat ring
clamping/removal tool.
Next, set the valve plug on the seat ring to which the valve stem has been
assembled. Place gasket (lower), guide ring, and gasket (upper) in the due order.
(2) For Model VDC or VAC valve, insert the spiral gasket at rst. (Do not reuse the
removed gasket. Always use a fresh gasket.)
Next, place gasket (lower), cage, and gasket (upper) in the due order. Lastly,
insert the valve plug into the cage.