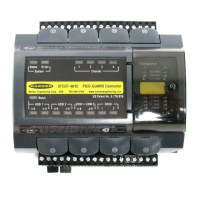
4 Processor/Base Board Connections
Figure 16. DXM700 base board
1 PW. Power in at 12 V DC to 30 V DC 7 O3. Sourcing Output 3 13 GD. Ground
2 GD. Ground 8 O4. Sourcing Output 4 14 GD. Ground
3 M-. Master RS-485 - 9 PW. Power in at 12 V DC to 30 V DC 15
CH. CAN Bus High (not used in the
DXM700)
4 M+. Master RS-485 + 10 GD. Ground 16
CL. CAN Bus Low (not used in the
DXM700)
5 O1. Sourcing Output 1 11 S-. Slave RS-485 -
6 O2. Sourcing Output 2 12 S+. Slave RS-485 +
A Ethernet port E USB port J Cellular modem sockets
B
Cellular RP-SMA radio antenna
connector
F
Cellular U.FL. antenna cable
connection
K Cover housing PCB cable
C Micro SD card holder G Processor button L
D DIP switches H Operating LED M
Button Operation
Pressing the button for 5 seconds forces a Push to the webserver. This assumes a proper configuration for the
webserver.
LED Operation
The PCB LED flashes to indicate the processor board is running.
The LED starts flashing about 10 seconds after power is applied and a network connection is present. Without an
ethernet network connection the LED starts to flash after about 40 seconds.
Cellular Modem Connection
Install the cellular modem onto the board with the cellular modem's U.FL connector on the right. The antenna cable
will go between the cellular U.FL connector and the board U.FL connector. Only install/remove a cellular modem
when the power to the device is disconnected.
Sure Cross
®
DXM700-Bx Wireless Controller
24 www.bannerengineering.com - Tel: + 1 888 373 6767
 Loading...