9
2-1 Hardware Installation Installation
Step 1 Installing the RIPM into a Server Rack
The RIPM includes mounting brackets for installation in 19-inch racks.
1.1 Attach the included bracket to the
top or bottom of the RIPM with the
provided screws.
Fig. 1
1.2 Mount the RIPM to the rack. See
Fig. 1.
Note: Mounting screws for the rack are not included. Please use the specified
screws from your rack’s manufacturer.
Warning: Before attempting to connect anything to the RIPM or your computer(s),
please ensure that all your computer equipment and devices are powered off.
Belkin Corporation is not responsible for damage caused by your failure to do so.
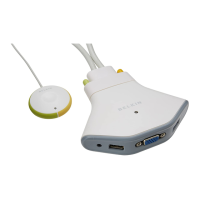
Step 2 Connecting your Console to the RIPM
Fig. 2
2.1 Connect your keyboard and mouse
to the “Console” keyboard and
mouse ports on the RIPM.
2.2 Connect your monitor to the
“Console” VGA port on the RIPM.
See Fig. 2.
 Loading...