18
3.0 TYPICAL INSTALLATION
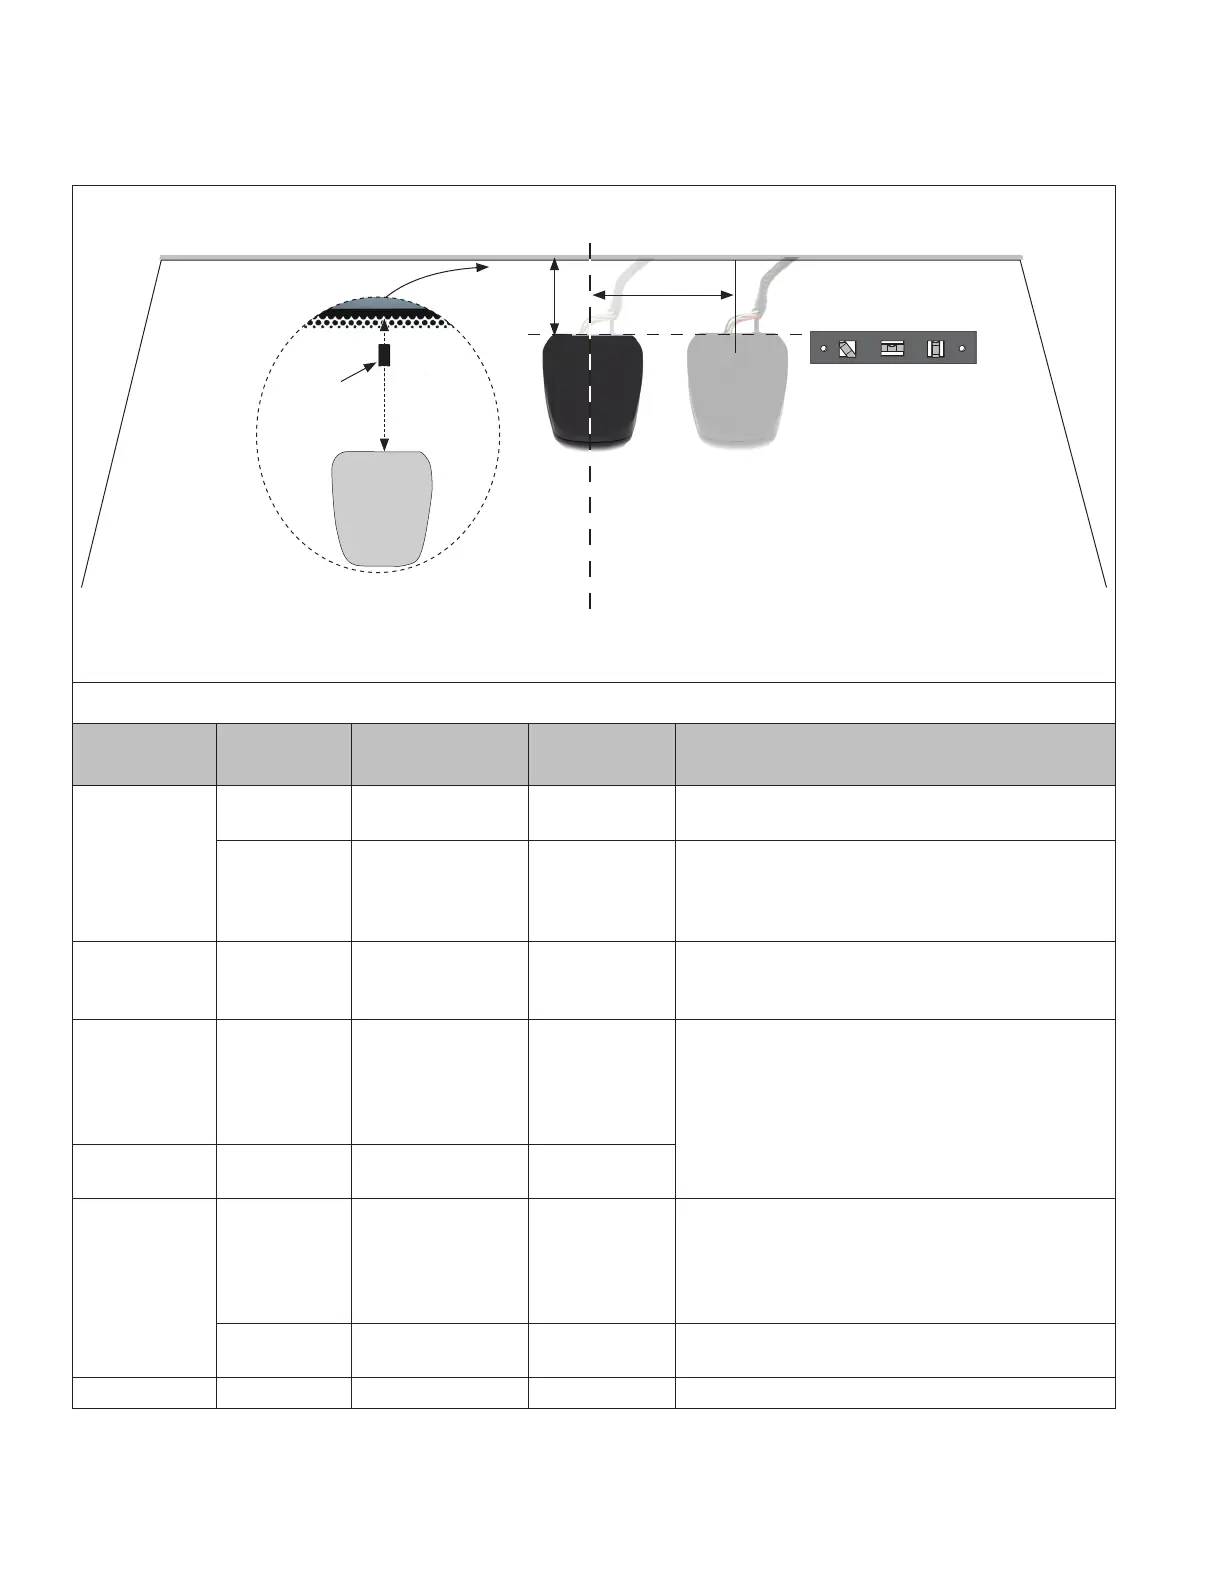
The Bendix
™
AutoVue
®
FLC-20
™
camera is installed on the windshield at a position determined by Bendix engineering
and the OEM. See Figure 11. (When replacing a camera bracket, temporarily mark the location of the top of the original
bracket to help position the replacement.)
Note: Kenworth
®
T680/880 and
Peterbilt 579/567
models do
not have a
rubber seal, so
measure down
(at the center
line mark)
from where the
printed “frit”
pattern’s solid
black part ends.
Top and Center of Windshield - Viewed from Inside.
A
Center line of
the windshield
Top Mounting Instruction
Vehicle OEM*
Vehicle
Model
Distance “A” Distance “B”
Comments
± ⅛ in. (3 mm) ± ⅛ in. (3 mm)
Kenworth
®
T680 / T880 /
W990
1.4 in. (35 mm) 0
Windshields have a mark at the center line. Measure
down from the lower edge of the printed border.
T370 2.38 in. (60.3 mm) 6 in. (152 mm)
The camera bracket is oset to the passenger’s side
of the vehicle by 6 in. (152 mm) from the center. The
camera bracket is located 2.38 in. (60.3 mm) downward
from the interior seal of the windscreen.
Mack
®
CHU / CXU 2 in. (51 mm) 6 in. (152 mm)
Measure down from the lower edge of the rubber seal.
Note the oset B. The camera bracket is oset to the
passenger’s side of the vehicle.
Navistar
®
International
®
ProStar
®
,
LoneStar
®
,
DuraStar
®
,
LT
™
series,
RH
™
series
2 in. (51 mm) 6 in. (152 mm)
The camera bracket is oset to the passenger’s side
of the vehicle. Measure down from the lower edge of
the rubber seal. [There is a grey mask area that is
1.8 in. (45 mm) high.]
Navistar
®
IC Bus
CE Series 7.125 in. (180 mm) 6 in. (152 mm)
Peterbilt
579 / 567
589
1.4 in. (35 mm) 0
Windshields have a mark at the center line. The
vertical location is between the bracket’s uppermost
surface and the nearest surface of the windscreen
seal. Measure down from the lower edge of the printed
border.
337/348 1.18 in. (30.0 mm) 0 Measure down from the bottom of the windscreen seal.
Volvo VNM / VNL 1.3 in. (34 mm) 0 Measure down from the lower edge of the rubber seal.
* All trademarks shown here are the property of their respective owners and are used for reference only.
Note: Use only Bendix-approved
windshield adhesive when
re-mounting a camera bracket.
(Included with the bracket kit.)
A small “Torpedo” Level
is Used to Make Sure the
Top of the Bracket is Level
During troubleshooting, if you need to check that the camera bracket is installed at the correct point on the
windshield, use the Make/Model columns to nd the correct vertical distance “A” (and “B” if applicable).
B
NOTE: Some
Placements
are Oset
Center
Line Mark
A
Torpedo level Angular
tolerance of +/-1º