Do you have a question about the Biolight Meditech M850 and is the answer not in the manual?
M850 Patient monitor is intended for continuously monitoring or spot checking of SpO2, PR, ECG, HR and RR signals of single adult, pediatric and neonatal patient.
This device has a function of automatic display rotation (Gravity Activated) which provides for vertical and horizontal positioning to maximizing space utilization and visibility.
Explosion hazard: Do not use the monitor in the presence of flammable anesthetics mixture with air, oxygen, or hydrogen.
Defines symbols used in the manual, such as Type CF applied part, defibrillation protected.
Open the package. Parts are as follows in the package .Take out the monitor and its accessories.
Before you start to make measurements, carry out the following checks on the monitor including all connected modules.
Press the button about two seconds to turn on the monitor. The alarm indicating lamp flashes, and then goes out.
You can set the screen brightness to a value between 1 to 5.
If you select 【On】, the screen can react to the gravity. When the monitor rotates, the screen will rotate the display direction automatically.
After starting up, you need to set date and time of this monitor.
Please select patient information correctly before measuring.
To enter the demo mode: Select 【Menu】→【System】→【Maintenance】→enter the required password.
Enter the required password. On 【Factory Mainten.】interface, you can select 【Language】and then choose a desired language.
Select【Menu】→【System】to check the version of the monitor software.
If you have changed the system’s configuration and want to restore the factory configuration, follow this procedure.
Pressing power button about 2s can turn off the monitor.
By nature, the monitor’s alarms can be classified into three categories: Physiological alarms, Technical alarms, Prompt messages.
By severity, the monitor’s physiological alarms can be classified into three categories: high level alarms, medium level alarms and low level alarms.
When an alarm occurs, the monitor will raise user’s attention by the following indications: Alarm tone, Alarm lamp, Alarm message, Flashing numeric.
Symbols to identify controls for alarm pause, alarm sound status, and alarm reset.
Set the minimum alarm volume and alarm volume levels.
Press the button on the front panel of monitor to suspend all alarm indicators.
Set the minimum alarm volume and alarm volume to 【off】 to shut off the alarm volume.
Turn on alarm reset. Alarm reset will be displayed on the interface of system.
Check the alarm message appeared on screen. It is needed to identify the alarm and action appropriately, according to the cause of the alarm.
Explains the principle of ECG measurement and how the monitor works.
Imperative to only use ECG electrodes and cables provided by manufacturer or specified in this manual.
Describes the steps for monitoring ECG, including skin preparation and electrode placement.
It is important to set the paced status correctly when you start monitoring ECG.
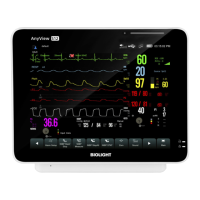
Shows the ECG waveform, HR parameter, and associated labels and limits.
Allows configuration of HR alarm, limits, scan speed, gain, lead type, and QRS volume.
Monitor measures RESP with the method of impedance. Respiration rate is calculated based on impedance changes.
Steps include plugging the ECG cable, placing electrodes, and setting relevant parameters.
Shows the respiration waveform, rate, and associated limits and units.
Allows configuration of Resp alarm, limits, scan speed, gain, lead, and apnea alarm.
Explains the measurement of oxygen saturation using light spectra and volume tracing principles.
Use only SpO2 sensors specified, avoid use during MRI, and monitor skin for prolonged use.
Steps for selecting, connecting, and applying the SpO2 sensor to the patient.
Displays SpO2 percentage, high/low alarm limits, SpO2 value, and unit.
Shows Pulse Rate (PR) value, high/low alarm limits, and unit.
Configure SpO2 alarm level, limits, scan speed, average time, and QRS volume.
Sets the SpO2 desaturation limit, triggering a high physiological alarm when crossed.
Enter trend reviewing window to review ECG, Reap, SpO2 and PR data stored before.
Displays stored data in a tabular format, allowing navigation between pages.
Allows selection of patient ID to review patient's trend data.
Describes the rechargeable battery and indicates battery status through icons.
Connect the Micro USB to the power adapter and then to the monitor to charge the battery.
Recommends initial optimizing cycles and regular conditioning for battery maintenance.
Procedure to check battery performance by charging and discharging cycles.
Batteries should be replaced and discarded properly according to local regulations.
Keep equipment and accessories free of dust and dirt. Follow rules to avoid damage.
Ensures performance and safety of equipment by checks after one year and annually.
Use common detergent and non-corrosive disinfectant. Avoid alcohols and abrasive materials.
Recommended disinfectants include glutaric dialdehyde and 10% decolourant solution.
Clean sensor casing with medical alcohol; sensor cable with Hydrogen Peroxide or isopropyl alcohol.
Dispose of the monitor, SpO2 sensor, and ECG cable in accordance with local regulations.
Details CFDA classification, CE classification, and protection degrees against electric shock and liquid ingress.
Provides mainframe weight and dimensions.
Specifies operating and storage conditions for temperature, atmospheric pressure, and humidity.
Details power adapter input/output and Micro USB function.
Covers display size, resolution, touch, autorotation, and indicating lamps.
Lists ECG, RESP, and SpO2 measurement ranges, resolution, accuracy, and other parameters.
Lists factory default settings for alarm volume, SpO2, HR, and RESP alarm levels.
Includes factory default settings for QRS volume, brightness, and scan speed.
Shows factory default HR and RESP high/low limits for Adult, Pediatric, and Neonate.
Details factory default SpO2 and PR high/low limits for different patient types.
Specifies the factory default interval for trend data storage.
Lists physiological alarm messages, their causes, and adjustable alarm levels.
Details technical alarm messages, their causes, and associated alarm levels.
Describes prompt messages, their causes, and display level.
| ECG | Yes |
|---|---|
| SpO2 | Yes |
| NIBP | Yes |
| Respiration Rate | Yes |
| Temperature | Yes |
| EtCO2 | Optional |
| IBP | Optional |
| Display Type | TFT LCD |
| Touch Screen | Yes |
| Battery Life | Up to 4 hours |
| Alarm System | Audible and visual alarms |
| Resolution | 1024 x 768 |
| Parameters | ECG, SpO2, NIBP, Respiration Rate, Temperature |
| Connectivity | USB, Wi-Fi |