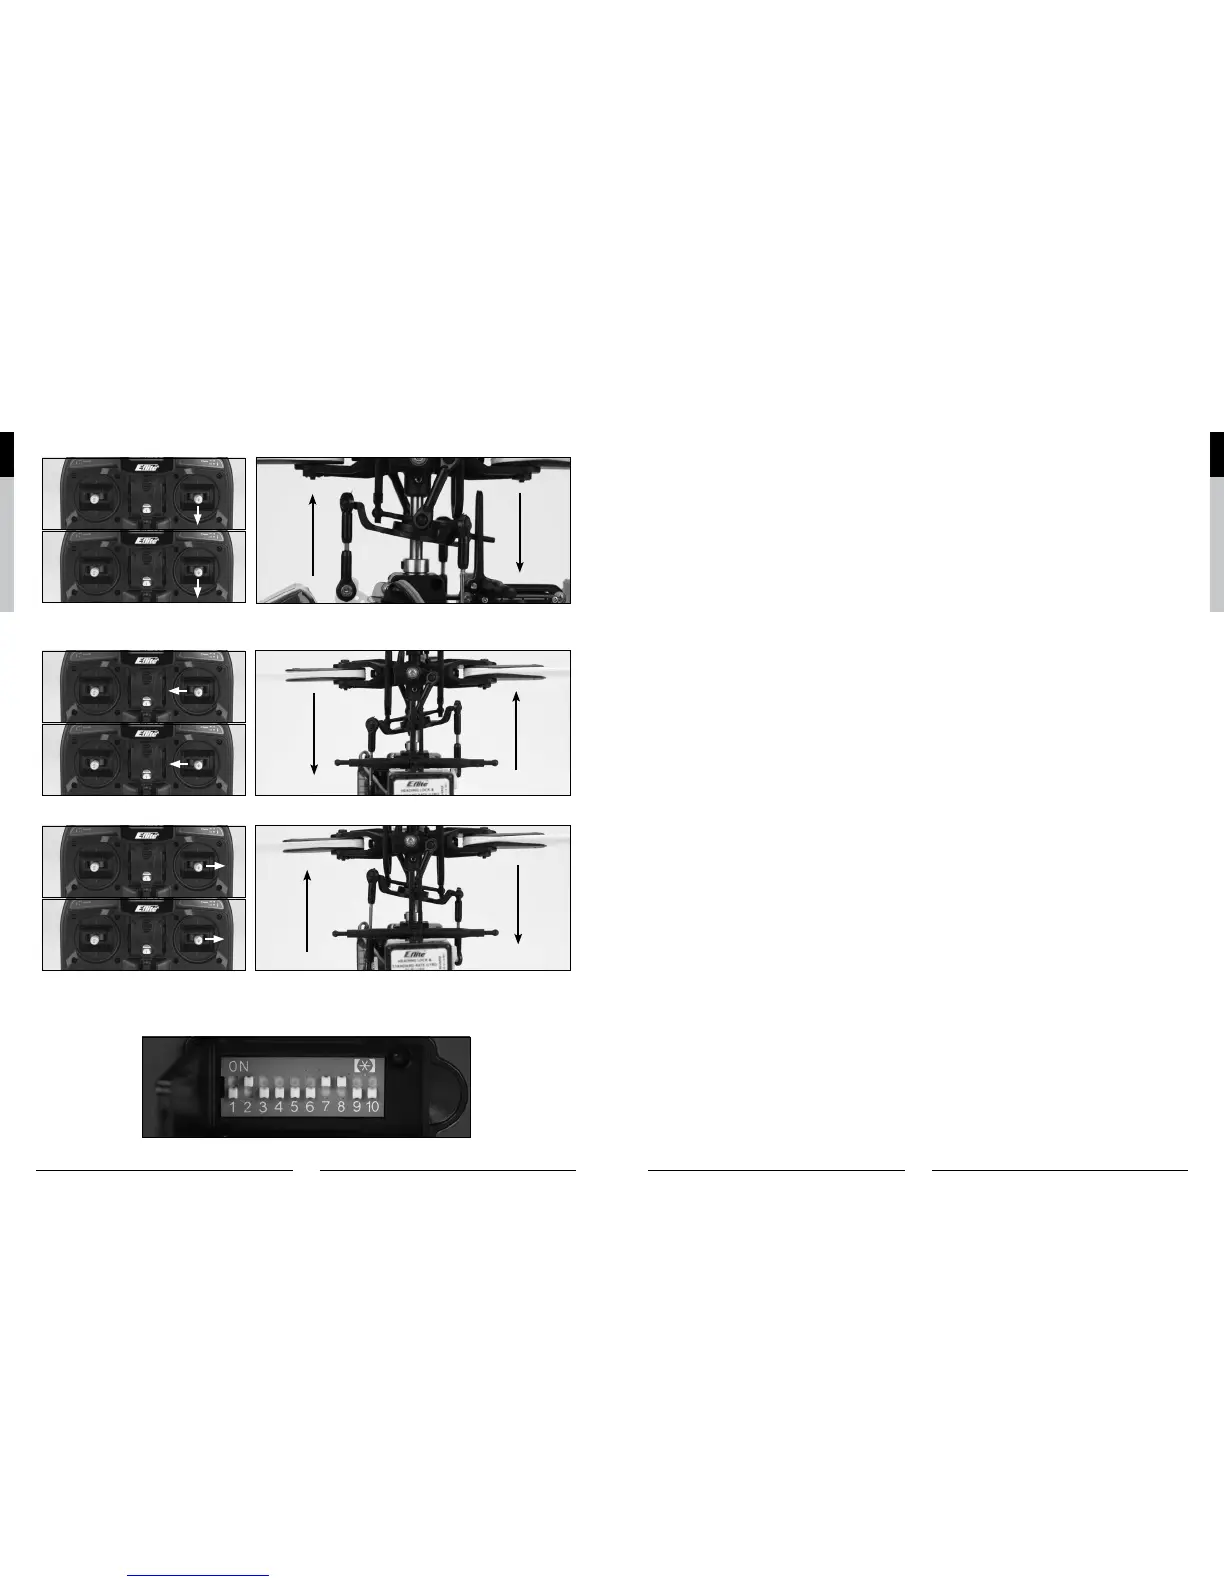
With the stick pulled back, the swashplate will tilt toward the rear.
M2
M1
While viewing the helicopter from the rear (tail boom toward you), move the right-hand stick left and right to check aileron roll
control. When the stick is pushed to the left, the swashplate should also tilt left.
M2
M1
With the stick pushed right, the swashplate will tilt to the right.
M2
M1
If at any time during the test the controls do not respond properly, double-check the positions of the dip switches located
under the door on the bottom left front of the transmitter. These dip switches set the transmitter programming for functions
such as servo reversing, model type and various forms of mixing. Each switch should be set in the position as shown for
proper control of the Blade SR.
For added reference, the following are the functions and available settings for each dip switch (default settings for the Blade
SR are underlined):
Dip Switch 1*: Up – Channel 1/Throttle channel reversed Down – Channel 1/Throttle channel normal
* For safety, channel 1/throttle channel reversing can only be changed when the transmitter is powered off. All other dip
switch positions/functions can be changed while the transmitter is powered on.
Dip Switch 2: Up – Channel 2/Aileron channel reversed Down – Channel 2/Aileron channel normal
Dip Switch 3: Up – Channel 3/Elevator channel reversed Down – Channel 3/Elevator channel normal
Dip Switch 4: Up – Channel 4/Rudder channel reversed Down – Channel 4/Rudder channel normal
Dip Switch 5: Up – Channel 5/Gear channel reversed Down – Channel 5/Gear channel normal
Dip Switch 6: Up – Channel 6/Pitch channel reversed Down – Channel 6/Pitch channel normal
Dip Switch 7: Up – Helicopter Mode (Channel 6 becomes pitch channel) Down – Airplane Mode (Channel 6 becomes an
extra aileron channel)
Dip Switch 8*: Up – 120-degree Cyclic Collective Pitch Mixing (CCPM) Down – Standard mixing
*Only functions when in helicopter mode.
Dip Switch 9*: Up – Rudder/Elevator mixing Down – No mixing
*Only functions when in airplane mode, and no function if switch 10 is in the up position.
Dip Switch 10*: Up – Elevator/Aileron mixing Down – No mixing
*Only functions when in airplane mode, and no function if switch 9 is in the up position.
If the controls still do not respond properly after ensuring the dip switch positions are correct, you should also check the
servo connections to the receiver. The servos should be connected to the corresponding channel on the receiver as follows
(when viewing the helicopter from behind):
AILE (Aileron) Channel – Left-hand rear aileron servo
ELEV (Elevator) Channel – Forward elevator servo
AUX1 (Pitch) Channel – Right-hand rear pitch servo
Once you’ve confirmed the proper dip switch positions and servo connections, all controls should be functioning properly.
However, if you continue to encounter any problems with your Blade SR responding properly to the transmitter, do not fly.
If you’ve confirmed proper control operation of your Blade SR, unplug the flight battery and reconnect the main and tail
motors to the 2-in-1 unit, taking care to connect them to the proper leads using the markings on the label for reference.