21
Miter Detent System
To avoid possible injury,
disconnect plug from power
s
ource before performing any assembly,
adjustments or repairs.
CALIBRATING MITER DETENT SYSTEM
1. Engage the miter detent at the 0° position.
Loosen the miter lock knob 1/2 turn.
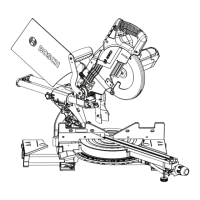
2. Look for four round holes in the miter scale plate.
In each hole is a screw. Use a Philips screwdriver
to loosen all four screws 1 to 2 turns. This will
loosen the miter detent plate (see figure 12).
3. Slide the head assembly completely to the back
and engage the slide rail lock knob by tightening
the knob to the right (clockwise) (item 25 - page
12).
4. Lock saw down using the head assembly lock pin
(item 36 – page 12).
5. Hold one side of a 90° combination square
against the fence and rotate the table (and
detent plate) until the side of the saw blade plate
is in full contact with the other side of the
square...do not contact the blade teeth with the
sqaure (figure 13).
6. Tighten all four screws – loosen and reset the
miter scale pointer to the “0” position.
MITER SCALE POINTER ADJUSTMENT
1. Rotate table to 0° detent position and lock in
place.
2. Raise the head assembly to the full UP position.
3. Loosen the pointer adjust screw that holds the
miter scale pointer in place (see figure 14).
4. Position the pointer to align with the 0° line.
Tighten the screw.
Screws
Detent Plate
FIG. 12
Pointer
Adjust
Screws
Miter Scale
Pointer
FIG. 14