26
Assembling Your Bowflex Ultimate
®
2
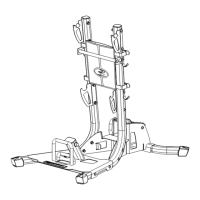
STEP 12
Parts:
•LeftLatBoom(Box6)
•RearPulleyFrame(Box6)
•SidePlate(Box4)
Tool:
•HexKey(3/16”)
12-1 InsertRearPulleyFrameinto
holesinLeftLatBoom.
Make sure the Pulley Frame
Swivel is parallel to the planes
A and B shown in the Side View.
12-2AlignholesinSidePlateandLatBoom.
12-3 Install but do not tightenhardware.
Hardware (1:1):
2 Pan Head Allen Bolt (3/8” X 3/4”)
2 Washers (3/8”)
Pan Head Allen
Bolt
Washer
Left Lat Boom
Side Plate
Rear Pulley
Frame
STEP 13
Parts:
•PulleyFrameBoomAssembly(from step 12)
•LatBar(Box6)
Tool:
•HexKey(3/16”)
13-1 InsertleftsideofLatBarintoLeftBoom.
13-2 Install but do not tightenhardware.
1 Pan Head Allen Bolt (3/8” X 3/4”) 1 Washer (3/8”)
Hardware (1:1):
Pulley Frame, Left Boom
Assembly
Lat Bar
Pan Head Allen
Bolt
Washer
CORRECT
INCORRECT
Plane A
Plane B
Plane A
Plane B
Swivel
Swivel
Side View
NOTE: Before you continue, be sure you have a minimum of 88” (7’4”) of ceiling height to insert the
Upper Lat Assembly into the Lower Base (see step 17).