11
5. INSTALLATION
5. MONTAGE
5. INSTALLATION
5. INSTALACION
LS2-B891, LT2-B892
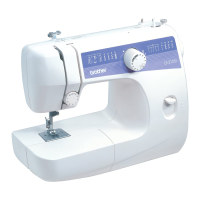
5-5. Belt guard 5-5. Protecteur de courroie
5-5. Riemenschutz 5-5. Protector de correa
1. Loosen the two screws q and the screw w, and then dis-
connect belt guard L e and belt guard R r.
1. Lösen Sie die beiden Schrauben q und die Schraube w
und nehmen Sie den linken e und den rechten Riemenschutz
r ab.
1. Desserrer les deux vis q et la vis w, puis déconnecter le
protecteur de courroie gauche e et le protecteur de courroie
droit r.
1. Aflojar los dos tornillos q y el tornillo w, y luego desconectar
el protector de correa L e y protector de correa R r.
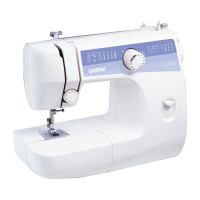
2. Loosen the four bolts t which are screwed into the machine
head.
3. Align the grooves in belt guard L e and belt guard R r with
the bolts t.
4. Position belt guard L e and belt guard R r so that there is
no gap between them and so that they are parallel to the
work table, and then secure only belt guard R r by tighten-
ing two of the bolts t.
2. Lösen Sie die vier Schrauben t vom Maschinenoberteil.
3. Richten Sie die Aussparungen des linken e und des rechten
Riemenschutzes r auf die Schrauben t aus.
4. Richten Sie den linken e und den rechten Riemenschutz r
so aus, daß kein Abstand zwischen den Riemenschutzen
vorhanden ist und sie parallel zum Nähtisch ausgerichtet sind.
Befestigen Sie danach nur den rechten Riemenschutz r mit
den Schrauben t.
2. Desserrer les quatre boulons t qui sont vissés dans la tête
de machine.
3. Aligner les rainures du protecteur de courroie gauche e et
du protecteur de courroie droit r sur les boulons t.
4. Placer le protecteur de courroie gauche e et le protecteur
de courroie droit r de manière qu’il n’y ait pas d’écart entre
eux et qu’ils soient parallèles à la table de travail, puis fixer
seulement le protecteur de courroie droit r en serrant deux
des boulons t.
2. Aflojar los cuatro pernos t que están atornillados en la cabeza de la máquina.
3. Alinear las ranuras en el protector de correa L e y protector de correa R r con los pernos t.
4. Ubicar el protector de correa L e y protector de correa R r de manera que no haya separación entre ellos y de manera que
queden paralelos a la mesa de trabajo, y luego asegurar sólo el protector de correa R r apretando dos de los pernos t.
Parallel
parallel
Parallèle
Paralelo