Maintenance
Inner Chimney/Ignition Electrode cleaning
The Chimney Assembly and Burner must be completely cool before proceeding further.
The Inner Chimney and Igniter should be cleaned according to the maintenance schedule; or more frequently if ignition is unreliable or the signal
becomes erratic.
It is advised to ensure the optical glass is kept clean and free from finger grease and other such contaminants.
1. Unplug the mains power cord.
2. Remove the six Chimney Back Piece retaining screws using a T20
Torx driver.
3. Note the location of the chimney fan power cable and then
disconnect this from the socket.
4. Carefully place Chimney Back Piece and screws to one side.
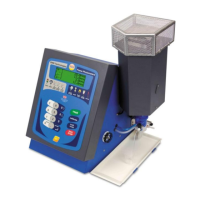
5. Identify the Ignition Electrode connection. Slide back the
insulating boot and disconnect the wire using a T20 Torx driver.
6. Using a T10 Torx driver, remove the four screws holding the
chimney top ‘guard’ to the outer chimney, place the guard to
one side. Remove the 2 screws holding the Inner Chimney to the
Top Cover after removing the 4 screws holding the mesh
chimney top in place.
7. Lift the Inner Chimney Assembly up slowly and remove the air
tube connection on the bottom of the chimney (see overleaf).
8. Continue raising the Inner Chimney in a vertical motion out of
the Outer Chimney, being careful not to damage the Ignition
Electrode.
1. If the user intends to clean or replace the Ignition
Electrode during this procedure, undo the 25.4 (1”) AF
hexagonal Retaining Nut on the igniter.
2. Remove one widow by loosening the clamping bracket
using a T20 Torx driver.
3. Replace the igniter and fit a new nut. Retighten.
47
Insulating Boot
Ignition Wire Retaining
Screw
Ignition Electrode
body