13
4 Replacing Assembly Units
4.3 Replacing the Slipping Clutches
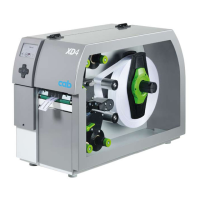
The rewinders for the transfer ribbon are coupled to slipping clutches (1) in the main drive. The supply hubs of the
transfer ribbon are braked with a slipping clutches (2) during printing.
Change a slipping clutch when it can no longer be set 5.1 on page 19.
Removal and installation of the slipping clutch is also required for replacement of a winder.
1
2 1
2
3
3
3 3
Fig. 10 Slipping clutches
Danger!
Risk of death via electric shock!
Before opening the rear cover, disconnect the device from the mains supply and wait at lease one
minute until the power supply unit has discharged.
Removing the slipping clutch
1. Unplug the printer from the electrical outlet.
2. Remove the rear cover. 2.2 on page 6.
3. Remove the snap ring (3).
4. Pull coupling (1) or brake (2) from the winder axis.
Ensure that the pin (4 in Fig. 12) remains on the winder axis when pulling the brake off. Reattach the pin to the
winder axis if it has been pulled off. The axis prole is shaped in such a way that the pin only ts on the winder
axis in one way.
 Loading...